We moved!
Help articles have been migrated to the new Help and Support. You can find help for your products and accounts, discover FAQs, explore training, and contact us!
Converting data from Payroll CS
While payroll items are global (applying to multiple clients) in Payroll CS, they are client-specific in Accounting CS.
Before restarting the conversion process for your client, you need to complete a few additional preparation steps in Payroll CS. In this case, for example, the client has at least one employee with the same pay item but different pay rates in multiple departments. Prior to converting, you need to set up additional pay items in Payroll CS for any such employee - that is, one pay item to correspond with each pay rate, or else set the pay rate to be the same for each department.
Details about the required pre-conversion steps in Payroll CS are included in the "Employee earnings data" section of the Payroll CS to Accounting CS conversion guide (PDF).
For the conversion of earnings data, all tax information set up for the employee in Payroll CS must be available based on the current address information for the client or the employee. If the current address specified in Payroll CS fails to include sufficient information to identify the correct payroll taxing jurisdictions, earnings data cannot be imported. To correct this, you will need to do the following:
- In Payroll CS, first identify all employees with earnings in multiple tax jurisdictions, and then ensure that such earnings are recorded for separate departments.
- During the conversion process in Accounting CS Payroll, mark the Departments checkbox (in the Modules screen of the conversion wizard) to ensure that earnings data for each payroll department are included with the import.
- In the Client Setup - Payroll screen of the conversion wizard, click the Add Locations button and specify all pertinent address information for each of the client's work locations.
- In the Departments screen, mark the Locations checkbox. Select the client work locations that map to the appropriate employee payroll departments.
If necessary, after completing the conversion and data import, you can remove the additional location/department data from the Main tab of the Setup > Employees screen.
There may be additional information needed for tax or tax form purposes - such as information for the county, school district, or municipality. If any of that type of information is required for a jurisdiction, the employee's name will appear in that screen during the conversion process. To complete the validation for each of the listed employees, double-check the ZIP code and then specify the appropriate information for all fields on that mapping screen.
Generating payroll liabilities
When you create historical payroll checks and generate the liabilities as closed, the application assumes that the effect of the payroll checks and tax payments are already included in the General Ledger. If you want the paid liabilities to display on the General Ledger, you must generate the liabilities as Handwritten. (See Entering historical payroll data for detailed instructions.)
This will automatically create open liabilities, which you will then need to print from the Print Checks > Payroll Liabilities tab. Once printed, the liabilities will appear on the General Ledger along with the payroll checks.
Printing payroll reports
Currently, if you want to include only active employees in your employee-based payroll reports, you can use the fields in the Filtering and Sorting section of the Print Reports screen to limit the list of employees. In the Filter by drop-down list, select Status, in the Method drop-down list, select is, and in the Selected drop-down list, select Active.
By default, the application excludes voided and deleted checks from payroll reports when the implied status filter is set to Standard (in the Report Designer). To include them, you can set up a filter in the Print Reports screen to override the implied filter. (For more information about how implied filters affect payroll reports, see the Implied status filtering section of Report Designer: Options for payroll reports.)
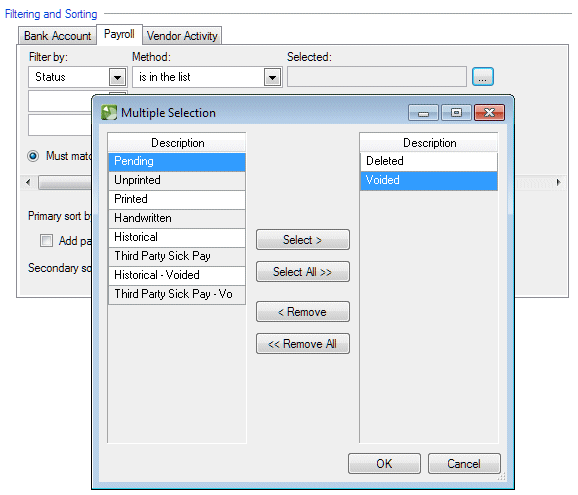
- Select the payroll report in the File > Print Reports screen.
- In the Payroll tab within the Filtering and Sorting section, select Status from the Filter by drop-down list and Is in the list from the Method drop-down list.
- In the Selected field, click the Ellipsis button to open the Multiple Selection dialog, where you can select Deleted or Voided (as well as other check statuses) to include those types in the report.
To include deleted checks in certain payroll reports without needing to modify the fields in the Filtering and Sorting section of the Print Reports screen each time you print, you can change the default (implied) filtering settings within the Report Designer. (For more information about how implied filters affect payroll reports, see the Implied status filtering section of Report Designer: Options for payroll reports.)
- Choose File > Report Designer.
- Expand the Payroll folder and double-click a report in the Reports pane.
- Choose File > Page Setup and click the Report tab.
- In the Implied Status Filtering Options section, change the selection in the Checks field from Standard to None.
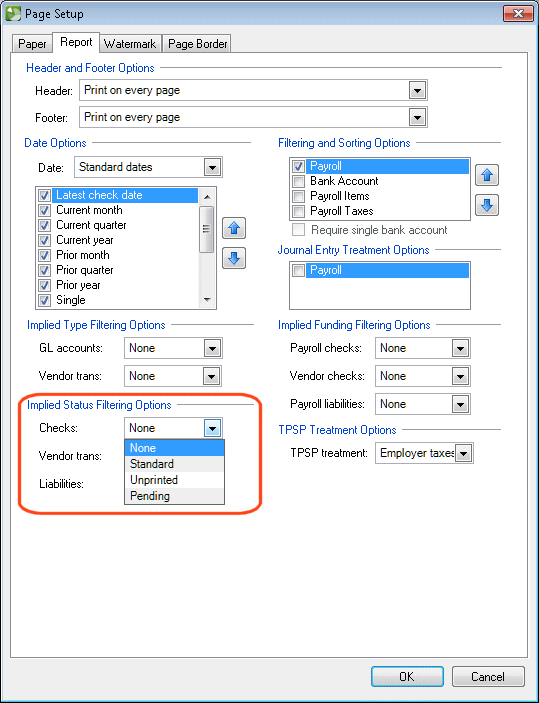
- Click OK and then choose File > Save to save your changes.
Working with payroll journal entries
This may happen in either of the following scenarios. In both cases, Accounting CS creates and saves an export file, but the file does not include any transaction data.
- The processing period selected for export does not include any payroll checks.
- All payroll checks in the selected processing period have already been exported. In this case, you can recreate the export file in Accounting CS as follows.
- Choose File > Export > Transactions.
- In the Export Transactions screen, mark the Payroll journal entries transaction checkbox, and then click the Options button associated with this checkbox.
- In the Export Options dialog, mark the Include previously exported checks checkbox and click OK.
- In the Export Transactions screen, mark the checkbox for each client whose data you want to export.
- Click the Export button.
You won't see the payroll journal entry in the Actions > Enter Transactions screen at all, because all of the amounts are used directly from the payroll checks themselves. To view the entry, preview or print the Payroll Journal Entry report from the File > Print Reports screen.


