


We moved!
Help articles have been migrated to the new Help and Support. You can find help for your products and accounts, discover FAQs, explore training, and contact us!
Using the Setup > Payroll Consolidation Groups screen, you can create payroll consolidation groups, which enable you to process consolidated payroll tax forms and impounded tax payments for groups of clients that would normally be considered a single client, but have been split up into several clients for some reason. This may also be useful for client companies that have merged, or for firms converting their client data from Creative Solutions Accounting.
Adding client records to a consolidation group
- Choose Setup > Payroll Consolidation Groups.
- In the Identification section of the Main tab, choose an ID and a description for the consolidation group.
- In the Clients grid, use the filter options and the drop-down lists to select the client records to include in the group.
Note: Only one client can be specified as the primary client, and the primary client must be listed in the first row of the grid. To reorder the client records in the grid, use the Up and Down arrows below the grid.
- If you would like to group impounded tax payments for this group of clients when you're processing them in the Actions > Manage Impound Payments screen, mark the Group impound tax payments checkbox.
Note: To group impound tax payments, all of the consolidated clients must be set up with the same deposit and withdrawal accounts in the Impound tab of the Setup > Clients screen.
- By default, if the same employee exists in more than one of the client records in the consolidation group, the application consolidates that employee's payroll tax forms (so they'll receive a single W-2 Form for all three client records, for example). But if you want the application to print separate payroll tax forms for that employee for each client record, mark the Do not combine duplicate employees checkbox.
- Click the Payroll Tax Forms tab. The payroll tax form information for the group defaults to that of the primary client record. Make any changes here if necessary and that will override information that was previously set up for all of the consolidation clients (primary and secondary) in the Payroll Tax Forms tab of the Setup > Clients screen.
- If you do not want to consolidate state payroll tax forms, mark the Do not consolidate checkbox in the State section. If you do not want to consolidate local payroll tax forms, mark the Do not consolidate checkbox in the Local dialog (accessed by clicking the Local button in the State section.
- Click Enter to save the consolidation group information.
Processing payroll tax forms for consolidation groups
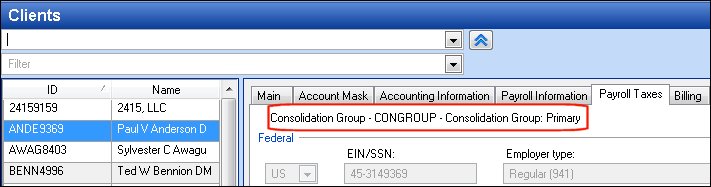
For clients that are in consolidation groups, the application displays consolidation information at the top of the Payroll Taxes tab of the Setup > Clients screen. It shows the name of the consolidation group and specifies whether the client is the primary or a secondary client in the group.
- Choose Actions > Process Payroll Tax Forms.
- Mark the checkbox next to the primary client in the Form Selection grid.
Note: Secondary clients are filtered out of the Form Selection grid automatically, so only the primary client is available for processing. However, if you have chosen not to consolidate state or tax forms for a secondary client (by marking the Do not consolidate checkbox), then state or local forms will be displayed in the Form Selection grid for secondary clients.
- Click the Process Selected button when you're ready to process payroll tax forms for the group (via the primary client).
Processing impounded tax payments for consolidation groups
- To group impound tax payments for a consolidation group, mark the Group impound tax payments checkbox on the Main tab of the Payroll Consolidation Groups screen.
Note: All of the consolidated clients must be set up with the same deposit and withdrawal accounts in the Impound tab of the Setup > Clients screen.
- Choose Actions > Manage Impound Payments. Tax payments for each vendor for all the secondary clients are grouped under the primary account.
- Mark the checkboxes for the tax liabilities that you want to pay. You can choose to pay all of the liabilities under the primary client (which includes all of the liabilities for the secondary clients) or you can pick and choose the liabilities to pay for the primary and secondary clients.
- You can click the Ellipsis
 button next to each liability to open the Details dialog and view the liability details.
 - Click the Pay Selected button to create the payments.
Note: After the payments have been created, if you select a client in the Actions > Enter Transactions screen that is a primary or secondary client within the consolidation group and then highlight a transaction that was paid via the Actions > Manage Impound Payments screen, only the portion of the payment attributable to that specific client is displayed in the Payment column. To see the full amount of the liability that was paid for the entire consolidation group, click the Notes tab in the Transaction detail.
Removing client records from a consolidation group
If necessary, you can remove one or more clients from a payroll consolidation group.
- Choose Setup > Payroll Consolidation Group, highlight the appropriate group, and click Edit.
- In the Clients grid, highlight the clients to remove from the group — select a single client or press the CTRL key while selecting multiple clients.
- Click the Delete
 button below the grid.
Note: If you click the Delete button below the Payroll Consolidation Groups list, it will delete the entire Payroll Consolidation group.
- Be sure to review the following for each client you removed: EIN/SSN, Unemployment ID, Withholding ID, UI base rate, and deposit schedules, and update the information as needed.
Was this article helpful?
Thank you for the feedback!

|
Get the most out of your Thomson Reuters Tax & Accounting products. Our continued learning packages will teach you how to better use the tools you already own, while earning CPE credit. Learn more. |

|
|

|
Chat - Best option for simple questions Call us at +1 800 968 0600. You might like to see our hours and menu options before calling |