


We moved!
Help articles have been migrated to the new Help and Support. You can find help for your products and accounts, discover FAQs, explore training, and contact us!
The design grid is an integral part of the Report Designer and enables you to manipulate the elements contained in your reports, financial statements, and letters directly in the Report Designer workspace.
By default, the design grid includes the following regions, but you can add additional regions between the header and footer regions.
- Header
- Alternate Header
- Main
- Footer
- Alternate Footer
To change the editing mode, select the applicable element. The Report Designer opens the appropriate properties pane in the Design Tools frame based on the selection.
- Region mode. Click the title bar for the applicable region.
- Row mode. Click a row number to select the row. To select multiple rows, press and hold the CTRL or SHIFT key while clicking the row numbers.
- Column mode. Click a column heading button to select the column. To select multiple columns, press and hold the CTRL or SHIFT key while clicking the column heading buttons.
- Cell mode. Click in a cell to select the cell. To select multiple cells, press and hold the CTRL or SHIFT key while clicking the cells.
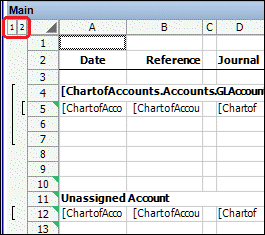
- Group mode. Click a group button in the upper-left corner of the region. Show me.
Formatting elements in the design grid
- If the report includes more columns than can fit on one printed page, the Report Designer displays a dotted, red vertical line on the right border of the last column that fits on the page. (The red line indicates that everything to the right of it will print on a subsequent page.)
- To resize the page to accommodate more columns, either reduce column width by choosing Format > Column > Width and entering the desired width, or change the page layout by choosing File > Page Setup and modifying the report margins, orientation, or paper type.
- If the report includes more rows of data than can fit on one printed page, the Report Designer automatically inserts a natural page break and displays a dotted, red horizontal line at the point where the page ends.
To insert a manual page break, select the row that you want to be the first row on the next page, and then choose Insert > Page Break. The Report Designer adds the page break above the selected row. To remove a manual page break, select the first row below the red line, and then choose Insert > Remove Page Break.
- The Format menu includes options for applying formatting to the selected elements (cells, regions, rows, or columns). Select the specific elements in the design grid, and then choose Format > <element>.
- To open a context menu that includes the same options as the Format menu, you can right-click an element in the design grid.
Was this article helpful?
Thank you for the feedback!

|
|

|
Get the most out of your Thomson Reuters Tax & Accounting products. Our continued learning packages will teach you how to better use the tools you already own, while earning CPE credit. Learn more. |

|
|

|
Chat - Best option for simple questions Call us at +1 800 968 0600. You might like to see our hours and menu options before calling |