


We moved!
Help articles have been migrated to the new Help and Support. You can find help for your products and accounts, discover FAQs, explore training, and contact us!
You can use variables to customize your reports in the Report Designer and create a "global" definition that can be used in multiple reports and for multiple clients. For example, you can insert a text variable such as [Client.Name] and/or [Firm.Name] in a report, financial statement, or letter for your clients, without the need to manually enter that information in each document. The data for the selected variable is pulled into the report or on-screen preview from other areas of the program.
You can insert variables that pertain to the client's general information, banking information, Chart of Accounts data, firm information, and much more. The easy-to-use Variables tree view provides a comprehensive list of categories and variables that can be easily inserted into the selected report.
Note: Predefined (standard) reports that are available in the Report Designer contain report-specific variables that are best suited for the report's purpose. You may not need to add any new variables, but only to modify the ones that already exist. Using the Design Tools frame, you can modify such items as, period, amount type, and generally how the variable is presented in the report.
See also: Report Designer overview, Working with formulas
Inserting a variable
Follow these steps to insert a variable into a report that is open in the Report Designer.
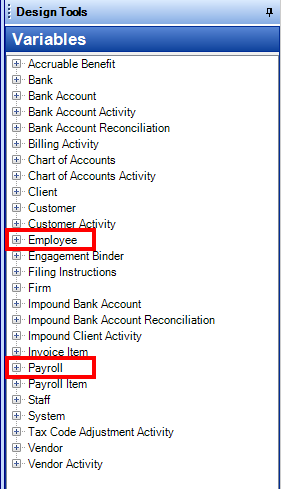
- Within the design grid, select a cell, row, or column in one of the regions in which to insert a variable. Choose Insert > Variable to open the Variable tree view in the Design Tools frame.
- Expand the tree view categories and double-click or drag and drop a variable to insert it into the selected cell(s) of the report.
Notes
- To insert variables into a letter, drag it from the Design Tools frame into the desired region of the letter. Double clicking a selected variable works for regular reports only.
- Once you have inserted the variable, you can right-click in the cell and choose Format Cells from the context menu to modify the contents or the appearance of the cell as needed.
- You can access the variable tree view from the Variables section of the Design Tools frame, when you click the Formula
 button next to the Contents field in the, Cell, Row, or Column sections, or next to the Formula field at the top of the design grid. The variable tree can also be accessed from the Insert > Formula dialog.
Choosing the correct variable
When creating a custom report or modifying an existing report in the Report Designer, it is important to choose the correct variables so that the information is displayed properly.
As a best practice, we recommend that variables used on the same row are pulled from the same top-level branch of the variables tree.
Example
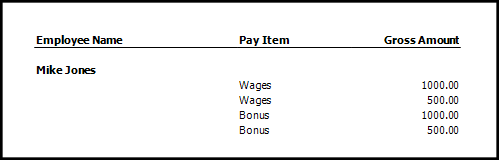
In the following example, a report is created to list the employees for a client, the active pay items for each employee, and the gross pay amount.

Because the variables used in row 4 are pulled from different top-level branches in the variable tree, the preview of this report incorrectly lists each pay item multiple times.
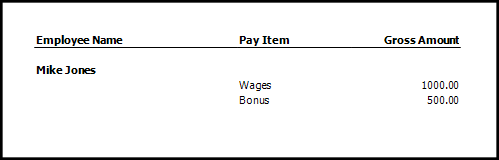
To correct the report, replace the [Employee.PayItems.Description] variable with the [Payroll.Check.PayItems.Description] variable so that both variables in row 4 are pulled from the same top-level branch in the variables tree.
The top-level branch from which the variable is selected determines the type of information that will be included in the report. For example, variables in the Employee branch of the variables tree are used to report general employee information, as in the Employee List - Detailed report. These variables pull employee information from the Setup > Employees screen. Variables in the Payroll branch of the variables tree are used to pull payroll check information, as in the Payroll Journal - Detailed report. These variables pull information from payroll checks in the Enter Transactions screen.
Print distinct values
For variables to repeat for each unique instance of the variable data, mark the Print distinct values checkbox in either the Row or Cell Properties sections of the Design Tools frame.
Example
Column A in the following comparison chart that displays a page in the Account Groupings report depicts the report with the Print distinct values checkbox marked so that each account grouping description variable prints in a single instance for all accounts before moving to the next account grouping description. Alternatively, when the Print distinct values checkbox is cleared as in Column B, all instances of a single account grouping description variable is printed for each account until there are no more to print.
Was this article helpful?
Thank you for the feedback!

|
|

|
Get the most out of your Thomson Reuters Tax & Accounting products. Our continued learning packages will teach you how to better use the tools you already own, while earning CPE credit. Learn more. |

|
|

|
Chat - Best option for simple questions Call us at +1 800 968 0600. You might like to see our hours and menu options before calling |