


We moved!
Help articles have been migrated to the new Help and Support. You can find help for your products and accounts, discover FAQs, explore training, and contact us!
Accounting CS enables you to insert conditional expressions for selected elements in the design grid of the Layout Designer to specify content to print only when the criteria for the condition are met.
Inserting a new conditional expression
- In the design grid of the Layout Designer, select an element and choose Insert > Conditional Expression.
- Use the Condition grid to build a conditional expression.
The following table lists the operators available for the conditional expressions.
| Operator | Description |
|---|---|
| = | Equal to |
| <> | Not equal to |
| < | Less than |
| <= | Less than or equal to |
| > | Greater than |
| >= | Greater than or equal to |
| Has data | The selected item includes data |
| Has no data | The selected item does not include any data |
| Contains | The selected item contains specified text |
| Does not contain | The selected item does not contain specified text |
- The operator field in each row of the Condition grid is preceded and followed by text fields. Click the Formula
 button to insert a formula, variable, amount, or text as part of the conditional expression. To enter static text for a condition to test, be sure to enclose that text within quotation marks.
 - Existing conditional expressions are tagged with a green triangle in the upper-right corner of the element.
- You can build complex conditions by selecting AND or OR at the end of a row in the grid, which opens another row to add to the condition. Note that you can keep building to the current condition beyond the six visible rows in the Condition grid. When you have filled the six rows, and then select AND or OR at the end of the sixth row, a scrolling region is displayed so that you can add more items to the condition.
- Multiple tabs are displayed in the Conditional Expression dialog only if more than one condition is set up for the current expression.
- A new tab is automatically added in the Conditional Expression dialog (for example, Condition 1, Condition 2, and so forth) when you select the Test next condition option.
Action conditions
If true, print
- Print element (marked by default). If the conditional expression meets the criteria specified, the selected element is included in the output for the layout.
- Print. If the conditional expression meets the criteria specified, the value in the field (including a formula and/or variable) is included in the output for the layout.
If false . . .
- Complete condition (marked by default). When this option is marked and the conditional expression does not meet the criteria specified, the selected element is not included in the output for the layout.
- Test next condition. If this option is marked, a new Condition tab is automatically inserted in the Conditional Expression dialog to allow subsequent conditions to be evaluated if the previous condition was not met.
- Print element. If the conditional expression does not meet the criteria specified, the selected element is included in the output for the layout.
- Print. If the conditional expression does not meet the criteria specified, the value in the field (including a formula an/or variable) is including in the output for the layout.
Editing an existing conditional expression
Select an element in the design grid of the Layout Designer where a conditional expression already exists and choose Format > Conditional Expression.
Removing an existing conditional expression
Select an element in the design grid of the Layout Designer where a conditional expression already exists and choose Insert > Remove Conditional Expression.
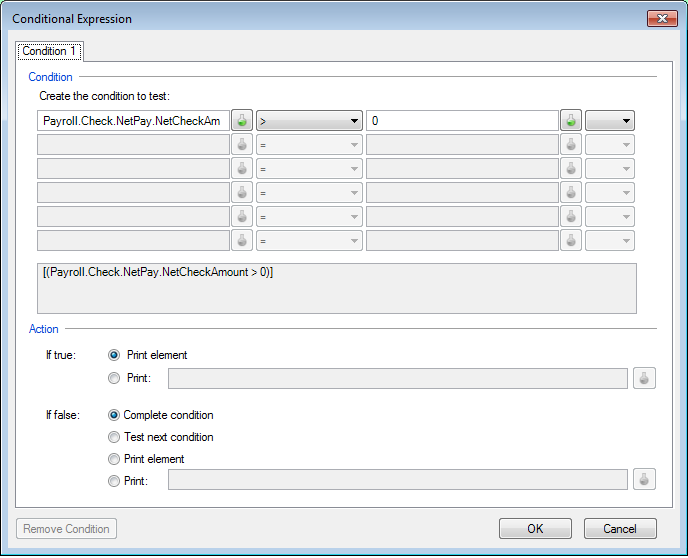
 Example of a conditional expression that prints only if the Net Check amount is greater than zero
If you are designing a check from scratch, you may not want to include several elements in the check when the account is set up for direct deposit. There is a common conditional expression that can be applied to variables such as, Bank Name (Payroll.Check.BankName), Routing number (Payroll.Check.BankRoutingNumber), Signature (Payroll.Check.Images.Signature), and MICR Line (Payroll.Check.MICRLINE) that enable you to print those elements only if the amount for that item is greater than zero. That way, those elements do not show up on zero-amount checks that are direct deposited to the bank. In the following example, we will apply the zero-amount conditional expression to the Net Check Amount variable.
- Open a check layout in the Layout Designer.
- Click the Payroll.Check.NetPay.NetCheckAmount variable in the check layout.
- Choose Insert > Conditional Expression to open the Conditional Expression dialog.
- Click the Formula button in the first field of the first row to open the Formula dialog.
- Select Payroll > Check > NetPay > Net Check Amount, and then click OK to close the Formula dialog.
- In the Conditional Expression dialog, select the greater than (>) sign from the drop-down list in the second column of the first row.
- Enter 0 in the third field of the first row, and then click OK. Show me
Notes
- You can only use double quotes ("), not single quotes (') when you enter text as part of the conditional expression.
- You can apply conditional expressions on layout elements such as, a text box, drawing/shape, variable, or a whole repeating region (yellow section).
Was this article helpful?
Thank you for the feedback!

|
|

|
Get the most out of your Thomson Reuters Tax & Accounting products. Our continued learning packages will teach you how to better use the tools you already own, while earning CPE credit. Learn more. |

|
|

|
Chat - Best option for simple questions Call us at +1 800 968 0600. You might like to see our hours and menu options before calling |