


We moved!
Help articles have been migrated to the new Help and Support. You can find help for your products and accounts, discover FAQs, explore training, and contact us!
The Payroll Taxes tab provides a single location for virtually all tax-related setup for a client. Use this tab to view and configure applicable taxes for the client, filing frequencies, applicable forms, and to link agents to a tax or taxes for payment purposes.
The application determines the taxes applicable to a given client based on the client's work location addresses and ZIP codes entered in the Main tab of the Clients screen and resident addresses of all current and inactive employees. Therefore, it is very important to use the Address verification feature when entering address information for clients and employees.
For clients who are part of a payroll consolidation, you can modify information in the Taxes section only.
Choose Setup > Clients and then click the Payroll Taxes tab.
Fields & buttons
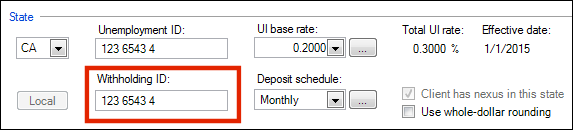
The fields in the State section enable you to view and modify the state unemployment and state and local withholding information for the selected client.
- State. If the client has a presence in only one state, that state displays in this field. If the client has a presence in multiple states, you can select each state from the drop-down list, one at a time, to view or modify unemployment and state and local withholding information.
Note: When you click Enter to save your changes, the entries in the State field revert automatically to their default alphabetical order. The state that you modified may not be displayed in the field, but it will be saved.
- Unemployment ID. Enter the client's unemployment identification number.
- UI Base rate. Enter or modify the base rate and effective date for state unemployment for this client. Click the
 button to open the Unemployment Rate dialog, where you can enter or modify the base rate for the client and add rates for other periods. Some states have supplemental rates, and if these are applicable to the currently selected state, they will be listed in the Unemployment Rate dialog. If the client is a reimbursable employer, the option to specify this is also available in the Unemployment Rate dialog, if applicable.
 - Total UI rate. The total UI base rate is displayed here.
- Effective date. This field displays the effective date for the current rate.
- Local button. Click this button to open the Local dialog, where you can view the list of local taxes that apply to this client, enter or modify the Withholding ID for each tax, modify the deposit schedule for the agent that corresponds to each tax, and, if appropriate, specify that the client has nexus in this locality.
Note: The Local grid includes only localities that are assigned to a tax agent. If a locality is not part of a tax agent that is already provided by the application, you will need to add a local jurisdiction tax agent before the locality will display here in the grid.
- Withholding ID. Enter the client's state withholding ID number. Show me.
- Deposit schedule. Select the appropriate deposit schedule for this client's state withholding. The available selections vary by state. Click the Ellipsis button to open the Deposit Schedule dialog, where you can schedule the effective date on which to begin using a deposit schedule.
- Govt. reimbursable employer. (New Jersey only.) When this checkbox is marked:
- The application calculates the employee unemployment insurance taxes on payroll checks (SUI, SDI, and FLI) at the separate rate given by the state for Governmental Reimbursement Employers. For more information, see the state's Rate information, contributions, and due dates web page.
- The application updates the modified rates appropriately on Form NJ-927 for employers specified as Govt. reimbursable employers.
- Client has nexus in this state. Mark this checkbox if the client has business presence in this state. This field is used for determining tax calculations, including reciprocal agreements between states, if applicable. If the business location is in the selected state, this checkbox will be marked and grayed out by default.
- Use whole-dollar rounding. Mark this checkbox to have the application automatically use whole dollar rounding when calculating state withholding for the client. If you choose whole-dollar rounding, pennies of 49 cents or less will round down, and pennies of 50 cents or greater will round up during check entry. If whole-dollar rounding is required by the state, this checkbox will be marked and grayed out by default.
- Taxes grids. In the grids you can modify the GL liability and expense accounts and (for state and local taxes) the agents. In the Wage Exempt column, you can specify if the client is exempt from specific taxes.
Notes
- For federal taxes, you cannot change the selection in the Agent column because the agent is determined automatically based on the type selected for the employees in the Main tab of the Employees screen at the time payroll checks are entered.
- You can modify the text in the Description column. These changes are reflected immediately in employee records, checks, reports, etc.
- To specify the text to use for box 14 on the client's W-2 forms, enter a description in the Box 14 column.
Was this article helpful?
Thank you for the feedback!