


Enabling the GoFileRoom ControlPanel
Use the following procedure to enable Microsoft Outlook integration with GoFileRoom so that you can easily upload documents.
- Verify that you have installed the latest version of the GoFileRoom Client Add-In.
- Close Microsoft Outlook.
- Click the Start button and choose All Programs > GoFileRoom > Enable Control Panel Outlook Integration.
- In the dialog that opens, click the Install button.
- Click Close when the installation is complete.
Setting up the GoFileRoom ControlPanel
Use the following procedure to set up the ControlPanel.
- Open the GoFileRoom ControlPanel
 from the Start menu in Windows.
 - If required, enter your login ID and password.
- Select the following options on the Configurations tab of the GoFileRoom ControlPanel window.
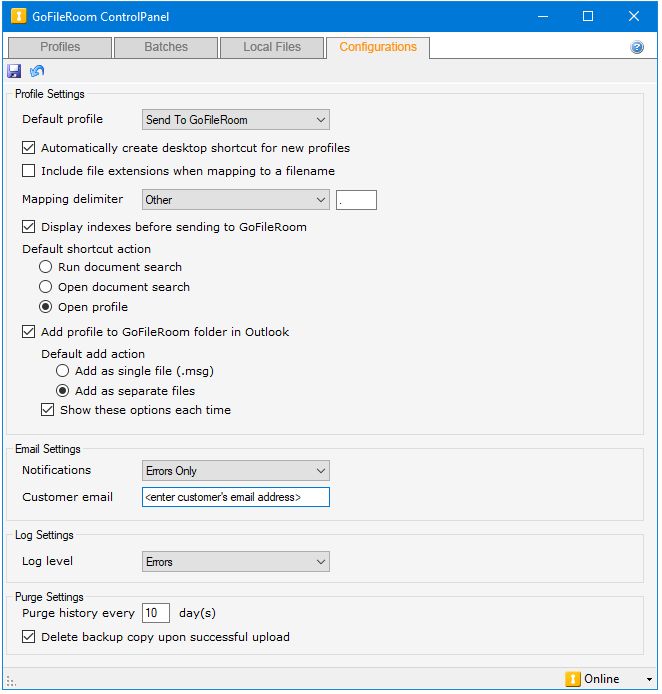
Note: Be sure to enter a period "." in the field next to the Mapping delimiter (Other) drop-down list.
- Click the Save
 button before you exit the Configurations tab.
Note: The new Add-Ins are listed in Outlook in the File > Options > Add-Ins pane as GFRCPOutlookIntegration and Thomson Reuters WorkFlow Tools.
Sending documents to GoFileRoom
The GoFileRoom ControlPanel Add-in allows you to send a single file, multiple files, or an entire folder to GoFileRoom by dragging and dropping it onto a desktop shortcut.
You can change your default email preferences so that emails are saved based on your needs. GoFileRoom profiles can be used when you move documents from your desktop, network location, C:\ drive, and so forth.
Right-click the folder or document and choose Send to > GoFileRoom, and then select the profile that you want to use. For more information, see Sending documents to GoFileRoom.
You can also drag profiles to a GoFileRoom ControlPanel desktop shortcut. Alternatively, you can drag-and-drop files from Windows to GoFileRoom using the cabinet icon on your Windows desktop.
- Create a folder on your C:\ drive, called GoFileRoom Profiles.
- Drag the profiles that you have created into the GoFileRoom Profiles folder on the C:\ drive.
- Right-click your Windows taskbar and choose Toolbars > New toolbar.
- Navigate to the GoFileRoom Profiles folder, and then click the Select Folder button to create a new GoFileRoom Profiles taskbar.
Changing profile settings
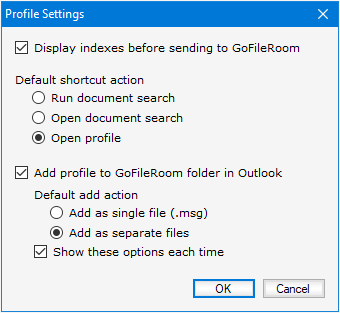
Because the default profile is set to Send to GoFileRoom when the GoFileRoom ControlPanel is installed with the GoFileRoom Client Add-in, you'll need to make the following changes in the Profile Settings dialog as follows.
- From the Start menu in Windows, open the GoFileRoom ControlPanel.
- Click the Settings
 button in the Profiles tab in the GoFileRoom ControlPanel screen.
 - Set up your profiles as follows.
Notes
- Users can set up additional profiles by clicking the New Profile
 button on the Profiles tab. When documents are uploaded in this manner, they can be viewed immediately on the Batches tab of the GoFileRoom ControlPanel.
 - Documents other than Microsoft Word, Microsoft Excel, or Adobe documents that get stuck as "Checked out" can be checked back in via the Local files tab in the GoFileRoom ControlPanel.
- When you are already logged into the GoFileRoom ControlPanel, you can click the GoFileRoom Quick Launch
 icon in the Windows taskbar to quickly log into www.gofileroom.com.
Was this article helpful?
Thank you for the feedback!