


We moved!
Help articles have been migrated to the new Help and Support. You can find help for your products and accounts, discover FAQs, explore training, and contact us!
To set up an employee with a Chapter 13 bankruptcy garnishment and have the application make the appropriate calculations during payroll check entry, follow these steps.
See also: Garnishment overview
Setting up a vendor as a payroll agent for a Chapter 13 bankruptcy garnishment
You will need to modify a payroll agent vendor to receive the garnishment deduction.
- To add a new vendor, choose Setup > Vendors and click the Add button. Or, for an existing vendor, click the Edit button.
- Enter vendor information as usual.
- In the Identification section of the Main tab, select Payroll Agent in the Vendor type field.
- In the Payment Preferences section, make your selections based on how you will submit the payment.
- If you're paying by check, select Check.
- If you're making the payment outside of Accounting CS, select Payment.
- If you're paying via direct deposit, select Direct Deposit and then, in the Direct Deposit tab, enter valid direct deposit information for the vendor.
- Click Enter to save your changes to the vendor.
Creating Chapter 13 bankruptcy garnishment payroll items
The first step is to create a payroll item for the client to use for employees with Chapter 13 bankruptcy garnishments.
- Add a new deduction item for the client.
Note: We recommend that you do not enter an agent in the Identification section. You will select the appropriate agents when you add information in the Chapter 13 Bankruptcy section.
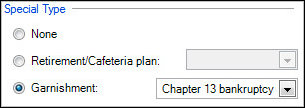
- In the Special Type section of the Main tab of the Payroll Items screen, choose the Garnishment option and select Chapter 13 bankruptcy from the drop-down list.
- Select Enter to save your changes.
Adding the new deduction item to the employee record
- In the Setup > Employees > Payroll Items tab, make the new garnishment deduction item active for the employee by marking its checkbox in the Deductions grid.
- Click the
 button for the new deduction item.
 - Enter or select the appropriate information in the Chapter 13 Bankruptcy section of the Main tab of the Employee Payroll Item Settings dialog.

- Case Identifier. (Required) Enter the bankruptcy case identification number. Note that case numbers generally include the case number plus the initials for the presiding judge and, in some localities, the magistrate judge. Example, 1:08-cv-12345-JQJ-SJJ.
- Order date. You can enter the date on which the bankruptcy case was issued. This field is not mandatory, but it is used only to determine the priority of multiple garnishments when needed.
- Agent. You can use this field to assign a payroll agent to the Chapter 13 bankruptcy order to use for generating liabilities.
- Percent or Amount. Specify the percent or the amount that is to be deducted per paycheck.
- Total Order amount. You can use this field to specify a perpetual limit for the case. If you leave this field at its default $0.00 amount, the application will assume that the garnishment has no limit.
- Inactive date. Use this field to specify a date on which the garnishment is no longer active. Payroll checks entered on or after this date will not include this garnishment. Note that the date you enter here must fall on or after the date in the Order date field.
- Save the employee payroll item information.
Limits
Limits for Chapter 13 Bankruptcy garnishments are not restricted by the Consumer Credit Protection Act (CCPA)
The maximum percentage of disposable income that can be garnished is 100%.
Was this article helpful?
Thank you for the feedback!

|
Garnishment overview |

|
Get the most out of your Thomson Reuters Tax & Accounting products. Our continued learning packages will teach you how to better use the tools you already own, while earning CPE credit. Learn more. |

|
|

|
Chat - Best option for simple questions Call us at +1 800 968 0600. You might like to see our hours and menu options before calling |