We moved!
Help articles have been migrated to the new Help and Support. You can find help for your products and accounts, discover FAQs, explore training, and contact us!
For live payroll processing only
Use the Reprocess last payroll feature to void, delete, or reverse the last batch of payroll checks printed for a client and recreate the batch as unprinted. This feature is useful if you find an error in a batch after the checks have been printed or if some or all checks printed incorrectly.
When you use this feature, you have the option to print the checks exactly the way they were printed initially or to update the check information to reflect any changes that have been made to employee or client information since the original checks were entered (such as changes to the payroll items, rates, tax items, work locations and departments, direct deposit settings, or name changes).
Notes
- The application will not reprocess checks that:
- have a status of Void, Deleted, or Reversed
- are handwritten checks
- were originally entered as historical or third-party sick pay checks
- are not in the last batch entered (unless they were entered using the same check date as the last batch)
- are in the last batch, but have not yet been printed
- When you reverse, delete, or void checks, the application adjusts any related payroll liabilities with a negative amount. The application creates new payroll liabilities when you reprocess the payroll.
- If you add a new employee record after the last payroll was processed, and that employee uses the payroll schedule being reprocessed, the application includes the employee in the reprocessed batch, but marks the DNP (do not pay) checkbox by default. You can clear the checkbox to add the employee to the reprocessed batch, if you choose.
- The Reprocess last payroll feature is not available to clients using Accounting CS Client Access.
To reprocess a payroll batch with the latest check date, follow these steps.
- Choose Actions > Enter Batch Payroll Checks.
- Select the appropriate client from the client selection list and then click the Reprocess last payroll link at the bottom of the screen.

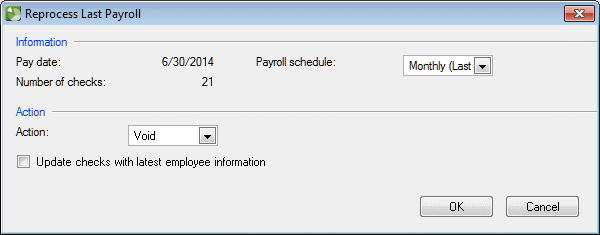
- In the Reprocess Last Payroll dialog, if this client has more than one payroll schedule with a pay date that matches the latest pay date, use the Payroll schedule drop-down list to select the payroll schedule to reprocess.

- In the Action drop-down list, select the action to be taken on all the checks for the selected payroll schedule.
- Select Delete to change the status of the original checks to Deleted.
- Select Reverse to change the status of the original checks to Reversed. If you select this option, you must specify the reversal date in the Reversal check date field. This date must be on or after the original check date.
When the application reprocesses the checks, it will create separate checks with matching negative amounts and with a status of "Reversal." The status of the original checks become "Reversed."
- Select Void to change the status of the original checks to Voided. All amount and unit fields remain on the checks, but the application displays the word "Voided" with the Net Pay amount in the Net Pay Distributions grid. Voiding the checks leaves a paper trail showing that the checks were voided.
- The Update Checks With Latest Employee Information checkbox is unmarked by default. Mark it or leave it unmarked depending on how you want your checks to be recreated.
- To create exact duplicates of the original checks, regardless of any changes that have since been made to employee information, leave the checkbox unmarked.
- To recalculate the check information for the original checks to include any changes made to the employee information since they were printed (such as changes to payroll items, rates, tax items, work locations or departments, direct deposit information, name changes, etc.) then mark the checkbox.
Note: If you have changed payroll item exclusions for the payroll schedule associated with this batch since the batch was originally printed, the application will recalculate the checks using the updated exclusions.
- Click OK to reprocess the checks. A confirmation prompt verifies the number of checks you are about to reprocess. Click OK to reprocess the checks and return to the Enter Batch Payroll Checks screen.
- If necessary, you can modify the information in the Pay date and Bank account fields. When you are ready to process the payroll checks, click the Enter Batch button.
Was this article helpful?
Thank you for the feedback!


