


We moved!
Help articles have been migrated to the new Help and Support. You can find help for your products and accounts, discover FAQs, explore training, and contact us!
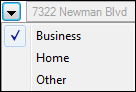
Business, Home, or Other address types
In Accounting CS you can specify up to three different addresses (Business, Home, or Other) when setting up Employees and Vendors. In the Main tab of either the Setup > Employees screen or the Setup > Vendors screen, click the Selection button in the Addresses section and then select the applicable address option.
Mailing address vs. Resident address
The Resident address (for employees) is the address that Accounting CS will use to determine which taxes an employee is subject to. (This is often referred to as the taxing address.)
The Mailing address is the address to which Accounting CS will mail the employee or vendor copies of payroll tax forms. The application uses the Mailing address as the employee's or vendor's address on Form W-2 and 1099.
Employee example
An employee's taxes are based on one address, but their W-2 must be mailed to a different address.
Note: You would follow these same steps for updating an Independent contractor's mailing address.
- Choose Setup > Employees, and click the Main tab.
- Specify the W-2 mailing address by selecting Other as the address type, entering the address, and marking the Mailing address checkbox.
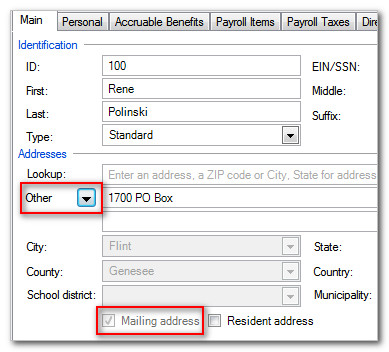
- Use the Address verification feature to validate the address.
- If this address is the one that should be used for taxing purposes, select Home as the address type and mark the Resident address checkbox.
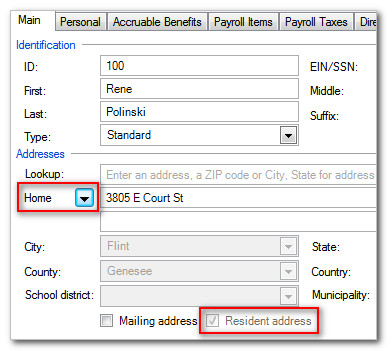
- Use the Address verification feature to validate the address.
- Click Enter to save your changes.
Vendor example
- Choose Setup > Vendors, and click the Main tab.
- Specify the 1099 mailing address by selecting Other as the address type, entering the address, and marking the Mailing address checkbox.

- Click Enter to save your changes.
Was this article helpful?
Thank you for the feedback!

|
|

|
Get the most out of your Thomson Reuters Tax & Accounting products. Our continued learning packages will teach you how to better use the tools you already own, while earning CPE credit. Learn more. |

|
|

|
Chat - Best option for simple questions Call us at +1 800 968 0600. You might like to see our hours and menu options before calling |