


We moved!
Help articles have been migrated to the new Help and Support. You can find help for your products and accounts, discover FAQs, explore training, and contact us!
Accounting CS enables you to export the following types of data for subsequent import into QuickBooks Pro, Premier, or Enterprise versions that are currently supported by Intuit. Note that Accounting CS does not support the export of data for QuickBooks Online.
This topic provides details on exporting setup information and transaction data from Accounting CS, via the Export Client Data wizard. For information on exporting payroll journal entries and reconciliation adjustments to QuickBooks using IIF files, see Exporting transactions to QuickBooks.
See also: Exporting client data to QuickBooks workflow
Notes
- If you use Accounting CS to import client data to and export client data from QuickBooks, you can save time during exports by using the Export Client Data Wizard to map existing data (accounts, vendors, and so forth) within Accounting CS to the corresponding items in QuickBooks based on the mappings that were used during the last import of QuickBooks data client data. If you use Accounting CS for exports only, you will have to manually map your accounts each time you export data.
- You can transfer only those transactions that were entered in Accounting CS or that were retrieved from QuickBooks and then subsequently modified in Accounting CS. (Transactions that were imported from a spreadsheet or converted from Creative Solutions Accounting (CSA) will not be available for export.)
- For any client data in the export file that does not already exist in QuickBooks, you can
choose Add as isin applicable mapping screens to add the item during the import into QuickBooks.
Accounting CS information available for export to QuickBooks
Accounting CS enables you to export several types of transactions and setup information for subsequent import into QuickBooks.
Specifying export options
Before you export client data into QuickBooks, you can select the application from which to export client data and specify the types of data to exclude from the export.
- Choose Setup > Clients and click the Integration tab.
- Select the appropriate client from
client list, and then click the Edit button. - Select QuickBooks from the drop-down list in the Export to program field, and then click
the 
button . - In the Export Client Data - Options dialog, mark all applicable
checkboxes . You can choose to exclude inactive items, choose which details to include, and specify the default reference to use for the various checks and liabilities. - Click OK to return to the Clients screen, and then click Enter to save the client record.
Selecting the export method in Accounting CS
Using the QuickBooks Data utility
- Choose File > Export > Client Data to open the Export Client Data Wizard.
- In the Source Data screen, select the client from which you want to import data, and then select QuickBooks as the export type.
- In Type of file to create
field , select Export via the QuickBooks Data Utility (QBgenxfer file), and then enter or browse to the location where you save the client's QuickBooks data. - Specify the date range for which to export client data. To see the transactions that have already been exported to QuickBooks, mark the Include previously exported transactions checkbox. Click Next.
Exporting data directly to QuickBooks
If your firm runs Accounting CS in the Virtual Office CS, Software as a Service, or other terminal server environment, the option to export data directly to a QBW file is not available. To transfer the export file from Accounting CS to QuickBooks, you or your client must have the CS QuickBooks Data Utility v.15.0 or higher installed.
To export data directly to a QBW file, the following are required:
- QuickBooks must be installed on the computer where the import is being processed.
- The company database must be open in QuickBooks during the export process. (The data files in QuickBooks are not altered in any way during the export process.)
- Choose File > Export > Client Data to open the Export Client Data Wizard.
- In the Source Data screen, select the client from which you want to import data, and then select QuickBooks as the export type.
- In the Type of file to create
field , select Export directly to QuickBooks (.QBW file). In the File Location field, enter or browse to the location where you save the client's QuickBooks data, and then select the appropriate QBW file in which to store the export data. - Specify the date range for which to export client data. To see the transactions that have already been exported to QuickBooks, mark the Include previously exported transactions checkbox. Click Next.
Note: The first time that you create an export file for a QuickBooks company file, you must complete the Application Certificate in QuickBooks. This security certificate grants Accounting CS permission to access and export the QuickBooks client data. View certificate.
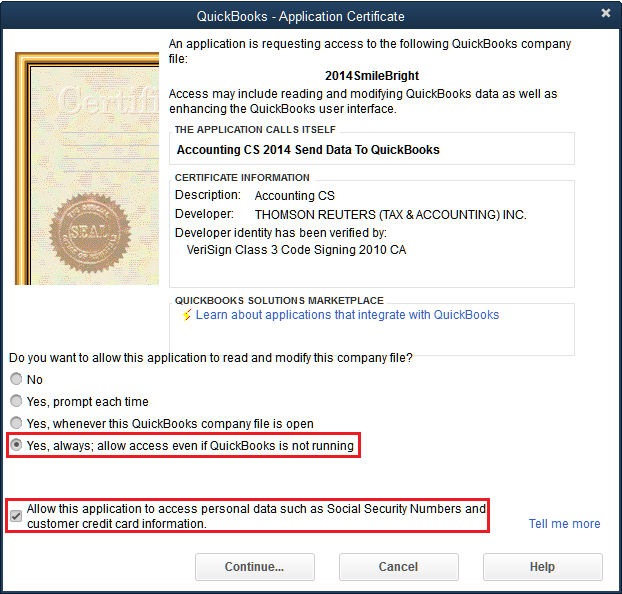
- The application certificate is client-specific and is required each time you export client data from Accounting CS.
- To make future exports easier, choose Yes, always; allow access even if QuickBooks is not running.
- To include payroll data in the export,
choose Allow this application to access personal data such as Social Security Numbers and customer credit card information. - If you receive a new QuickBooks backup from your client each month, you will need to complete this process each month because when you restore the backup from your client, the application overwrites the certificate that was created the previous month.
Mapping QuickBooks data to Accounting CS items
Use the following mapping screens to map export items in Accounting CS that correspond to items in QuickBooks. To skip the data-mapping screens that do not require input from you, mark the Skip optional mapping tabs checkbox in the Source Data screen.
- Bank Accounts. Map each Accounting CS bank account to a corresponding QuickBooks bank-type account, and then click Next.
- Chart of Accounts. Map each account in the Chart of Accounts to a corresponding account in the QuickBooks Chart of Accounts, and then click Next.
- Segment Codes. Map each Accounting CS segment to a corresponding class in QuickBooks, and then click Next.
- Employees. Map each Accounting CS employee to a corresponding employee in QuickBooks, and then click Next.
- Vendors. Map each Accounting CS vendor to a corresponding vendor in QuickBooks, and then click Next.
Notes
- In each mapping screen, if a corresponding Accounting CS item does not exist in QuickBooks, you can select Add as is to add it to QuickBooks during the export. For any Accounting CS item that you do not want to export to QuickBooks, select Do not export.
- If the wizard encounters errors in any of the data mapping screens, it displays
an 
icon next to the invalid items. In the Error Navigation section below the mapping grids, the application displays the total number of errors found. Use the navigation buttons to jump to each error and correct the data.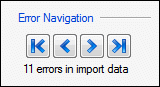
Selecting transactions and finalizing the export
- In the Transactions screen, select the transactions to include in the export file. Click Next.
- In the Export Complete screen, check any errors encountered during the export. You can print them and, if necessary, take the appropriate actions to correct any exceptions or failures.
- Click the Finish button.
- If you exported directly to the QBW file, the process is complete. If you used the QuickBooks Data Utility, the file is now ready to import into QuickBooks as described in the Using the CS QuickBooks Data Utility procedure.
Was this article helpful?
Thank you for the feedback!