Using Microsoft Excel to import transactions from CSA into Accounting CS

Show expandable text

We moved!

Help articles have been migrated to the new Help and Support. You can find help for your products and accounts, discover FAQs, explore training, and contact us!

You can export reports from Creative Solutions Accounting (CSA) to a Microsoft Excel format. This topic explains how to export the Transaction Listing report in Creative Solutions Accounting to Excel and provides formatting tips to help you create a spreadsheet to import transactions into Accounting CS.

Our support representatives are not trained to assist with Microsoft Office products. If you are not familiar with Microsoft Excel, we recommend that you work with someone who has experience using Microsoft Office Excel.

Notes

  • If you are licensed for only Accounting CS Payroll, the application will not import journal entries.
  • Payroll checks are imported as regular checks and they will not update the employee’s earnings.
  • If you are running Creative Solutions Accounting on Virtual Office, refer to Accessing local and network drives through applications that run in Virtual OFfice CS or SaaS for more information on accessing your local and network drives on Virtual Office to export the report.

Creating the export file

Follow the steps below to create the export file.

  1. With the client open in CSA, choose Utilities > Export.
  2. In the Export dialog, select the Transaction Listing report.
  3. Click Options to select the type of transactions to export.
  4. In the Transaction Listing Options dialog, make the following selections based on the types of transactions you are exporting.
    • Sort order: Date.
    • Format: All transactions.
    • Date Range: select the range that you are importing. It is recommended to not cross years.
    • Optional information:
      • Print vendor IDs.
      • Print Account description.
      • Print 1099 item (select for importing 1099 vendor checks).
    • Sort order: Date.
    • Format: All Checks written.
    • Date range: Selected Ranges.
      • Reference: enter the range of checks you will be importing for the period.
      • Optional information:
      • Print vendor IDs.
      • Print Account description.
      • Print 1099 item (select for importing 1099 vendor checks).

    Note: Although importing all transactions as journals is the easiest process, there is no distinction between checks and deposits, they are imported as transactions. They will not appear on a Check or Deposit List report.

    • Sort order: Date.
    • Format:  All transactions.
    • Date Range: select the period you are importing (Current period, Current year, etc.).
    • Optional information: optional.
  5. Click OK.
  6. Clear the following checkboxes:
    • Include column headings, to remove merged cells from the spreadsheet and make it easier to format.
    • Include carriage return at the end of each line, carriage returns are not necessary.
  7. Choose the DIF option in the Format area to the right of the dialog.
  8. Verify that the location for the file is correct, and then enter the file name to use for the report.

    Use a file name you will recognize.  Example, ClientIDtrans or ClientIDchecks.  Keep the file extension as .DIF.

  9. Click the Export button to export the report to the specified location.
  10. Minimize the CSA window.

Locating and opening the report in Microsoft Excel

  1. Open Microsoft Excel.
  2. Choose File > Open Other Workbooks and browse to the location you exported the report.

    To locate the DIF file, change file types to “All Files (*.*)".

  3. Use the File > Save As function to save the DIF file as an Excel workbook, rather than the DIF file. You will not be using the DIF file from this point forward.

Formatting the spreadsheet in Microsoft Excel

There are a number of steps to take within the Excel workbook to change it into a format that can be imported in Accounting CS as transactions.

  • Widen any column that contain ### signs until the text is displayed.
  • Delete any columns that contain zero data.  You may want to reserve columns A and B for the Transaction Type and Bank Name. You will need columns for Transaction Type and Bank Name within the spreadsheet, see Spreadsheet import - transactions for more information.
  • Delete any empty rows. The import process will not import data the follows a blank row.
  • Delete any extra rows at the bottom of the report (total lines, etc.).
  • Remove the asterisk(s) form the GL accounts column.
  • Remove any duplicate transactions that are entered in Accounting CS. This is especially important if you previously converted the client’s payroll into Accounting CS and did not convert the general ledger.

When using Excel’s Find and Replace feature, enter ~* in find and leave replace blank.

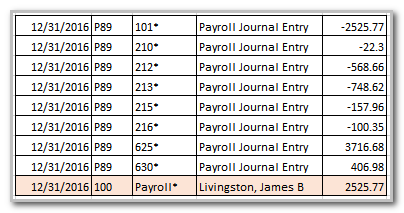
The export file will include the P89 transactions along with the net check for each employee. This occurs whether you are creating detailed or summarized payroll journals. If you are importing the Payroll journal, delete the net payroll check(s). The net payroll checks will use the GL account number “Payroll*”. Show me

p89

Note: Payroll checks will import as checks, they will not update the employee’s earnings.

If you are importing Checks and Deposits with multiple distributions, and each disbursement has a unique Payee Name/Description, each disbursement will be imported as an individual check with the associated disbursement. To change the spreadsheet to import the same reference number as one transaction by either:

  1. Copy/paste the main Payee Name/Descriptions to the other distributions so they are the same in each row. OR
  2. Remove the Vendor ID and Payee Name/Descriptions from the existing cells. 
  • Insert an additional row above the first disbursement. 
  • Add the Vendor ID and Payee Name/Descriptions to the newly inserted row along with the offsetting cash account.
  • Insert a new column that contains the Total amount of the Distribution. Show me

    copypaste

Note: The steps are similar for deposits. Show me

deposits

The Balancing entries and Deposit references, which are created when entering transactions, should be deleted them from the spreadsheet before importing into Accounting CS. If you are unsure of the balancing entries, the references are located the General Ledger tab in File > Client Properties within Creative Solutions Accounting.

If you are importing vendor checks, you will need to Split the cell which contains the Vendor ID : Vendor name into two cells.

  1. In Excel, use Find : “ and replace with “:”, to remove the blank spaces between the Vendor ID and Vendor name.
  2. Use Text To Columns feature in the Data ribbon to Split them into two cells.  The Original data type should be Delimited. For Delimiters, choose Other and use the colon sign.
  3. Once the Vendor ID and Vendor Name are in their own column/cells, move the remaining non-vendor descriptions into the new Vendor Name column.
  4. To import Vendor checks that contain 1099 items, you’ll need to add a heading of 1099 Form to the column that contains the 1099 item.

Note: If importing 1099 checks, the Form Selection and Box number must be complete in the 1099 Properties tab within Setup > Vendors in Accounting CS before you begin the import.

When you have finished formatting the report, save the Excel workbook.

Importing the spreadsheet into Accounting CS

Follow the steps in Spreadsheet import - transactions to import the spreadsheet into Accounting CS.

While importing the spreadsheet into Accounting CS, you will have the opportunity to:

  • Import all the transactions as cleared (or not) at the Data Mapping – Bank Accounts screen.  This is important if you have already completed your bank reconciliations.
  • Select the specific 1099 form and box number for each vendor(s) transactions at the Data Mapping – 1099 screen.

Was this article helpful?

Thank you for the feedback!