


We moved!
Help articles have been migrated to the new Help and Support. You can find help for your products and accounts, discover FAQs, explore training, and contact us!
To provide a cash advance or a loan to an employee, a client can deduct that advance from the employee's payroll check. This requires the setup of two new payroll items; a cash advance pay item and a cash advance repayment deduction item.
If the client writes the advance/loan check to the employee from a separate bank account (not the payroll bank account) and has no need to track the cash advance, skip setting up the Cash Advance pay item and create only the Advance Repayment deduction to repay the advance.
Create a Cash Advance pay item
- In the Main tab of the Setup > Payroll Items screen, create a new Cash Advance pay item. In most cases, the calculation type should be Fixed amount and the Special type should be None.
- Because the cash advance amount should not be included in the employee's gross pay, mark the Amount from gross pay presentation checkbox in the Exclusions section.
- Likewise, this pay item should also be excluded from accruable benefit and workers' compensation calculations, so select All from the those drop-down lists in the Exclusions section.
- In the Tax Exemptions tab, mark the All checkbox, to exclude the pay item from all taxable wages.
- Review any pre-tax deductions set up for the client, such as 401(k) deductions or child support items. You may need to exclude this new payroll item from the calculation of those deductions.
Create a Cash Advance Repayment deduction item
- In the Main tab of the Setup > Payroll Items screen, create a Cash Advance Repayment deduction item.
- In the Tax Exemptions tab, make sure that all checkboxes are cleared to make sure the repayment isn't treated as a pre-tax deduction.
Notes
- The special type for the deduction cannot be edited once the deduction has been used.
- If an employee has a new cash advance, you have the option to set up an additional deduction item if a firm or client wants to track the new repayment separately from the first on checks and on the deduction register and other payroll reports.
Activate the new payroll items for the employee
- Choose Setup > Employees and, in the Payroll Items tab, activate the pay item (if needed) and the deduction item for the employee.
- If the repayment is to be deducted across multiple checks, click the Ellipsis
 button next to the Cash Advance Repayment deduction and, in the Employee Payroll Item Settings dialog, select Perpetual in the Limit section.
- Choosing Perpetual and entering an amount sets a limit on the total amount that can be withheld for this deduction. Once the limit (in this case, the repayment amount) has been reached, the item will not start calculating again unless the limit is changed.
- For Perpetual limits, you can specify a Begin limit date to prevent the limit from reducing the deduction amount unless the check date falls on or after the specified date.
- For Perpetual limits, you can specify a Previously deducted amount, which is included in the calculated total when enforcing the specified limit. Use this field only for amounts that need to be added to what is tracked in Accounting CS, such as any amount that was deducted prior to using CSA or Accounting CS. Amounts from checks that have been entered are not included in the Previously deducted field
Note: If you've selected a perpetual limit for a repayment deduction item, you can view the Limit, Remaining Balance, and YTD deducted for all prior years in the Deduction Register report by choosing Remaining Balance Details in the Sections to Include section of the report options.
Create/process the payroll checks
- To give the employee the advance amount, create a payroll check that uses the new Cash Advance pay item (prior to the next payroll date).
- In the next scheduled payroll period, verify that the cash advance repayment is being deducted correctly.
Example 1
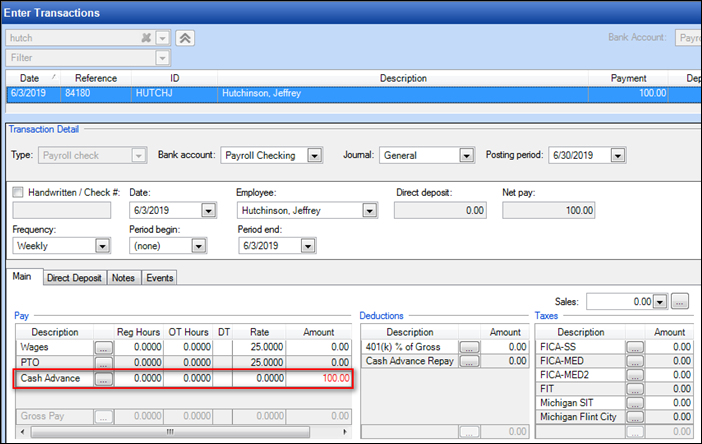
On June 3rd, employee Jeffrey Hutchinson is to receive an advance payment of $100.00. The repayment will be split into two equal payments deducted from his next two payroll checks - on June 7th and June 14th.
- First, we will create the advance check for Jeffrey. Using the Cash Advance pay item (which we set up using the process detailed earlier in this article), we can see that the advance amount is not taxable and the 401(k) deduction is not being calculated on this payroll check. Show me.
- After saving the payroll check, we can review the taxable wage amounts in the Actions > Enter Transactions screen by clicking on the check and choosing Edit > Adjust Taxable Wages dialog. We can verify that the Adjust Taxable Wages column shows all zeros. The cash advance should not be taxable, because it is not included as wages. Show me.

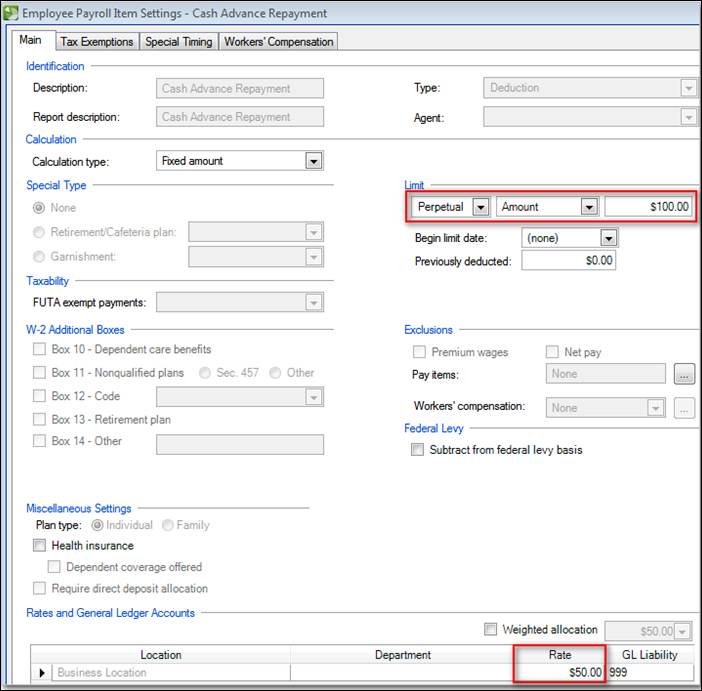
- Next we'll set up the repayment deduction in the Setup > Payroll Items screen (as detailed earlier in this article). The Cash Advance Repayment deduction item has a Fixed amount calculation type and a perpetual limit of $100 (the full amount of the advance). The rate of $50 (the agreed upon amount of repayment per check) is entered in the Rate column of the Rates and General Ledger Accounts section. Show me.
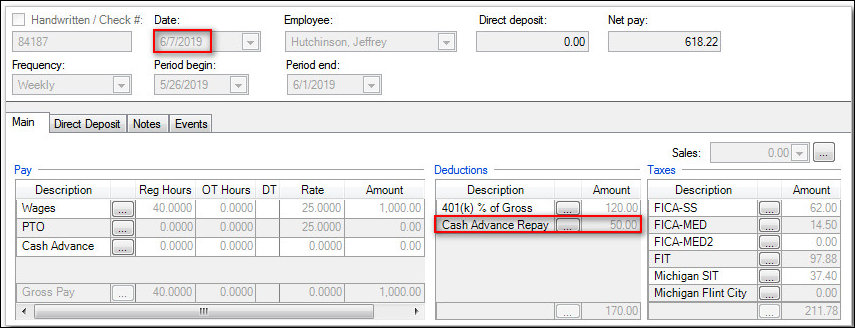
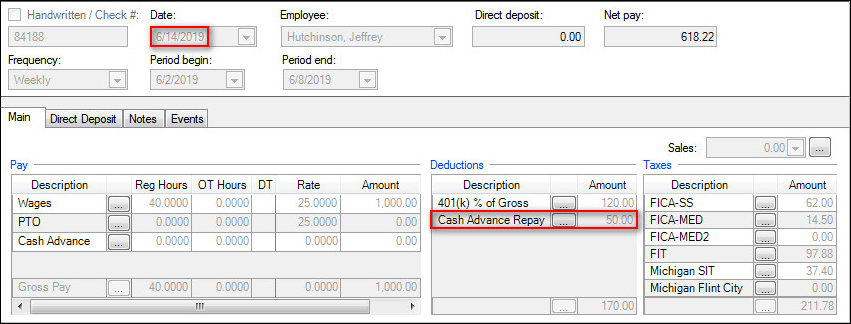
- Process the payroll as usual, entering Jeffrey's hours worked. The $50 deduction appears automatically on his payroll check and the deduction will be paid off completely with his second payroll check. Show me
- June 7 payroll check - Payment 1 of 2
- June 14 payroll check - Payment 2 of 2
- June 21 payroll check. Nothing deducted because the cash advance has been repaid.

- June 7 payroll check - Payment 1 of 2
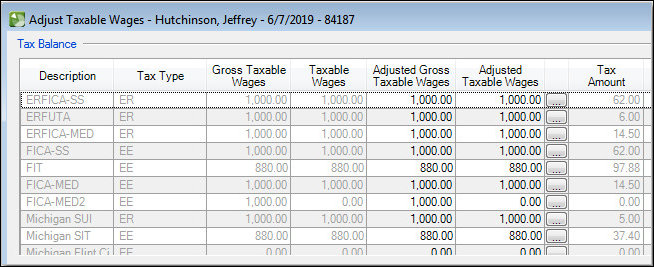
- After printing the payroll checks that contain the Advance repayment, we can review Jeffrey's taxable wages in the Actions > Enter Transactions Screen by selecting the payroll check and then choosing Edit > Adjust Taxable Wages. The adjusted taxable wages are equal to the gross pay amount. Note that the Federal Income Tax (FIT) and State Income Tax (Michigan SIT) have an Adjusted Taxable Wage calculated at $880.00. This is reduced by $120 due to Jeffrey's 401(k) deduction. Show me.
Example 2
Jeffrey receives another advance the following month (July 1) for the same amount and repayment terms, so we can use the same Cash Advance and Cash Advance Repayment items as we did in Example 1.
Note: If the terms were different from the previous loan, or if we just wanted to track advance loans separately on reports and checks, we could create new advance pay and deductions items and follow the steps provided in Example 1 again.
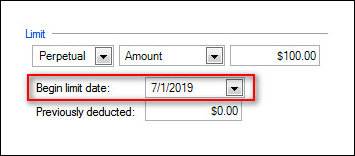
The original advance took place one month earlier, so we need to update the Begin limit date for the Cash Advance Repayment deduction item before we process the payroll checks.
- Choose Setup > Employees and click the Payroll Items tab.
- In the Limit section of the Payroll Items tab, update the Begin limit date field to 7/1/2019. This re-activates the item so Accounting CS will deduct $50 a paycheck until the $100 limit is reached.Show me.
Note: Making and saving changes to the existing deduction item resets the limit for that item as it shows on reports.
Was this article helpful?
Thank you for the feedback!

|
Get the most out of your Thomson Reuters Tax & Accounting products. Our continued learning packages will teach you how to better use the tools you already own, while earning CPE credit. Learn more. |

|
|

|
Chat - Best option for simple questions Call us at +1 800 968 0600. You might like to see our hours and menu options before calling |