We moved!
Help articles have been migrated to the new Help and Support. You can find help for your products and accounts, discover FAQs, explore training, and contact us!
In the designer grid you can change to Row mode to define the properties and formatting that apply to one or more rows.
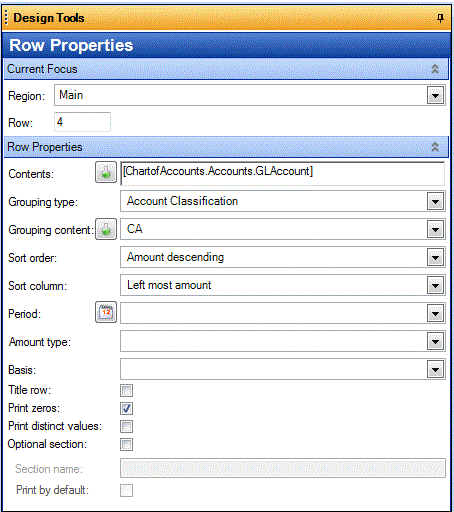
Select a row, or multiple rows in the grid to open the Row Properties section in the Design Tools frame. (To select multiple rows, you can press and hold the CTRL key and click the row number buttons for each row in the design grid.)
See also: Report Designer, overview
The Row Properties section of the Design Tools frame includes the following fields and checkboxes.
Current Focus
- Region. Displays the region that corresponds to the current selection in the design grid.
- Row. Displays the row reference number that corresponds to the current selection in the design grid.
Row Properties
- Contents. Enter text or click the Formula
 button to create and insert a formula. Contents entered in Row Properties flow to each cell in the selected row(s).
 - Grouping type/Grouping content. For accounting-based reports and financial statements only. Select the grouping type and then select the applicable grouping content (account number or account grouping code/subcode).
- Sort order. For accounting-based reports and financial statements only. For repeating rows of accounts specify one of the following sort options: GL account, GL account description, Amount descending, or Amount ascending.
- Sort column. For accounting-based reports and financial statements only. Specify the column by which to sort when a sort order for amount (Amount descending or Amount ascending) is selected.
- Period. Select the symbol or code that specifies the time period(s) from which to pull amounts (for example, CP-Current period, CY-Current year-to-date, CT-Current year total, and so forth). Click the Select Period
 button to open the Period dialog to view a complete list of period indicators and to create formulas.
 - Amount type. Specify an actual amount or select the balance, debit, or credit amount type. (The debit and credit amount types, for example, are frequently used in statements of cash flow.)
- Basis. For accounting-based reports and financial statements only. Select the basis from the drop-down list: Unadjusted, Adjusted, Report, Tax, Other, Budget, Adjusted Budget, and so forth.
- Title row (checkbox). To specify that the selected row is a title row, mark this checkbox. Title rows are automatically repeated on subsequent pages of a report and are commonly used for rows that include column-heading text. Only one row may be specified as a Title row. If more than one row has this checkbox marked, the row with the highest number will repeat on each page.
- Print zeros (checkbox). To specify that the selected row(s) should print even if all amounts in the row are zero, mark this checkbox. Otherwise, zero-amount rows are not shown in a report.
- Print distinct values (checkbox). To enable variables to repeat only for each unique instance of the variable data, mark this checkbox. For example, in the Deduction Register report, the [Payroll.Check.EmployeeFullNameLastFirstMI] variable requires a unique value for each employee name. This checkbox setting applies to each cell in the selected rows. For details, see Repeating elements in a report.
- Optional section (checkbox). To include a row section in the report that you can optionally choose to include or exclude from the report at print time, mark this checkbox and also specify a name for the optional section.
- Print by default (checkbox). To include the optional section by default at print time, mark this checkbox. Otherwise, it will be excluded by default at print time.
Was this article helpful?
Thank you for the feedback!


