


We moved!
Help articles have been migrated to the new Help and Support. You can find help for your products and accounts, discover FAQs, explore training, and contact us!
Within a dashboard screen you can add views to help organize your workflow and optimize your ability to see all the information presented in a portlet in a single view.
You can rearrange and resize portlets within the dashboard to meet your needs. Multiple portlets can occupy the same space on the dashboard, or they can be displayed in tabbed pages to make selection easier.
To select and display different views within a portlet, click the Select Portlets link at the top of the dashboard, mark the checkboxes next to any of the available portlets listed in the Select Portlets dialog, and then click OK.
To add a new portlet view to display to a dashboard in the application, click the Add View link at the top of the dashboard, enter a description for the view in the Add View dialog, and click OK.
Adding and deleting views in a dashboard
By default, the application provides a series of tabs across the top of each dashboard, called views. Use the following steps to add and remove views.
- To add a view, click the Add View link at the top-right of the dashboard, or right-click and choose Add View from the context menu to open the Add View dialog. Show me.
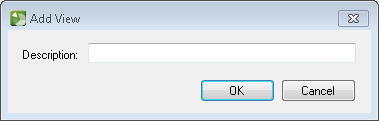
- Enter a description for the new view, which will appear as the tab name in the dashboard.
- Click OK to save the view name and close the dialog.
- To remove a view from the dashboard, click the delete
 button in the tab label, and then click Yes to confirm the deletion.
Adding and deleting portlets in a view
After you have added and removed views from a portlet, you can add, remove, resize and reposition portlets within each tabbed view.
- Click the Select Portlets link at the top-right of the dashboard, or right-click and choose Select Portlet from the context menu to open the Select View dialog.
- Mark the checkbox next to the portlets that you want to include in the Portlet view and click OK.
- To remove a portlet from a view, click the delete
 button in the top-right corner of the portlet.
Resizing portlets
You can resize portlets by dragging and dropping the boundaries between portlets.
- Hover the mouse pointer over the border between two portlets until the pointer turns into a resizing cursor:
 or
or  .
. - Click and hold the left mouse button and drag the border to create the desired portlet size.
Note: When present, click the maximize ![]() button in the title bar of the portlet to maximize it within the dashboard. To restore it to its previous configuration, click the Restore
button in the title bar of the portlet to maximize it within the dashboard. To restore it to its previous configuration, click the Restore ![]() button in the title bar of the portlet.
button in the title bar of the portlet.
Moving portlets
The process of moving portlets around the dashboard can be a bit more complex than merely resizing them. Not only can you insert portlets between other portlets or along the periphery of the dashboard, but you can also stack portlets on top of each other. You must pay careful attention to the shadow that is created by the portlet you're trying to move.
Moving portlets to a new location
- Click and hold the left mouse button on the title bar of the portlet you want to move.
- Move the portlet in the dashboard until the docking guides appear.
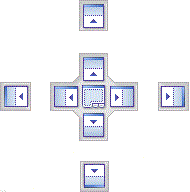
- Hover the mouse pointer over a point (top, bottom, left, or right) on the docking guide until the a shadow appears in the target position on the dashboard. The shadow in the dashboard will change depending on which quadrant of the docking guide your mouse pointer is hovering over, and will indicate where the portlet is to be dropped - between two portlets, for example, or along the edge of the dashboard.
- When the shadow appears in the proper location, release the left mouse button to drop the portlet into place.
Stacking portlets in a tabbed view
As with the process for moving portlets described above, click and drag the title bar of the portlet, but position the mouse pointer over the middle section of the docking guide and release the mouse button to stack portlets on top of each other and create a separate tabbed page for the selected portlet.

Note: To move a portlet that is in a tabbed view, you can click an drag on the tab of the portlet instead of the title bar.
Was this article helpful?
Thank you for the feedback!