


We moved!
Help articles have been migrated to the new Help and Support. You can find help for your products and accounts, discover FAQs, explore training, and contact us!
Use the Spreadsheet Import wizard to import employee data from a spreadsheet file using .XLS or .XLSX file format. You can use this method to add new employee records to a client record.
You can import setup information only one time for each employee using the new employees/earnings import. Importing again using this method will import only earnings information for existing employees and setup and earnings information for employees that are being imported for the first time.
To import changes to employee payroll item rates, Federal W-4 allowances, or State W-4 allowances, choose the Update employee information option in the Import type section of the Spreadsheet Import wizard. If you want to update other employee information, you need to use the Setup > Employees screen.
Special information
Before importing employee information, you may need to set up the following information.
- Departments (if you use payroll departments for your client)
- Locations (if you are importing multiple locations or location names that are different from the default Business location)
- Banks (if you are importing direct deposit information)
- Bank accounts (if you are importing earnings information)
- Payroll items (if you are importing earnings information)
- Accruable benefit items (if you are importing benefit hours)
Excel spreadsheet formatting requirements
- The employee information that you import must match the information that exists for the client. For example, if the spreadsheet includes a payroll item for an employee, and that item does not exist for the client in Accounting CS, the application will not import that employee record into the client record.
- The spreadsheet must contain an Employee ID column as the first column. The employee ID cannot be longer than 11 characters and must contain only uppercase letters and numbers.
- The spreadsheet must contain an Employee Last Name column.
- If a Social Security Number column is present, the numbers must be formatted with the dashes in the format XXX-XX-XXXX.
- No blank rows can exist between employee records in the spreadsheet.
- The spreadsheet can contain extra rows and columns of information that can be omitted during the import process in the Spreadsheet Import Wizard.
Be sure that the spreadsheet is closed and remains closed during the import process.
Be sure that the spreadsheet is not password protected.
Selecting the source file
- Choose File > Import > Spreadsheet.
- In the Source Data screen, select the appropriate client from the Client name field.
- Select Employees from the drop-down list in the Data type field.
- In the Import File section, click the Browse button to navigate to the file, or enter the path and filename of the spreadsheet file to import.
- Select the worksheet within the spreadsheet file to import.
- Select the year for which you are importing data.
- Click Next.
Mapping spreadsheet columns
Use this screen to map the spreadsheet columns to specific data fields in Accounting CS.
- If you saved mapping information from a prior import as a mapping template, that template will be included in the drop-down list in the Template field. If applicable, select the appropriate template.
- If the spreadsheet includes column headings or other rows of data that should not be imported, mark the checkbox in the Omit row column for that row. The application will not validate or import data in that row.
- For each column, click the column heading in the grid, and then select the applicable mapping item from the drop-down list in the Column <x> field above the grid.
Notes:
- To import state-specific W-4 information, you must map a column in your spreadsheet labeled with the name of the checkbox. For example, for Massachusetts, if you want to mark checkboxes for Full time student, Head of household, etc., you will need to map a column for each checkbox. Entering information in this column for an employee (such as an X, Yes, or True) will mark the checkbox for that employee in the Payroll Taxes tab of the Setup > Employees screen. However, if you enter False, 0, No, or leave that field blank, that checkbox will not be marked for the employee.
- For Independent Contractor employees, the State allowances > Additional Amount value will import as a Fixed Amount.
- After you have mapped all applicable columns, click Next.
- The application validates the spreadsheet data. If any issues are found, the invalid items are highlighted. If necessary, correct the data and then click Next.
Column headings available for mapping
The following selections are available for column mapping. Note that for some headings you can map sub-categories to columns also. For example, if you assign State Allowances as a column, the next column-selection field prompts you to select a state, etc.
Verifying address information
If the application encountered any invalid addresses in the Column Mappings screen, it will open the Address Mapping screen and list all employees for whom the address information needs to be corrected. Use this screen to enter and look up correct address information.
- In the Lookup field, enter a city and state combination, separated by a comma, or enter a ZIP code.
The application looks up the information and enters valid information in the address fields. If multiple valid entries are available, the application populates the drop-down list in the fields for which you need to select a valid entry. Examples
- Complete the remaining fields and click the Update button. If all address information for the selected employee is valid, the application marks the checkbox in the Valid column and moves to the next employee record.
- Repeat steps 1 and 2 until all employee records have been validated.
- Click the Next button to continue with the import.
Selecting import options
In the Import Options screen, choose how the spreadsheet data should be imported.
- Bank account. Select the bank account to use when writing checks to the client's employees. The drop-down list includes only active bank accounts that have been set up in the Setup > Bank Accounts screen.
- Journal. Select the journal to use when posting transactions for the client. The drop-down list includes all journals that have been set up for the client in the Setup > Journals screen.
Reviewing import diagnostics
The Data Analysis screen displays a list of the information that will be imported from the spreadsheet and the analysis results for the data. If necessary, you can click the Back button to make changes to any of the mapping and options screens. To view a diagnostic report for any of the items listed, mark the checkbox next to that item, and then click the Preview Selected or Print Selected button.
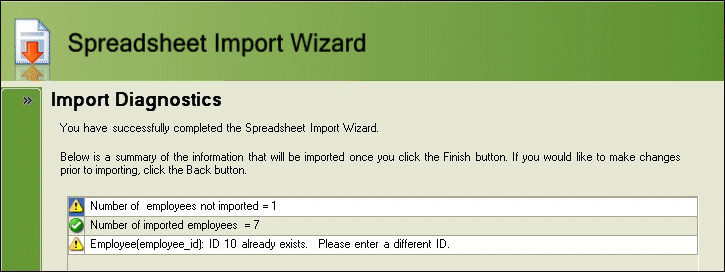
When you are satisfied with the data that will be imported, click the Finish button.
The Import Complete screen displays a summary of the information that was imported from the spreadsheet. Review the information. You can click the Print button to display a simple report of the import results, or you can click the Close button to close the Spreadsheet Import wizard.
If you are satisfied with the imported data, click the Finish button.
Sample spreadsheet file
The following sample spreadsheet file is available for you to download and review. The sample spreadsheet is set up with commonly used columns and sample data. You can modify the formatting, column, and data to fit your needs. There are four worksheets in this sample spreadsheet.
- Basic - example for importing basic employee information
- Multiple location - example for importing multiple locations for each employee
- Detailed - example for adding detailed payroll items for each employee
- Training - example that is used for our training classes
Note: If you import the sample data into a live client record, please remember to delete the imported data when you have finished.
Open the spreadsheet file, and then save the file to the location specified in the Spreadsheet field in the Import Data tab of the Setup > File Locations dialog.
Was this article helpful?
Thank you for the feedback!
IT number 408791