We moved!
Help articles have been migrated to the new Help and Support. You can find help for your products and accounts, discover FAQs, explore training, and contact us!
Tickmarks are available to use for any clients of the firm. The application includes 29 default tickmarks that can be customized to meet your needs. Also, you can create an unlimited number of new tickmarks by using your own images or text indicators.
After first setting up a Tickmarks column in the Trial Balance grid of the Actions > Enter Trial Balance screen (via the View Maintenance dialog), you can apply tickmarks to any items in the grid as necessary.
Notes
- Tickmarks are created and customized at the firm level and are available for use with all clients in the firm.
- Tickmarks can be created using text or images.
Creating tickmarks
- Choose Setup > Firm Information > Tickmarks.
- Click the Add button.
- In the Description field, enter up to 50 characters that may contain numbers, letters, or special characters.
Note: You can edit the description of any of the 29 existing tickmarks that are available from the Description list.
- In the Tickmark section, choose Text or Image to define the tickmark.
- Click the
 button next to the Text field to customize the font type, style, and size of the tickmark text.
 - Click the
 button next to the Image field to browse to the location of the image file to use for the tickmark.
- Click the
- Click Enter to save the tickmark.
Creating a tickmark column
- In the Actions > Enter Trial Balance screen, click the View Maintenance link.
- In the View Maintenance dialog, click the Add button (or select an existing trial balance view from the Description list and click the Edit button).
- Click the first blank row in the grid in the Column Order section.
- Select Tickmark from the drop-down list in the Column Type section.
- Select the appropriate period and year from the respective drop-down lists in the Column Definition section.
- Click Enter, and then click Done to close the View Maintenance dialog and return to the Enter Trial Balance screen.
Inserting a tickmark in the Trial Balance grid
- In the Trial Balance grid in the Enter Trial Balance screen, click the cell in the Tickmark column on the row for which you want to insert the tickmark.
- Select a tickmark from the drop-down list.
- Repeat these steps for any other items in the trial balance grid that require a tickmark.
Notes
- The drop-down list for the Tickmark column in the Trial Balance grid includes all tickmarks (including application defaults) that have been created in the Tickmarks screen.
- Because tickmarks are associated with specific accounts, you may have only one tickmark per period for each account.
- Tickmarks can be carried forward to the next period and/or year.
- Only the tickmark description is displayed in the Trial Balance grid.
Inserting a tickmark from the PDF editor
Note: When the Open PDF workpapers in native PDF application checkbox is marked in the Preferences tab of the Setup > Firm Information > Firm screen, the ability to launch the PDF editor in the Workpapers Dashboard and add tickmarks is unavailable.
- Choose View > Workpapers Dashboard.
- Double-click a PDF workpaper to open it in the PDF editor.
- Using the Stamp tool in the PDF Editor, choose the tickmark image that you want to add to the PDF document.
- Click the location in the PDF in which to place the selected tickmark. (After the image has been added to the document, the image can be resized, as needed.)
Adding custom tickmarks from the PDF editor
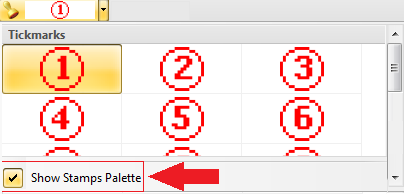
- In the PDF editor, mark the Show Stamps Palette checkbox located in the drop-down menu next to the Stamp tool in the Comment and Markup toolbar. Show me.
- In the Stamps Palette dialog, mark the Custom Tickmarks checkbox.
- Use the available menu commands to add custom tickmarks, either from an image or PDF on your local drive, or an image stored in your clipboard.
Inserting a tickmark in a Microsoft Word or Microsoft Excel document
You can take advantage of the Workpapers CS add-in to insert tickmarks into workpapers that are opened in Microsoft Word and Microsoft Excel from within the engagement binder.
- Choose View > Workpapers Dashboard.
- Double-click a Microsoft Word or Microsoft Excel document to open it in its native application.
- With your mouse pointer, select the location in the workpaper to insert the tickmark.
- In the Workpapers CS ribbon, click the tickmark image to insert into the workpaper.
Was this article helpful?
Thank you for the feedback!


 Workpapers CS

