
 Workpapers CS

We moved!
Help articles have been migrated to the new Help and Support. You can find help for your products and accounts, discover FAQs, explore training, and contact us!
If you are a licensed user of Workpapers CS you can install the Workpapers CS print driver to make it available from print dialogs in all applications. Selecting the Workpapers CS print driver from non-CS Professional Suite applications, such as Microsoft Word or Microsoft Excel enables you to create and store a PDF image of the source document or workpaper in the engagement binder.
The Workpapers CS printer is installed and available for all applications for which you are licensed in the Virtual Office CS or Software as a Service (SaaS) environment, but it cannot be used to print from a locally installed application to a version of Workpapers CS that is accessed in the Virtual Office CS or SaaS environment.
Installing the print driver
Use the following procedure to manually install the Workpapers CS print driver. The installation steps need to be completed at each workstation separately.
- Close all open applications.
- In Windows Explorer, browse to the location of the Workpapers CS print driver's installation file at X:\Program Files (X86)\Creative Solutions\Workpapers CS\PrintDriver (where X is the location of your application's local installation files).
- Right-click the ACSPrintDriverInstall.exe file and choose to install the printer driver as an Administrator.
Notes
- When installing the Workpapers CS print driver in a terminal server environment, you must perform the installation via Install mode. For details, refer to the CS Professional Suite: Installing Applications in a Terminal Server Environment (PDF).
- To uninstall the Workpapers CS print driver, click the ACSPrintDriverUninstall.exe file in the same location as the ACSPrintDriverInstall.exe file.
Using the print driver
- Open a document or workpaper that you want to send to the engagement binder within an application (for example, a Microsoft Word document or Microsoft Excel workpaper).
- Open the print dialog and select Workpapers CS as the printer, and then click the Print button to open the Workpaper Properties dialog.
- Select the workpapers client, binder name, folder location, and enter a workpaper reference and workpaper name.
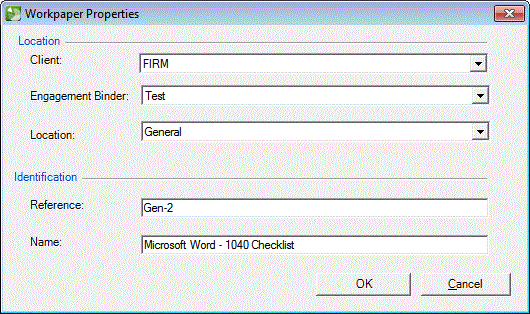
- Click OK to insert the workpaper as a PDF image into the Engagement Binder Tree.
Note: We recommend that you click the Refresh ![]() button in the Engagement Binders Tree portlet toolbar to refresh all items in the tree to confirm that all workpapers have been printed successfully from Workpapers Printer.
button in the Engagement Binders Tree portlet toolbar to refresh all items in the tree to confirm that all workpapers have been printed successfully from Workpapers Printer.
Was this article helpful?
Thank you for the feedback!

|
Troubleshooting the Workpapers CS print driver Workpapers workflow for audit-based engagements |

|
Get the most out of your Thomson Reuters Tax & Accounting products. Our continued learning packages will teach you how to better use the tools you already own, while earning CPE credit. Learn more. |

|
|

|
Chat - Best option for simple questions Call us at +1 800 968 0600. You might like to see our hours and menu options before calling |