


Practice CS enables you to create links to objects both within and outside the program that are related to item within Practice CS. Links can be associated with
- Clients
- Time and Expense transactions
- Invoices
- Projects (requires the Project Management module)
- Tasks (requires the Project Management module
Links can take the form of:
- Files
- Folders
- Web pages
- FileCabinet CS documents (requires FileCabinet CS)
- Interactions (requires Client Management module)
Note: Interactions include Notes, Phone Calls, and Phone Messages).
To add a link to a client, a time or expense transaction, an invoice, a project, or a task, click on the Links tab in the selected object and right-click in the window. The following choices will appear:
- Add Files
Click to add a file to the Links tab. A browse window will open from which you can choose the file to add. - Add Folder
Click to add a folder to the Links tab. A browse window will open from which you can choose the folder to add. - Web Page
Click to add a link to a web page to the Links tab. A window will open where you can enter the URL for the web page. When you click the Go button, the web page will display below. Click the OK button to add a link to this web page on the Links tab. - Interaction (Client Management module required)
Click to add a link to a previously entered Note, Phone Call, or Phone Message. A window will open displaying all interactions related to the client associated with the object to which you are adding the link. Select the Interaction(s) you would like to add as links and click OK. - Add FileCabinet CS Document
Click to add a link to a document stored in FileCabinet CS. A window will open displaying the documents pane. Select a document and it will appear in the document pane. Click OK to add a link to this document.Note: When you click on a FileCabinet CS Document link, the document will display in the Links tab window. The document can not be edited or printed, only viewed. To take other actions on the document, you must open it directly in FileCabinet CS.
- Rename Link
Click to change the name of the link you last clicked on. The link name will be highlighted and you can type the new name over the original name. - Delete Link
Click to delete the link you last clicked on. - Add Group
Click to add a group to the Links tab window. Groups are headers that enable you to organize links into logical sets.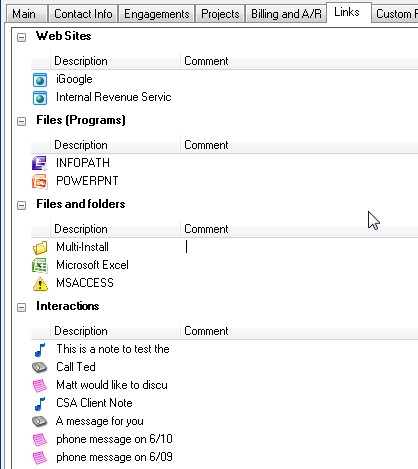
Note: To move a link into a group, click and drag the link to the group header.
- Delete Group
Click to delete a group header and all links in the group. - Rename Group
Click to change the title of the group you last clicked on. The current group name will be highlighted and you can type the new name over it. - Collapse Groups
Click to close all groups so only the group headers are visible. To open a group that has been collapsed, click the plus button in front of the group header.
Was this article helpful?
Thank you for the feedback!

|
Get the most out of your Thomson Reuters Tax & Accounting products. Our continued learning packages will teach you how to better use the tools you already own, while earning CPE credit. Learn more. |

|
|

|
Chat - Best option for simple questions Call us at +1 800 968 0600. You might like to see our hours and menu options before calling |