


New (tax) year, new help!
Fixed Assets and UltraTax CS 2023 help is now on Help and Support. We're still moving articles, but you can find most content for the 2023 tax year there. Continue using the Help & How-To Center for tax years 2022 and older.
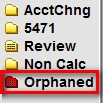
When input screens are not associated with a defined activity folder, an error message appears while opening the client asking you to resolve the issue and informs you that the orphaned input screens have been placed in the red Orphaned folder.
UltraTax CS has encountered 1 or more input screens that are not associated with a defined activity, and has placed them within the “Orphaned” folder. Please change their form and/or unit, or delete them entirely, whichever you believe to be appropriate. Then, please close and reopen the client.
This can happen if data is coming into the return and the unit that it was originally associated to no longer exists. Example would be 4562 information for a Rental and the Rental activity no longer exists. To avoid creating orphaned data in the future, make sure to dispose of all assets related to an activity that is disposed of by either selling, transferring, retiring, or putting out-of-service all assets.
To resolve orphaned input screens:
- Open the appropriate client.
- Click OK to close the error message regarding orphaned input screens.
- Click the Orphaned folder. Each input screen unit that is not associated with a defined activity folder is represented by an input screen tab.
- For each orphaned input screen, either:
- delete the input screen by selecting Edit > Delete Screen Data
OR
- assign the input screen to an activity by adding a unit for the appropriate activity where the Description and unit number matches what is in the Orphaned folder. Show me.

- Repeat Step 4 for each orphaned input screen.
- Close and then reopen the client. You should not receive the error message again and the Orphaned folder should not appear in the folders block.
Note: If your client does not have asset information entered, follow the steps below.
-
Close your client.
-
Right-click on Start and select Explore.
-
Navigate to X:\WinCSI\DeprData, where X is the drive letter where the data is stored.
-
Delete the client's folder. Note that this will not delete any tax information; only data related to assets / depreciation.
-
Choose File > Close.
-
Choose File > Open to open your client in UltraTax CS, and you should not receive the Orphaned folder message.
Note: If your client did have asset information entered and the orphan folder cannot be deleted or reassigned successfully, follow the steps below to eliminate the orphan folder(s):
- Access the Asset tab from any of the existing units.
- Click Edit > Reassign Assets.
- In the Activity drop-down list under the Focus area, select Unknown.
- Select the assets that appear above to the right and reassign them to the Misc Activity.
- Access the Asset tab under the Non Calculating folder and delete the assets.
Note: When entering assets and creating new activities like Rentals within Fixed Assets CS, the new unit will not automatically be added in the UltraTax CS client. You will receive a prompt regarding an Orphaned folder. It is recommended that when you add additional units (Rentals, Schedule C, etc.), you create the appropriate unit within the activity folder within UltraTax CS first and then the Fixed Assets CS program will pick it up. Asset data entry can be completed within either program.
Was this article helpful?
Thank you for the feedback!

|
Get the most out of your Thomson Reuters Tax & Accounting products. Our continued learning packages will teach you how to better use the tools you already own, while earning CPE credit. Learn more. |

|
|

|
Chat - Best option for simple questions Call us at +1 800 968 0600. You might like to see our hours and menu options before calling |