


New (tax) year, new help!
Fixed Assets and UltraTax CS 2023 help is now on Help and Support. We're still moving articles, but you can find most content for the 2023 tax year there. Continue using the Help & How-To Center for tax years 2022 and older.
To print a separate actionable items set of documents with your web or PDF client organizer or return, follow the steps below for any return type within the UltraTax CS program.
Note: The option to generate actionable items is only available when electronically filing the return and will only generate with electronic versions of the return (web, email PDF, or PDF to file).
Setting up your collation to create actionable items
Follow these steps to designate which documents will be included in the actionable items.
- Choose Setup > Entity > Federal or Organizer tab where Entity refers to the applicable return type.
- If setting actionable items for the return on the Federal tab, follow steps 3-5. If setting actionable items for the organizer, skip to step 6.
- In the Collation section, click the Tax Return button. Show screen
- On the Government tab, select the form(s) you wish to include as an actionable item and verify the Print condition is set to As required.
- Under When filing electronically, mark Include in Email/Web attachment and click OK and OK. Show screen
Notes:
- To remove an object from the actionable items, unmark Include in Email/Web attachment.
- If you want an object to print on paper when filing electronically, you will want to mark the Print on paper checkbox.
- In the Collation section on the Organizer tab, click the Organizer button. Show screen
- Select the form(s) you wish to include as an actionable item and verify the Print condition is set to As required.
- Mark the Include in Electronic Org option and select Action Items PDF. Click OK and OK. Show screen
Emailing PDF of a return
Use this option if you use a MAPI compliant e-mail program, such as Microsoft Outlook.
- Choose File > Print Returns and click the Clients button to select the client(s) you wish to print.
- Mark Government copy and only Create electronic file.
- Mark Client Copy, Electronic Delivery and select Email PDF. The text "with separate Actionable Items PDF" should now be displayed next to Electronic delivery. Show screen
Note: A Firm Email and TP or SP Email must be entered under Setup > Client Communications. For 1040 clients, UltraTax will send the email to the individual designated in the Email To column of Client Communications.
- Select Preparer copy and FileCabinet CS, if applicable.
- Click the Print button to generate the e-mail with actionable items.
Creating PDF to file for a return
Use this option if you do not use a MAPI compliant e-mail program, such as Microsoft Outlook.
- Choose File > Print Returns and click the Clients button to select the client(s) you wish to print.
- Mark Government copy and only Create electronic file.
- Mark Client copy, Electronic delivery and select PDF to file. The text "with separate Actionable Items PDF" should now be displayed next to Electronic delivery. Show screen
Note: In the Print destinations section of this dialog, click the ellipsis button to the right of PDF to file to change the location to which the PDF files will be saved.
- Select Preparer copy and FileCabinet CS, if applicable.
- Click the Print button to create the PDF files in the location specified.
Assembling a return for the web
Use this option to create actionable items to send to the client's NetClient CS portal.
- Choose Setup > Client Communication and verify a TP email is entered for the client and Return delivery is set to Web.
- Choose File > Print Returns and click the Clients button to select the client(s) you wish to print.
- Mark Government copy and only Create electronic file.
- Mark Client copy, Electronic delivery and select Web. The text "with separate Actionable Items PDF" should now be displayed next to Electronic delivery. Show screen
- Transmit the return to the client's NetClient CS portal.
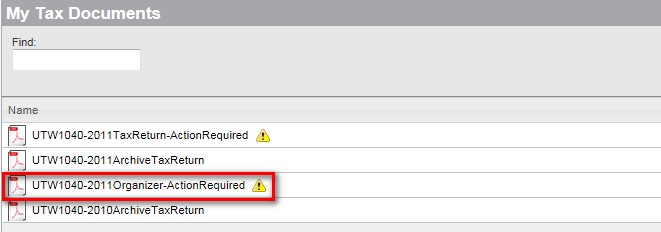
- Your client will see two separate documents in their portal. Show screen

Emailing PDF of an organizer
Use this option if you use a MAPI compliant e-mail program, such as Microsoft Outlook.
- Choose File > Print Organizers and click the Clients button to select the client(s) you wish to print.
- Select Email PDF and click the Email button. Show screen
Note: A Firm Email and TP or SP Email must be entered under Setup > Client Communications. For 1040 clients, UltraTax will send the email to the individual designated in the Email To column of Client Communications.
Creating PDF to file of an organizer
Use this option if you do not use a MAPI compliant e-mail program, such as Microsoft Outlook.
- Choose File > Print Organizers and click the Clients button to select the client(s) you wish to print.
- Select PDF to file and verify the location to which the PDF files will be saved. Show screen
Note: Click the ellipsis button to the right of the PDF to file option to change the location.
- Click Assemble.
Assemble a Web organizer
Use this option to send actionable items to the client's NetClient CS portal with the organizer.
- Choose Setup > Client Communication and verify a TP email is entered for the client and Return delivery is set to Web.
- If you want your client's NetClient CS login to be their e-mail address, click the Web Delivery Options button and mark the Use taxpayer's email address as NetClient CS portal login option.
- Choose File > Print Organizers and click the Clients button to select the client(s) you wish to print.
- Mark Web and click Assemble. Show screen
- Transmit the web organizer to the client's NetClient CS portal.
- Your client will see two separate documents in their portal. Show screen
Send a return to SafeSend
Use this option if you have a SafeSend account. Enable integration in both SafeSend and UltraTax CS and update print options to send a return to SafeSend.
Was this article helpful?
Thank you for the feedback!

|
Get the most out of your Thomson Reuters Tax & Accounting products. Our continued learning packages will teach you how to better use the tools you already own, while earning CPE credit. Learn more. |

|
|

|
Chat - Best option for simple questions Call us at +1 800 968 0600. You might like to see our hours and menu options before calling |