For local or Virtual Office Outlook IMAP Setup Instructions, see Setting up Web Builder CS Email in Outlook (IMAP).
Open the Microsoft Outlook Internet E-mail Settings Screen:
Internet Email Settings
In the Internet E-mail Settings screen, do the following:
- Under the User Information section, enter the following:
- Your Name: your name as you want it displayed
- E-mail Address: your email address
- Under the Server Information section, enter the following:
- Account Type: POP3
- Incoming mail server: wbsmail.webbuildersolution.com
- Outgoing mail server (SMTP): wbsmail.webbuildersolution.com
- Under the Logon Information section, enter the following:
- User Name: your email address
- Password: the password for your email
- Click the More Settings button.
- In the Outgoing Server tab, enter the following:
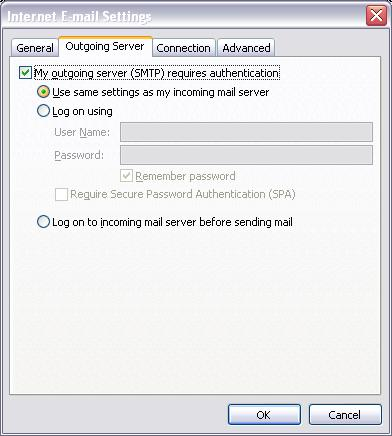
- Mark the option My outgoing server (SMTP) requires authentication.
- Mark the option Use same settings as my incoming mail server.
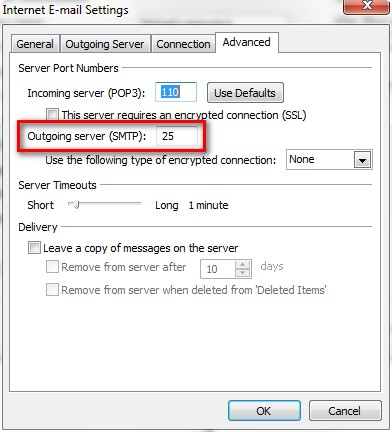
- In the Advanced tab, enter the following:
- Incoming server (POP3): 995 and mark the box for, This server requires an encrypted connection (SSL).
- Outgoing server (SMTP): 465 and select SSL in the Use the following type of encrypted connection field.
Note: If your email client does not support port 465, you may also use port 587 or 25. Ports 587 and 25 are not encrypted.
- Click OK.
- Click Next and then click Finish.
Was this article helpful?
Thank you for the feedback!

|
Get the most out of your Thomson Reuters Tax & Accounting products. Our continued learning packages will teach you how to better use the tools you already own, while earning CPE credit. Learn more. |

|
|

|
Chat - Best option for simple questions Call us at +1 800 968 0600. You might like to see our hours and menu options before calling |
Note: Some Internet providers are now blocking outgoing port 25 if you don't have mail service through them. Specifically, AT&T will not allow you to send e-mail through port 25 if you don't have mail service with them or don't upgrade your account to a business account. If they do have mail service through them, try using the provider's outgoing mail settings for sending from the WebBuilder Mail account. If they do not have mail service, they would need to contact them about either opening up port 25 or providing them with another solution.