


Warning
Product support for the Creative Solutions Accounting platform ended on September 30, 2020.
Help & How-To Center content for the Creative Solutions Accounting platform may be outdated and is used at your own risk.
If you are using the multi-user features available in Engagement CS to check out documents for use on local computers or laptops, we recommend using the laptop installation on your local computer or laptop. Using this method of installation will copy all group privileges and staff members from the network installation to the local computer or laptop.
Notes:
- The laptop installation can be run while staff members are working in the network version of Creative Solutions Accounting (CSA), but the global files will not get copied to the laptop installation. You will need to backup and restore the global data. See below for more information.
- If you are not installing CSA to a single network location, you will need to install the CSA program to each local computer or laptop separately using the appropriate installation CD or web download.
Steps to complete the laptop and/or desktop installation from the network location:
- Verify that you are logged in to your computer as an administrator.
- In Windows Explorer, navigate to the network location where Creative Solutions Accounting (CSA) is installed. (For example, X:\WINCSI, where X represents the name of the network drive.)
- Right-click Setup.exe in the X:\WINCSI\CSA\LAPTOP\ folder and choose Run as administrator to install.
- Follow the prompts to install the program to you local drive.
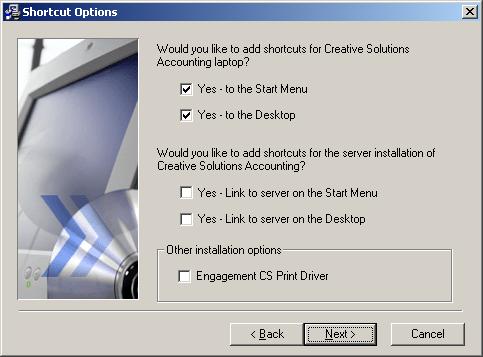
- On the Shortcut Options page of the Installation wizard, you can choose to setup CSA laptop shortcuts that connect to the local installation of CSA on your laptop while your are not connected to the network, and/or CSA shortcuts that link to the network installation of the program while you are connected to the network and working with the network installation of the program.
- To force the installation of the Engagement CS print driver, mark the Engagement CS Print Driver checkbox.
Updating the laptop installation of CSA with CS Connect updates
There are two methods for applying CS Connect updates to the laptop installation of CSA
- Method 1:
Apply all the CS Connect updates to your network installation of CSA, then rerun the laptop installation to the local machine. - Method 2:
If you have Internet access on your local machine, you can download and apply updates directly from CS Connect to the local laptop installation of CSA.
Updating the laptop installation of CSA with new staff member IDs
After adding, removing or editing staff members on the Groups and Staff tabs of the Setup > System Configuration > Administration dialog for a network installation of CSA, the system files can be copied to your laptop installation of CSA (see below for more information).
Backup from the network installation of CSA
- Open the network installation of CSA.
- Choose File > Backup to open the Backup dialog, and select System Data from the drop-down list in the top left corner of the dialog.
- Highlight the Wsw.sys and CSA.sys files in the Available pane of the System Data Backup dialog, and then click the Select button to move these items to the Selected pane.
Note: You can hold the CTRL key to highlight more than one item at a time. - Select a backup location that can be accessed by the laptop installation of CSA (For example, network drive or removable media). If you need to change the location, click the Change Backup Location button and browse to the proper drive and/or folder. If you are using a floppy disk, make sure that the disk is already in the appropriate drive.
- Click the Backup button.
- Click the Done button to close the Backup Status dialog.
Restore to the laptop installation of CSA
- Open the laptop installation of CSA.
- Choose File > Restore to open the Restore dialog, and select System Data from the drop-down list in the top left corner of the dialog.
- If necessary, click the Change Backup Location button to change the backup location to where the files were saved to. This should be the same location as in Step 3 above.
- Highlight the Wsw.sys and CSA.sys files in the Available pane of the System Data Restore dialog, and then click the Select button to move these items to the Selected pane.
- Click the Restore button.
- Click the Done button to close the Restore Status dialog.
Note: You can copy the wsw.sys and csa.sys files from the network directory to the local laptop installation. Copy from X:\WinCSI\CSASys and paste/replace to c:\WinCSI\CSASys. (X:\ being the location of the network install and C:\ the location of the Laptop installation).
20056303
Was this article helpful?
Thank you for the feedback!