


We moved!
Help articles have been migrated to the new Help and Support. You can find help for your products and accounts, discover FAQs, explore training, and contact us!
You can set up custom fields to track information that is not normally tracked by the application. For each custom field that you set up, the application creates a corresponding variable for use in the Report Designer. (Example of Custom Fields variables in the Report Designer)
To create custom fields, follow these steps.
- Choose Setup > Custom Fields, and then choose the data-entry screen (Firm, Staff, Client Staff, Clients, Employees, Vendors, or Customers) for which you want to create the custom field.
- In the Description field, enter the description to display as the field label in the application. The description must be unique and can contain 50 alphanumeric characters including dashes, commas, apostrophes, slashes, and spaces.
- Select a field type from the list in the Type field.
- Check Box. Creates a checkbox field that is unmarked by default.
- Date. Creates a date field in which a date can be entered either manually or selected from an onscreen calendar attached to the field.
- List. Creates a field in which you can select an option from a drop-down list. You must specify the items that appear in the list, as described in the Creating list entries for custom fields help topic.
- Number. Creates a field in which only numerals and decimal points may be entered. An entry can be made manually or calculated using an onscreen calculator attached to the field.
- Staff List. Creates a field with a drop-down list that includes all active staff members within your firm.
- Text. Creates a free text field. When you select the Text type, the Length field becomes available for you to specify the maximum number of characters (up to 100) that can be entered in the text field during data entry.
- In the Sort field, enter the order in which you want the field to appear in the Custom Fields tab of the specified data-entry screen. If you use the same Sort number for more than one field, those items will be alphabetized by Description within that sort number. For example, if you assign a field named "Company" a sort order of 0 and fields named "Class" and "Destination" a sort order of 1, the Company field will be displayed first, the Class field second, and the Destination field third in the Custom Fields tab.
- Click Enter to save your changes.
Example
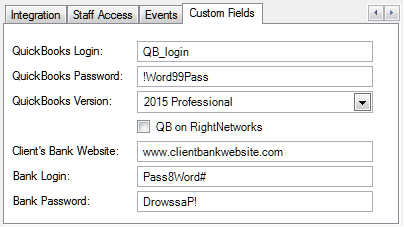
After the custom fields have been set up, you can enter or select the appropriate information in the Custom Fields tabs of the data-entry screens (Firm, Staff, Clients, Employees, Vendors, or Customers) for which custom fields have been created.
In the following example, the Custom Fields tab in the Clients screen is populated with text fields to include a QuickBooks login and password, a drop-down list for the QuickBooks version number, a QB on RightNetworks checkbox, and other similar text fields for bank information.
Was this article helpful?
Thank you for the feedback!

|
|

|
Get the most out of your Thomson Reuters Tax & Accounting products. Our continued learning packages will teach you how to better use the tools you already own, while earning CPE credit. Learn more. |

|
|

|
Chat - Best option for simple questions Call us at +1 800 968 0600. You might like to see our hours and menu options before calling |