


We moved!
Help articles have been migrated to the new Help and Support. You can find help for your products and accounts, discover FAQs, explore training, and contact us!
Use the Spreadsheet Import wizard to import data from a spreadsheet in .XLS or .XLSX file format. During the import process, you will map the spreadsheet columns to data in Accounting CS. The application verifies the data based on the specified mappings.
Note: As a best practice for importing client data from a spreadsheet, be sure to clear all cell formulas and replace them with actual values before importing them into Accounting CS.
Special information
- You must have Microsoft Excel installed on the computer on which you run the import. Be sure that the spreadsheet is closed before starting the import process.
- You can specify the default location for the spreadsheet files that you will import in the Spreadsheet field of the Setup > File Locations > Import Data tab.
- If you are converting data from Creative Solutions Accounting (CSA), you may find it helpful to export CSA report data to a Microsoft Excel spreadsheet, which you can then import into Accounting CS.
- You must format columns as text columns in Microsoft Excel for non-segmented clients that contain subcodes in accounts. Example
- The application stops reading the data when it encounters a blank row in the spreadsheet. So before you start the import process, verify that there are no blank rows between data records in the spreadsheet.
- If the Worksheet to import drop-down list is blank, verify that the spreadsheet file type is .XLS (not .XLSX) and re-import the data. You may also want to close and restart the application to re-populate the drop-down list. You can also change the spreadsheet type from .XLSX to .XLS or vice versa, and then re-import the data.
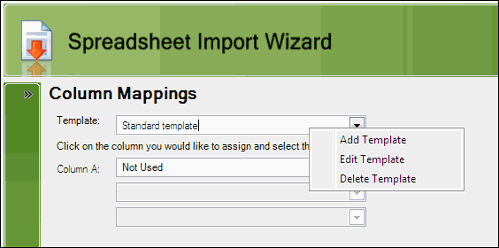
- You can save mapping information from a prior import as a mapping template in the Column Mappings screen. Note that mapping templates are client-specific and apply only to the client that was selected at the time they were created.
- To save mapping information as a template, right-click in the Template field, choose Add Template from the context list, and then enter the template name in the dialog that opens. Note that you must do this before you map the columns; otherwise the application will not save the template.
- To change the name of a mapping template, select the template to rename, right-click in the Template field, choose Edit Template from the context list, and then enter the new mapping template name.
- To delete a saved mapping template, select the template to delete, right-click in the Template field, and choose Delete Template from the context list.
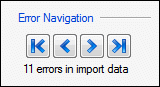
- If the application encounters any issues in the Column Mappings screen and/or any of the Data mapping screens, it flags the invalid items. In the Error Navigation section below the mapping grids, the application displays the total number of errors found. Use the navigation buttons to jump to each error and correct the data.
Types of data available for spreadsheet import
Setup data
Employees: Importing new employees and earnings
Employees: Updating employee information
Transaction data
Account balances from QuickBooks
Accounts receivable transactions
Time entry (for live payroll processing only)
Was this article helpful?
Thank you for the feedback!

|
Conversion topics in Accounting CS |

|
Get the most out of your Thomson Reuters Tax & Accounting products. Our continued learning packages will teach you how to better use the tools you already own, while earning CPE credit. Learn more. |

|
|

|
Chat - Best option for simple questions Call us at +1 800 968 0600. You might like to see our hours and menu options before calling |