Warning
Product support for the Creative Solutions Accounting platform ended on September 30, 2020.
Help & How-To Center content for the Creative Solutions Accounting platform may be outdated and is used at your own risk.
Potential error messages when opening an Excel workpaper that is linked to the Trial Balance:
- A problem occurred (00000000): Description: Unable to set the install property of the AddIn class. The Excel document could not be updated for the engagement.
- A problem occurred (00000000): Description: Add method of AddIns class failed. The Excel document could not be updated for the engagement.
- Upon opening the Excel workpaper the amounts linked to the Trial Balance may show as #Value.
To fix these errors:
The file location of the CSA add-in may need to be listed as a Trusted Location within MS Office 2010 or higher:
For Office 2010 and higher:
- Click File > Options
- Click Trust Center > Trust Center Settings > Trusted Locations
- Click Add new location
- Click Browse
- Navigate to and select C:\Program Files\Common Files\Creative Solutions\ file location for a 32 bit machine or C:\Program Files (x86)\Common Files\Creative Solutions\ for a 64 bit machine.
- Mark the checkbox next to the option "Subfolders of this location are also trusted".
- (optional) Provide a description of the location.
- Click OK.
- Repeat this process in both MS Word and MS Excel.
The CSA add-in may be disabled:
If you run the application in the Virtual Office CS or SaaS environment, be sure to try this step as well:
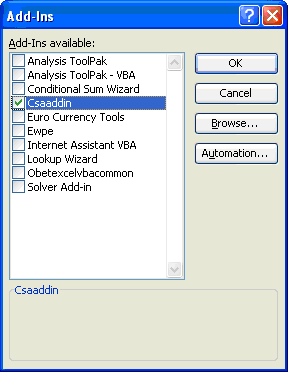
If the CSAaddins checkbox is not marked, click the mark it and then click OK. Close the Excel document and then re-open it. You should no longer see the error message
- Open the workpaper in Excel and choose File > Options.
- In the Excel Options dialog, choose Add-Ins.
- At the bottom of the Add-Ins dialog, select Excel Add-ins from the Manage drop-down list and click Go....
- Verify that the "Csaaddin" checkbox is marked.

If the CSA add-in does not appear in the list of Add-Ins, then do the following to enable the CSAaddin:
- Open the workpaper in Excel and choose File > Options.
- In the Excel Options dialog choose Add-Ins.
- At the bottom of the Add-Ins dialog, select Disabled Items from the Manage drop-down list and click Go....
- If the Csaaddin appears choose Enable.
- Click Close to save the changes.
If you run CSA in the Virtual Office CS or SaaS environment and attempted to enable the add-in but were not successful, email Support at cs.support@tr.com and include your firm ID in your email.
Run the Desktop Setup on each workstation
- Close all open programs. You will want to reboot your workstation after running the desktop setup.
- From the Windows taskbar, click the Start button and in the search program and files field type X:\folder\WINCSI\CSA\Desktop and search (where X and folder represent the server location where you installed Creative Solutions Accounting).
- Right-click on the Setup.exe file located in the Desktop folder and choose Run as administrator to install.
Note: If you installed Creative Solutions Accounting to X:\WinApps\WINCSI\, you would need to enter X:\WinApps\WINCSI\CSA\Desktop. If your WINCSI folder is on the root of the X drive and not nested in another folder(s), you would enter X:\WINCSI\CSA\Desktop.
For staff that need run the program from their laptop when not connected to the network, they will run a laptop setup.
Click HERE for additional information on Laptop Setups.
38109395
Was this article helpful?
Thank you for the feedback!


