
 myPay Solutions

To set up an employee with a Child Support Garnishment and have the application make the appropriate calculations during payroll check entry, follow these steps.
Verifying the client's medical support status for the ACH addenda record
Direct deposit payment method only
For clients with employees who make direct deposit child support payments.
When child support payments are made via direct deposit, the ACH file includes the payment information along with the appropriate addenda record details. One of the required fields in that addenda record is the Medical Support Indicator field, which is used to specify whether or not the client offers a health care plan to the employee. To ensure that the addenda record is correct, follow these steps.
- Choose Setup > Clients and select the appropriate client.
- If the client offers a health care plan to its employees, click the Payroll Information tab and mark the Offers health care plan checkbox in the Miscellaneous Information section.
Note: If you mark the checkbox for a client, the application will place a Y in the Medical Support Indicator field of the addenda record when the child support payment is made via ACH. If you do not mark the checkbox, the application will place an N in that field.
- Click Enter to save the information.
Adding child support information for the employee
- Choose Setup > Employees, select the client (in the top, right-hand corner) and highlight the appropriate employee in the Employees list.
- In the Deductions grid of the Payroll Items tab, mark the Active checkbox next to the child support payroll item and click the Ellipsis
 button to open the Employee Payroll Item Settings dialog for this item. If a child support deduction item is not listed, contact your Payroll Specialist.
 - Certain sections are grayed out and can be modified only at the client payroll item level. Modify the fields in other sections for this employee as needed.
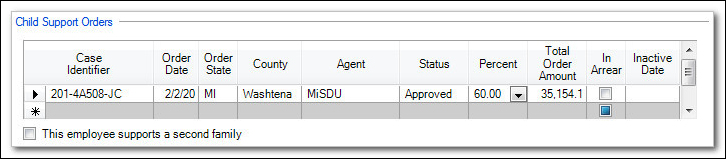
- In the Child Support Orders section, enter all of the child support orders for this employee in the grid. Orders for various amounts and states can be entered here using this single deduction item.
Note:
- In the Agent column, select the payroll agent vendor that was set up for the child support deduction. Only vendors set up as Payroll Agent type will show up in the drop-down list.
- The default maximum percentage of disposable income is set to 60%. Marking the In Arrear checkbox or the This employee supports a second family checkbox changes this default maximum percentage. For more details, refer to the Garnishment overview.
- The case information that you enter into the grid (Case identifier, date, state, agent, etc.) will appear in the addenda record for the ACH file that is created when the vendor check with the liability is printed. This identifies the court case to which the direct deposit amount should be applied.
- When you enter the state and county for the child support order, the application automatically generates the appropriate FIPS code within the addenda record for the ACH file.
- The Total Order Amount field also specifies a perpetual limit for the case. If you leave this field at its default $0.00 amount, the application assumes that the garnishment deduction(s) has no limit.
- When there are multiple orders, enter them in the grid, specifying the amount for each in the Amount column. If there is not enough disposable income to cover the amounts, Accounting CS will prorate the garnishment amounts using the ratio of each order amount compared to the total disposable income amount.
- Click OK to save the payroll item settings.
Was this article helpful?
Thank you for the feedback!