New (tax) year, new help!
Fixed Assets and UltraTax CS 2023 help is now on Help and Support. We're still moving articles, but you can find most content for the 2023 tax year there. Continue using the Help & How-To Center for tax years 2022 and older.
Use the following procedure to send email PDF Business Organizers to your clients.
- Choose File > Print Organizers to open the Print Organizers dialog.
- In the Print what group box, your selection will depend on whether your email supports Messaging Application Programming Interface (MAPI).
- Click the Email PDF / XLS option if your email application supports MAPI.
- Click the PDF / XLS to file in option to create a PDF of the organizer package and save it to a specified location on your hard drive. You should use this option if your email application does not support MAPI, so that the PDF of the organizer package can be manually attached to an email message.
Note: When printing a single client, UltraTax CS automatically selects the option in the Print what group box displayed in the Organizer Delivery column in the Setup > Client Communications dialog.
- If you click the PDF / XLS to file in option, click the Browse button
 to specify a location to save the PDF other than the default directory (My Documents). In the Modify Location dialog, select the desired location and click OK.
 - Click the Options button to open the Organizer Print Options dialog and mark the checkboxes for the organizer items you want to include. Note that you must have a client open or selected to access these options. The print collation settings shown here are set on the Setup > [Entity] > Organizer tab.
- Click OK to close the Organizer Print Options dialog.
- Click the Clients button to open the Select Clients to Print dialog. This dialog allows you to select the clients to whom you want to prepare Business Organizer PDFs.
Note: Unless you have a client's return open, clients who have an email address are included in the Clients to print pane automatically. When a client is open, only that client appears in the Clients to print pane. Use the Remove button to modify the list.
Tips
- Before you send PDF Business Organizers to your clients via email, you should email one to your office.
- To select all clients quickly, click the Select All button. All clients for whom you are assembling web organizers must have an email address entered in the Setup > Client Communications dialog. If the email address is missing, you will receive a notification when attempting to assemble the Business Organizer. Enter this information as necessary and choose File > Print Organizers to assemble the business organizer again.
- If multiple clients are selected, the Per client settings option will be selected in the Print what group box and UltraTax CS will process the organizers according to the specific client delivery preferences selected in the Setup > Client Communications dialog.
- To see how the client's Business Organizer appears in Adobe Reader, click the Preview button when the Email PDF / XLS or PDF / XLS to file in option is selected. The Adobe Reader opens automatically and the Business Organizer appears. Note that the Preview button is disabled if you have multiple clients selected. (If necessary, you can install Adobe Reader via the Adobe Reader download site.)
- Previewing an Email Business Organizer that contains an actionable item such as the engagement letter or consent form will result in two separate PDFs, one containing the cover letter and questionnaire and the other containing the actionable items.
Note: Clients that have None selected for the organizer delivery method in the Client Communications dialog are not available for Business Organizer processing even if you enter an email address. If you want to send a PDF Business Organizer to the client, select Email (PDF) or File (PDF) from the drop-down list in the Organizer Delivery column in the Client Communications dialog.
- Click OK to close the Select Clients to Print dialog, then click the Email button (or the Assemble button if the PDF / XLS to file in option is selected).
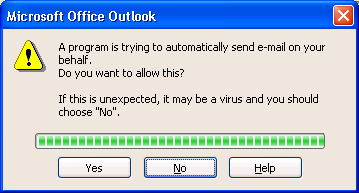
Note: Since UltraTax CS automatically sends the PDF Business Organizer, you may be required to authorize sending the email if your email application supports Simple MAPI (such as Microsoft Outlook Express) instead of Extended MAPI (such as Microsoft Outlook). The following image shows an example of a message you might receive. To authorize the sending of PDF Business Organizers, click the Yes button. This is a function of the email security configuration and not a limitation of UltraTax CS.

Was this article helpful?
Thank you for the feedback!


