


We moved!
Help articles have been migrated to the new Help and Support. You can find help for your products and accounts, discover FAQs, explore training, and contact us!
In Accounting CS, only one workers' compensation code can be associated with a location/department combination. To have Accounting CS automatically calculate multiple workers' compensation codes on a payroll check (rather than distributing workers' compensation amounts only to the employee's primary location) you need to enter hours or amounts for different locations/departments.
Follow the procedures below, in order, to set up additional locations and/or departments and assign an employee to them.
Adding workers' compensation codes to the client
Setting up workers' compensation information for a client.
Adding locations and/or departments for the client
Adding locations for a client.
Setting up client payroll departments.
Assigning locations and/or departments to the employee
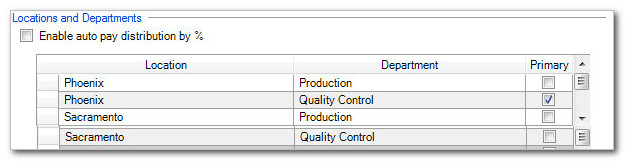
- Choose Setup > Employees and click the Main tab.
- In the Locations and Departments grid, use the drop-down lists to select location/department combinations for the employee.
- Continue to add rows with as many location/department combinations as necessary.
See also: Entering basic employee information.
Activating workers' compensation codes for each combination
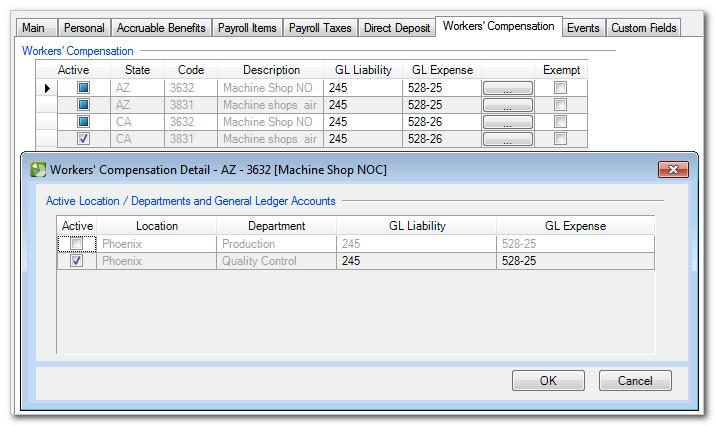
- Choose Setup > Employees and click the Workers' Compensation tab.
- The Workers' Compensation grid contains all of the codes available to the employee. Click the Ellipsis
 button in the row for the appropriate code.
 - Mark the checkbox in the Active column for the location/department combination for which this code should be active, and enter the GL account information.
- Click OK. The Active column in the Worker' Compensation grid should now show a filled (mixed) checkbox
 , and the GL account columns may display"(See details)". Show me
- Repeat these steps for all the workers' compensation codes that should be added for the employee. Each code should be associated with a different location/department combination. Show me
- When you are finished, click Enter to save your changes.
Note: If the employee is to be excluded from workers' compensation, mark the Exempt checkbox. When a state and code are selected and this checkbox is marked, the wages will be calculated on the check as excluded, making the premium zero.
Accounting CS automatically excludes officer wages from workers' compensation calculations within the XactPAY and InsurePay files.
- Clients using XactPAY: Do not mark the Exempt checkbox for employees who are specified as an Officer (in the Personal tab of the Setup > Employees screen).
- Clients using InsurePay: To include officers in premium calculations, you must clear the Exempt checkbox for the appropriate code for employees who are specified as an Officer (in the Personal tab of the Setup > Employees screen).
See also: Adding workers' compensation information to an employee record.
Entering a payroll check
Follow these steps to enter payroll checks and have the workers' compensation amount calculate automatically for all codes.
- Choose Actions > Enter Transactions and select Payroll Check in the Type field.
- Select the employee and enter the dates for the payroll check.
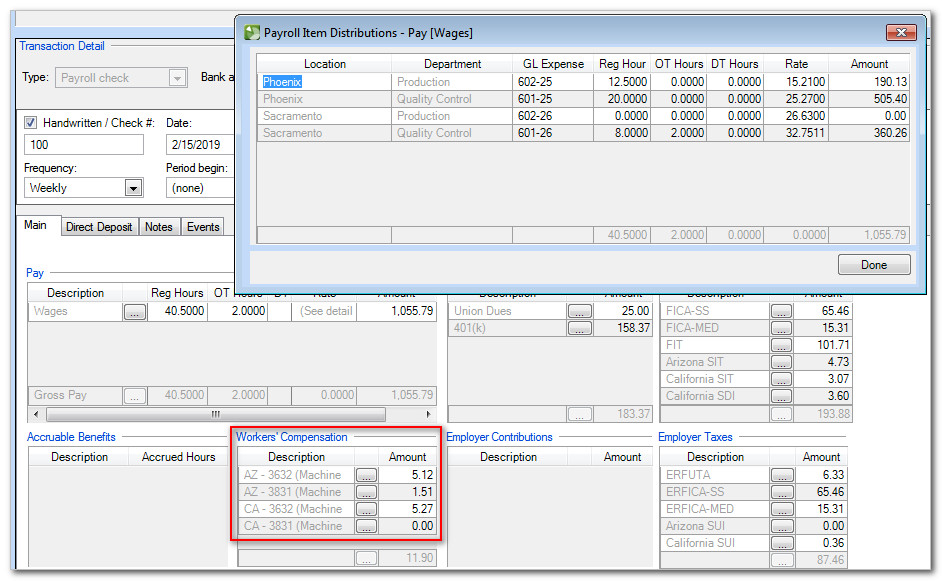
- In the Main tab, click the Ellipsis
 button next to the pay item description to open the Payroll Item Distributions dialog.
 - Enter the number of hours and/or amounts the employee worked at each location and department combination.
- The Workers' Compensation section will update automatically as pay amounts are entered.
Example
In the following example, our client, Acme Manufacturing, has locations in Arizona and California. Their employee, Sarah Abbott, works in the Quality Control department and the Production department at both locations, each of which have different pay rates and workers' compensation codes.
- First, we'll need to set up the locations (Phoenix and Sacramento) and the departments (Production and Quality Control).
- In the Main tab of the Employees screen, we'll assign Sarah to both locations and both departments. Her primary location is Phoenix and her primary department is Quality Control. Show me.
- On the Workers' Compensation tab of the Employees screen, we'll activate the workers' compensation codes for those locations/departments.
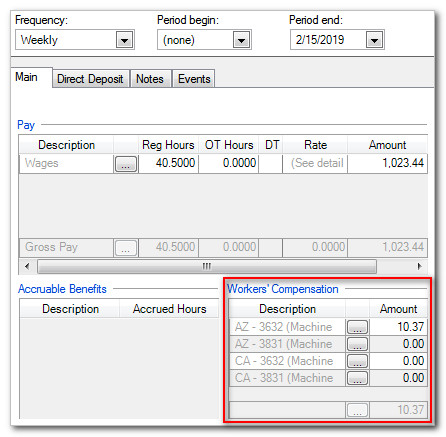
- Now we can enter a payroll check for Sarah. In the Actions > Enter Transactions screen, we will click the Ellipsis button to enter her hours in the Payroll Item Distribution dialog. This way we can distribute her hours across the correct locations and departments. Notice that her workers' compensation amounts calculated appropriately. Show me.
If we had not clicked the Ellipsis button to specify the distribution of hours for the different location/departments, all of the hours would have been assigned to the Sarah's primary location/department (Phoenix Quality Control) and the workers' compensation code associated with it. Show me.
Was this article helpful?
Thank you for the feedback!

|
|

|
Get the most out of your Thomson Reuters Tax & Accounting products. Our continued learning packages will teach you how to better use the tools you already own, while earning CPE credit. Learn more. |

|
|

|
Chat - Best option for simple questions Call us at +1 800 968 0600. You might like to see our hours and menu options before calling |