
 Workpapers CS

We moved!
Help articles have been migrated to the new Help and Support. You can find help for your products and accounts, discover FAQs, explore training, and contact us!
If you are licensed for and have installed PPC's SMART Practice Aids with the Fieldwork module, you can link engagement binders in Workpapers CS to SMART Practice Aid's engagements to enable you to transfer, open, and edit SMART documents within the Workpapers Dashboard.
Notes
- Integration with PPC's SMART Practice Aids also enables you to roll forward SMART workpapers. Placeholder workpapers can be created during the roll forward process and replaced by SMART workpapers when the roll forward process is complete. For details, see Roll forward an engagement binder.
- If you are licensed for and have installed PPC's SMART Practice Aids with the Field Work module, you can set up a direct link to a new or existing engagement from Workpapers CS for dynamic two-way integration. Alternatively, without the Field Work module installed, you can add PPC Practice Aids as external workpapers via the Add Workpaper Wizard.
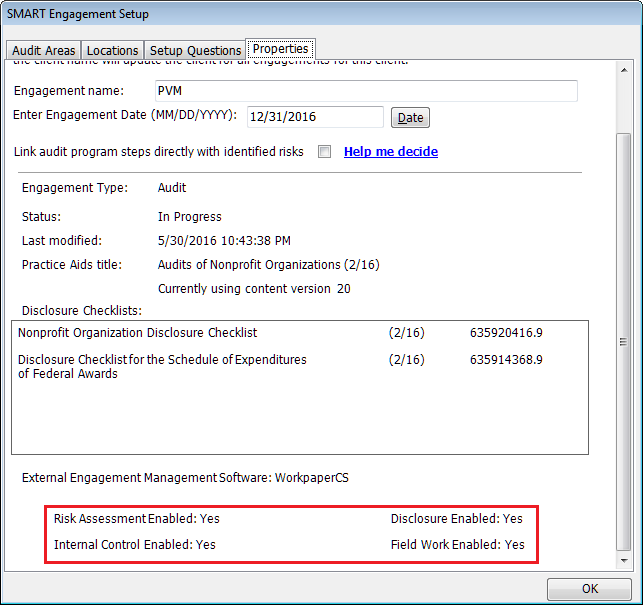
- In PPC's SMART Practice Aids, you can find out what modules you are licensed for by choosing Help > About to view a list of the installed modules for the product. You can also choose Edit > SMART Engagement Setup in SMART Practice Aids, click the Properties tab in the SMART Engagement Setup dialog and scroll to the bottom of the tab to view a list of modules that are enabled for the current SMART engagement. Show me.
Linking an existing engagement to PPC's SMART Practice Aids
- Choose Setup > Engagement Binders, or right-click a binder in the Engagement Binders Tree portlet of the Workpapers Dashboard, and then choose Properties to open the Engagement Binders dialog.
- Select the engagement to link with PPC's SMART Practice Aids, click the PPC tab, and then click the Edit button.
- Click the Add Link
 button to launch PPC's SMART Practice Aids.
 - In the Select New/Existing Engagement dialog choose the Select an existing engagement? option and click OK.
- Select the following items in the Open Engagement dialog.
- Database. (The local database is displayed by default).
- Client name. (The last client that was accessed in PPC's SMART Practice Aids is selected by default.)
- Engagement name. (The list of existing PPC binders for the selected client is displayed.)
- Allow multi-user for this engagement / Do not allow multi-user for this engagement. Enable or disable multiple-user access to the engagement.
- Click the Open button to open the selected engagement and return to the main screen in PPC's SMART Practice Aids.
- Choose Tools > Create SMART Docs... and mark the checkboxes next to the SMART Practice Aids that you want to upload to the engagement binder in Workpapers CS, and then click the Create button.
Note: If the Generate SMART Docs option is unavailable, it is likely that you are not licensed for the Field Work module. To verify that you are licensed for the Field Work module, choose Help > About in PPC's SMART Practice Aids to view a list of the modules installed with the version number.
- Use the Generation Status dialog to monitor the progress of workpaper generation in real-time. Any errors that occur during the generation process can be viewed in the Error Report tab.
- After the workpaper generation is complete, close the Generation Status dialog, and then the Upload status dialog is displayed.
- Close the dialog, and then close or minimize the PPC's SMART Practice Aids application.
- Verify that the SMART Practice Aids that you uploaded have been inserted into the top level of the engagement binder that you selected in Workpapers CS.
- Double-click a SMART Practice Aid in the Engagement Binders Tree portlet to launch it in PPC's SMART Practice Aids.
Creating and linking a new engagement to PPC's SMART Practice Aids
- In the Setup > Engagement Binders screen, or the Engagement Binders properties dialog (which is accessed from the right-click context menu in the Workpapers Dashboard), select the engagement to link with PPC's SMART Practice Aids, click the PPC tab, and then click the Edit button.
- Click the Add Link button to launch PPC's SMART Practice Aids.
- In the Select New/Existing Engagement dialog in PPC's SMART Practice Aids, choose the Create a new engagement? option and click OK to open the Create Client Engagement wizard.
- Select and/or enter the following items in the Create Client Engagement screen.
- Database. (The local database is displayed by default).
- Client name. Enter or select a client from the list (The last client accessed in PPC's SMART Practice Aids is selected by default.)
- New engagement name.
- Engagement date (optional)
- Engagement Type.
- Click Next and select the Practice Aid title to use in the new engagement.
Notes
- Different options appear in this screen based on the Practice Aid title selected, PPC modules for which you are licensed and have installed, and the engagement type that is selected on the previous screen. For details, refer to the user assistance in the PPC's SMART Practice Aids application.
- To include Workpapers CS as the external engagement management software to be used, the Field Work checkbox must be marked as a module to be included with the engagement.
- After reviewing your options in the current screen of the Create Client Engagement wizard, click Next and choose your options.
- Click Finish to apply the selections for the new engagement client.
- In the main screen of PPC's Practice Aids, choose Tools > Create SMART Docs... to open the Create SMART Docs dialog.
- Select the applicable documents from the Forms list in the Create SMART Docs dialog, and then click the Create button.
- Use the Generation Status dialog to monitor the progress of workpaper generation in real-time. Any errors that occur during the generation process can be viewed in the Error Report tab.
- After the workpaper generation is complete, close the Generation Status dialog and the Upload status dialog.
- Close or minimize the PPC's SMART Practice Aids application.
Notes
- Workpapers that are generated from PPC's SMART Practice Aids are uploaded to the top-level of the engagement binder and can be moved to any folder within the engagement.
- Workpapers that are linked to Workpapers CS are automatically flagged to be recreated when changes are made in SMART Practice Aids. Choose Tools > Create SMART Docs in SMART Practice Aids to view a list of all available workpapers. New or modified documents are flagged to be recreated.
- The PPC Practice Aids
 icon is attached to linked workpapers that are uploaded to the engagement binder. If the link to the PPC's Practice Aids engagement is deleted, the related SMART workpapers in the engagement binder are disconnected from the PPC engagement and converted to Microsoft Word documents with the
  icon attached. (The link can also be deleted via the SMART Practice Aids application. With an engagement open in SMART Practice Aids, choose Tools > Unlink engagement.)
 - To confirm that all workpapers have been successfully linked to in the engagement from PPC's SMART Practice Aids, we recommend that you click the Refresh
 button in the Engagement Binders Tree portlet toolbar to refresh all items in the tree.
 - If you prefer to manage workpapers from within Workpapers CS for a new engagement created in SMART Practice Aids, you can choose to exclude options in the Field Work module that manages workpapers, signoffs, and the ability to finalize documents. Two-way integration also enables you to change the roll forward options for SMART Practice Aids workpapers directly from the Workpapers CS engagement binder.
Was this article helpful?
Thank you for the feedback!

|
Integration workflow for audit-based engagements between SMART Practice Aids and Workpapers CS Roll forward workflow for SMART Practice Aids engagements that are linked in Workpapers CS Roll forward a linked SMART Practice Aids engagement from Workpapers CS |

|
Get the most out of your Thomson Reuters Tax & Accounting products. Our continued learning packages will teach you how to better use the tools you already own, while earning CPE credit. Learn more. |

|
|

|
Chat - Best option for simple questions Call us at +1 800 968 0600. You might like to see our hours and menu options before calling |