
 Workpapers CS

We moved!
Help articles have been migrated to the new Help and Support. You can find help for your products and accounts, discover FAQs, explore training, and contact us!
The Roll Forward process can take place any time during the engagement process, but is usually performed after work in the engagement binder has been Finalized, or is close to completion. The existing engagement binder is used as a template to create next year's engagement binder.
See also: Roll forward a linked SMART Practice Aids engagement from Workpapers CS.
Notes
- You must advance the client to the next Fiscal Year to include the next year's dates in the new engagement binder.
- The Roll Forward can only be performed by staff members who have the appropriate privilege assigned to them. For details about security in the application, see Security overview.
- You must have Checkpoint Tools for PPC installed to insert and replace workpapers from that application into an engagement binder in Workpapers CS .
- You must have PPC's SMART Practice Aids installed with the Fieldwork module to link engagements and workpapers from SMART Practice Aids to an engagement binder in Workpapers CS .
There are several ways to initiate the Roll Forward process.
Click the Roll Forward  button in the toolbar of the Engagement Binders Tree portlet in the Workpapers Dashboard.
In the Workpapers Dashboard, right-click the Engagement Binder Briefcase  in the tree view of the Engagement Binders Tree portlet and choose Roll Forward.
In the Firm Dashboard, open the Engagement Binder Portlet, mark the checkbox for the binders to roll forward, update the engagement binder name and period end date, as necessary, and then click the Roll Forward button. (Note that only binders with a Tax Return type are listed in this portlet.)
Click the Roll Forward button in the Engagement Binders screen.
Use the following steps in the Roll Forward wizard to complete the process.
- In the New Engagement Binder Properties screen of the Roll Forward wizard, name the engagement binder, define the period ending date, beginning, and ending date, and click Next.
Notes
- You can mark the Retain workpaper assignments checkbox when you have already set up staff in the previous engagement binder and want to keep those same assignments in the engagement binder that is rolled forward.
- You can mark the Public entity checkbox when the engagement type is Audit.
- In the Workpaper Settings screen, select a new or change an existing treatment for each workpapers from the drop-down list in the Roll Forward Setting column of the Workpapers grid, and then click Next.
Note: If you are rolling forward an engagement binder that contains PPC SMART Practice Aids, see Roll forward a linked SMART Practice Aids engagement from Workpapers CS.
- If you selected Replace - PPC Checkpoint Tools as a roll forward setting for any of the workpapers in the previous screen of the Roll Forward wizard, the next screen to display is Select Checkpoint Tools Replacement Workpapers. Click the Select Replacement Workpaper button to launch the Checkpoint Tools for PPC application and choose a replacement workpaper to include in the roll forward process, and then click Next.
- In the Workpapers to Roll Forward screen you can modify the reference and name for each workpaper that is listed.
- Click the Finish button to complete the Roll Forward process.
Note: In the final phase of the Roll Forward process, a diagnostic screen displays in the wizard that lists all workpapers that were included, excluded, replaced, and renamed. The diagnostic screen indicates whether the roll forward was successful, or in the case of failure, the diagnostic screen displays all errors and exceptions. Show me.
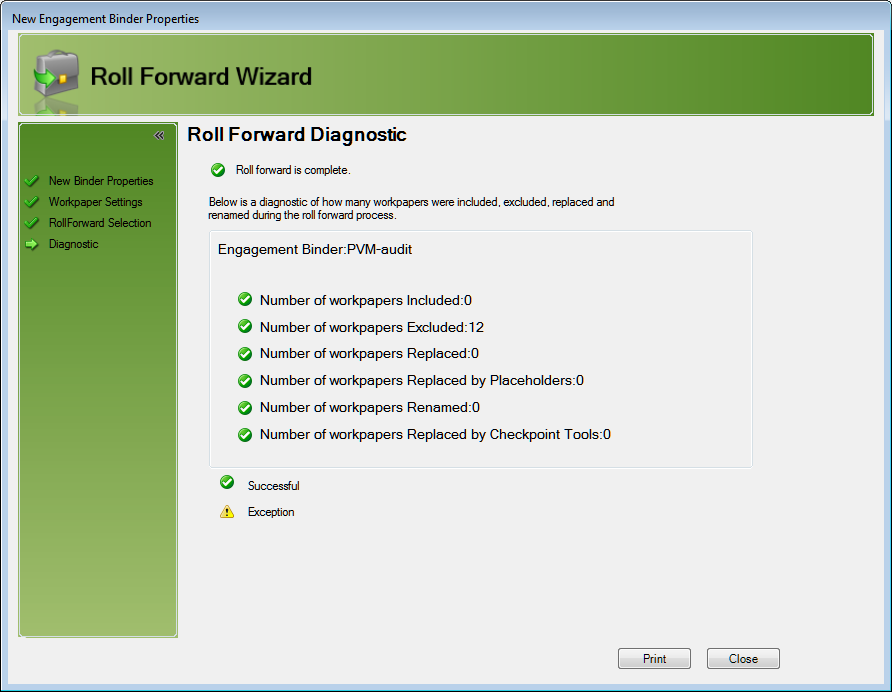
- Click the Print button to print the Diagnostic report or click Close to close the Roll Forward wizard.
Was this article helpful?
Thank you for the feedback!

|
Finalize Engagement Binder Wizard Workpapers workflow for audit-based engagements Dynamic linking or adding PPC SMART Practice Aids into the engagement binder |

|
Get the most out of your Thomson Reuters Tax & Accounting products. Our continued learning packages will teach you how to better use the tools you already own, while earning CPE credit. Learn more. |

|
|

|
Chat - Best option for simple questions Call us at +1 800 968 0600. You might like to see our hours and menu options before calling |