


Follow these steps to install the Lookup List Sync utility to synchronize GoFileRoom Lookup lists with your firm's time and billing applications (such as Practice CS) that use a SQL database. You can use the Lookup List Sync utility with any database to which you can make an ODBC connection.
Create an ODBC Connection
Follow these steps to create an ODBC Connection to the SQL database to which you are trying to connect. Typically, you will create the ODBC Connection on the SQL server that is hosting the database; however, you can do this directly on the server or on another computer that has access to the SQL server.
Note: The computer on which you create the ODBC connection should remain on at all times; otherwise, the Lookup List Sync utility will not run.
- On the computer that will run the LookUpList Sync utility, double-click the applicable odbcad32.exe file.
- 32-bit computer: C:\Windows\System32\odbcad32.exe
- 64-bit computer: C:\Windows\SysWOW64\odbcad32.exe
- Click the System DSN tab and click Add.
- In the Create New Data Source dialog, select SQL Server and click Finish.
- Enter a name and description for the data source. For example, you can use GFR_Lookup_List for both the name and description.
- Select the correct SQL Server, and click Next.
- If multiple users log in to this computer, we recommended that you choose the With SQL Server authentication using a login ID and password entered by the user option.
- Enter the login and password for the SQL server. Your firm should choose a SQL login that has read access to the SQL Database.
Note: If only a domain administrator account is used on this computer, you can choose With Windows NT authentication using the network login ID.
- Click Next.
- Mark the Change the default database to checkbox, and then select the applicable database from the drop-down list. Click Next, and then click Finish.
Install the Lookup List Sync utility
- Download the Lookup_List_Sync.zip file.
- Extract the files to an easy-to-find location.
- Double-click the GoFileRoom Lookup List Sync.msi file, and follow the prompts in the installation wizard.
- When installation is complete, create a GFRTemp folder in the C:\Program Files (x86)\GoFileRoom\GFRLookupListSync folder.
- Right-click the GFR_LookupListSync INI (Manage).exe file, choose Run as administrator, and configure each tab as follows.
- General tab
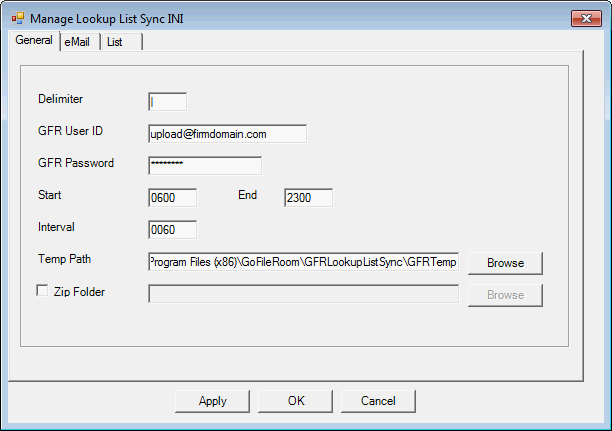
- In the GFR User ID and GFR Password fields, enter your firm's GoFileRoom upload account credentials.
- Enter the start and end times for the utility to run and the interval at which to run it. Use Military time for thes fields. With these settings in the image above, the utility will run every hour between 6:00 AM and 11:00 PM.
- In the Temp Path field, enter the name of the folder you created in step 4.
- eMail tab
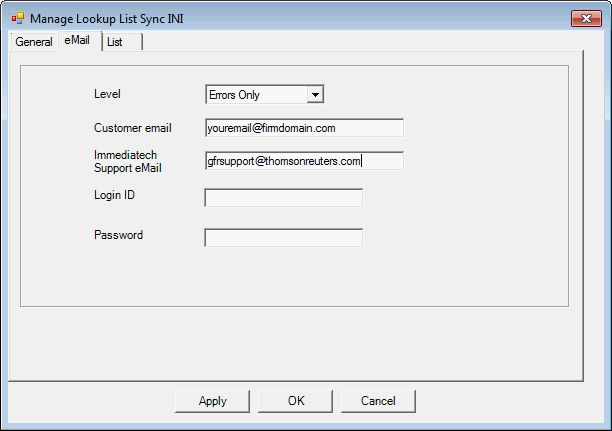
- In the Level field, select the type of emails you'd like the utility to send. Most firms typically set this for Errors Only.
- In the Customer email field, enter the email address for the utility to send notifications to when errors occur in the Lookup List Sync utility.
You can enter multiple email addresses using the semicolon as a separator.
- In the Immediatech Support eMail field, enter gfrsupport@thomsonreuters.com.
- Leave the Login ID and Password fields blank.
- List tab
Use the List tab to configure multiple Lookup List fields in GoFileRoom. Firms often configure Lookup List fields for their Clients Drawer, HR Drawer, CPE Drawer, or My Files Drawer.
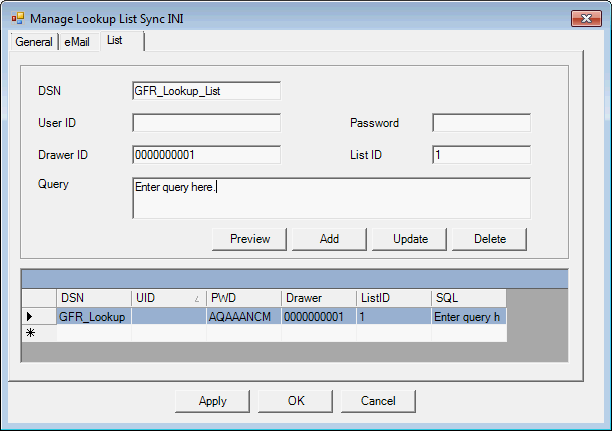
- Enter the DSN name that you created when you set up your ODBC connection to the SQL Database (for example, GFR_Lookup_List).
- If you use SQL Authentication during the ODBC connection, enter the SQL username and password. If you use Windows Authentication, you can leave these fields blank.
- Enter the Drawer ID and List ID from the Address field in the Properties dialog in the Manage Lookup Lists screen.
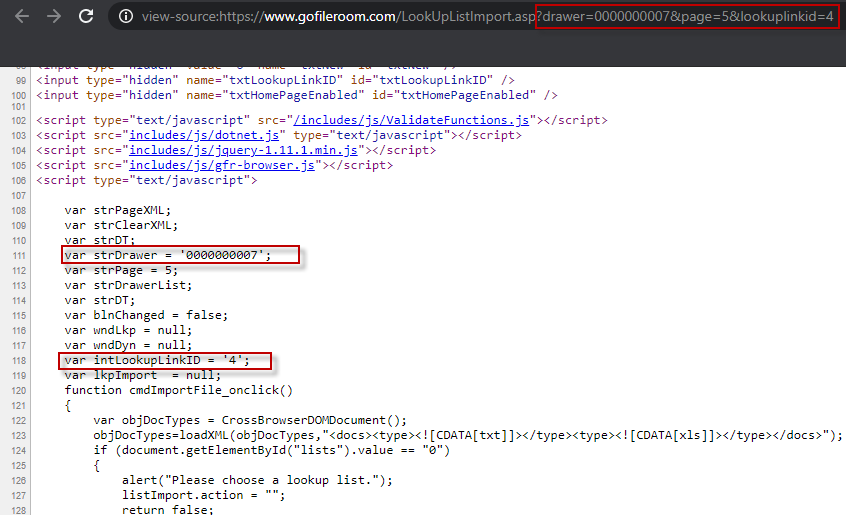
- In GoFileRoom, choose Administration > Manage Fileroom and click the Lists tab.
- Select Manage Lookup Lists, then choose the applicable drawer from the Drawer field.
- Right-click anywhere in the blank area on the page and select View Frame Source.
-
A new tab will open. In the image below, the Drawer ID is 0000000007 and the List ID is 4 (lookuplinkid).
- Use the Query field to enter information that your firm syncs with GoFileRoom. See the Scripts folder that was extracted from the Lookup_List_Sync.zip download or Common Lookup List queries for more detailed query setup information.
- After you enter information in these fields, click Add to save the query and include it in the list. Click Preview to verify that the utility populates this information as expected. Click OK to close the dialog.
- General tab
Install and configure the Service
- Navigate to the files you extracted earlier, right-click the srvinstw.exe file, and choose Run as administrator.
- Follow the prompts in the installation wizard.
- After the service is installed, click the Windows Start button, click the Run link, and enter services.msc in the Run dialog.
- In the Services dialog, right-click the new GFR_Lookup_List service and choose Properties.
- Click the Recovery tab and select Restart the Service for the three failure fields.
- Click Apply, click OK, and restart the service.
Within a few minutes, the GoFileRoom Lookup List should be populated in GoFileRoom. If any issues arise, navigate to C:\Program Files (x86)\GoFileRoom\GFRLookupListSync\Log to view the error logs.
Your IT professional may need to make registry changes for the Lookup List Sync utility to work properly. See the "Systems without the GoFileRoom Client Add-in" section in the Recommended registry changes for TLS 1.2 article.
Was this article helpful?
Thank you for the feedback!