


After scanning documents using ScanFlow, but prior to uploading them, you can make modifications such as adding or deleting a document or document pages, moving pages, separating non-recognized barcode pages, or rotating pages.
Note: The following procedures assume you have already scanned documents for uploading into GoFileRoom.
Important! Do not use the Page view when making modifications to a batch. Use the Bookmark view to ensure that the batch is complete.
Scanning additional documents to a batch
Follow these steps to add documents to batch.
- Generate a new barcode cover sheet and place it with the additional page in the scanner feeder.
- Click the GoFileRoom Batch scan button
 .
. - In the Add Pages to Document dialog that opens, click the Create new document option and click OK to open your scanner application.
- Scan the new document.
Scanning an additional page to a document
Follow these steps to add pages to a document in your batch.
- In the Acrobat Bookmarks pane, Select the bookmark nearest to where you want the new page to appear.
- Place the new page in the scanner feeder.
- Click the GoFileRoom Batch Scan button.
- Click the option for the position of the newly inserted page in the document and click OK to open your scanner application.
- Scan the new document.
Importing new documents to a new batch
If you are using a multi-function printer to scan documents to TIFF files prior to sending them to GoFileRoom, you can add pages to a document in a new batch by following these steps.
- Click the GoFileRoom Batch import button
 .
. - Click the option for the position of the newly inserted page in the document and click OK to open your scanner application.
- Scan the new document.
- In the GoFileRoom Batch Import dialog, click the Add Documents button.
- Browse to and select desired TIFF files and click the Open button to add them to the list of files to be imported.
Note:
- Single- and multiple-page TIFF files can be imported.
- TIFF files that you import can contain GoFileRoom barcodes.
- TIFF files must be one-bit colour (black & white) and have a resolution of 300 DPI (or 300x300 depending on your scanner's configuration options).
- In the list of files to be imported, you can move, delete, or re-order files.
- Click the Import button. Selected files are processed separated into separate documents when applicable.
Importing documents to an existing batch
Follow these steps to add pages to a document to an existing batch.
- Click the GoFileRoom Batch import button
 .
. - Click the Create new document option and import the new document.
Importing additional pages to a document
Follow these steps to import additional pages to a document within a batch.
- In the Acrobat Bookmarks pane, select the bookmark for the page that will be adjacent to the new pages.
- Click the GoFileRoom Batch Scan button.
- Click the option for the desired position of the new pages and click OK.
- Import the new pages.
Deleting a document from a batch
Follow these steps to delete a document from a batch.
- In the Acrobat Bookmarks pane, select the bookmark for the barcode cover sheet of the document you want to delete.
- Right-click and choose Delete from the context menu.
Deleting a page from a document
Follow these steps to delete a page from a batch document.
- In the Acrobat Bookmarks pane, select the bookmark for the page of the document you want to delete.
- Right-click and choose Delete from the context menu.
Moving pages in a document
Move pages in a document by dragging and dropping them in the Acrobat Bookmarks pane.
Separating a document
Occasionally, a barcode cover sheet is recognized during the scanning process and is included in the preceding document. You can use the Create New Document feature to separate this document.
- In the Acrobat Bookmarks pane, select the barcode cover sheet that was not recognized.
- Click the Create New Document button.
- Click Yes in the confirmation dialog that opens.
- Enter the document ID found on the selected barcode cover sheet and Click OK.
Tip: Enter only the last several digits of the document ID. All zeros will automatically populate the field.
- Click OK to close the confirmation dialog that opens.
Rotating a page
Note: The Rotate button in the Adobe Acrobat toolbar rotates the current view of that page; not the page itself. Changes made to the view using this button will not apply to the current document.
- In the Acrobat Bookmarks pane, select the page you want to rotate.
- Choose Document > Pages > Rotate and choose from the available options.
- Click OK.
Retrieving a Backup Batch
If a batch is scanned but not uploaded, ScanFlow places it in a backup directory where it is retained for seven days. This period can be modified by administrators for any local GoFileRoom user who scans documents with ScanFlow
Note: You can contact GoFileRoom Support to change the retention setting for the backup directory.
You can retrieve temporary backups of scanned documents in C:\Users\<user profile>\AppData\Roaming\GoFileRoom\GFRScanflow\Backup. Double-click a file to view it in Acrobat.
Troubleshooting scanning errors
When an error occurs during the scanning process, ScanFlow displays a Scanning Error dialog that includes information and provides options for how to proceed.
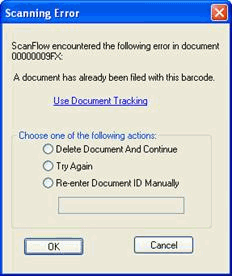
Note that in this case the error states that the document has been filed. The document ID already has a document associated with it; therefore, it can not be used. An error that states that the document has already been scanned indicates a Scanned status for the document ID.
You can click the Use Document Tracking link to access to the Document Tracking report to research the Document ID. You can use the report to identify or reset a document ID status from Scanned to Barcoded. Based on your research, you can delete the document from the batch, try again, or re-enter the document ID manually.
Choose an option in the Scanning Error dialog and click OK.
Was this article helpful?
Thank you for the feedback!