


We moved!
Help articles have been migrated to the new Help and Support. You can find help for your products and accounts, discover FAQs, explore training, and contact us!
Accounting CS enables you to import client data from QuickBooks, including bank accounts, chart of accounts data, employee information, payroll items, transactions, and vendor information. Options that are available in the Client Data Import wizard may vary based on the source application options selected in the Import Client Data - Options dialog. The import enables you to map client data from the source company to existing data or fields in Accounting CS.
See also: Importing client data from QuickBooks workflow
Notes
- If you are not able to open QuickBooks during this import procedure (for example, if you are running Accounting CS in Virtual Office CS or another terminal server environment), you or your client can use the CS QuickBooks Data Utility to create an export file.
- The QuickBooks data file must be in single-user mode to import the data into Accounting CS. When the file is in multi-user mode, QuickBooks makes copies of the file so that other users can work with the data, and Accounting CS cannot access the files.
- You can import setup information for the Accounting CS client. For example, if the Chart of Accounts does not exist in the application for the current client, you can import the Chart of Accounts and select <Add as is> for each account to have the application automatically add the account number for the client.
- You will have the opportunity to view, set up, and update the mapping of QuickBooks data to Accounting CS data during the import process only. After the import is complete, you will not be able to change the mapping.
- When Accounting CS imports transactions, it does not include balances for transactions that were posted prior to the selected date range. For example, you will need to manually enter balances in the following situations.
- When importing client data, you must use the client’s working QBW file, not the accountant’s copy (QBA) of the QuickBooks client data.
- To import data into a prior year, use the Period End Dates dialog to add the applicable prior years to the client record.
- When importing payroll checks with employee data, the payroll information includes only the total check amounts, not the number of hours worked.
Requirements
- QuickBooks Pro, Premier (including Accountant's edition), or Enterprise edition must be installed on the machine where the import is being processed. Accounting CS supports the current version and two prior-year versions of these applications.
- Accounting CS supports imports of the QBW file type or of an export file created by the CS QuickBooks Data Utility from a QBW file. It does not support Accountant's copy file types (QBA, QBX, QBY, QBM, etc.).
- The company database must be open in QuickBooks during the import process. (The original data file is not altered in any way during the import process.)
- If you will be importing payroll data, the QuickBooks company must have an active QuickBooks payroll subscription. To determine whether a payroll subscription is active, open the company in QuickBooks and choose Payroll Center from the Employees menu. Your payroll subscription status will be displayed in the upper-right corner of the dialog that opens - in green if active or in red if inactive.
Pre-import procedures when using the CS QuickBooks Data Utility
Complete the following procedures as outlined in the Using the CS QuickBooks Data Utility procedure to prepare a file for import into Accounting CS. Note that you would use this utility to create export files when the client data cannot be directly opened in QuickBooks during the import process — for example, when QuickBooks is installed in a different location than Accounting CS such as, in a Virtual Office CS, Software as a Service, or other terminal server environment.
- Installing the CS QuickBooks Data Utility (if you have not already installed the utility)
- Creating the export file using the CS QuickBooks Data Utility
- Saving the export file to a location you can browse to during the import process
Specifying import options
Before you import client data into Accounting CS, you can specify QuickBooks as the application from which to import client data and also specify the types of data to exclude from the import.
Note: If you import payroll information for the client, you must enable the Payroll (After-the-fact) service in the Add/Remove Services dialog.
- Choose Setup > Clients and click the Integration tab.
- Select the appropriate client from client list, and then click the Edit button.
- Select QuickBooks from the Import source drop-down list, and then click the Ellipsis
 button.
 - In the Import Client Data Options dialog, mark all applicable checkboxes. You can choose to exclude employees or payroll checks and inactive items, and you can choose to import only employee data and payroll checks.
- Click OK to return to the Clients screen.
Importing QuickBooks client data
Follow the steps below to import client data via the Import Client Data wizard.
- If you run Accounting CS on a computer running the Windows 8 (or higher) operating system and on which the User Account Control feature is enabled, open QuickBooks, but do not open the client database yet.
- In Accounting CS, choose File > Import > Client Data to open the Import Client Data wizard.
- In the Source Data page, verify that the appropriate client is selected and that QuickBooks is selected as the source.
- Browse to the file location of the file to use for the import and then select the appropriate file (either the QuickBooks company file or the file created by the CS QuickBooks Data Utility).
- If you run Accounting CS on a computer running the Windows 8 (or higher) operating system and on which the User Account Control feature is enabled, return to QuickBooks and open the client database that you want to import. Then return to Accounting CS and click Next in the Import Client Data wizard.
- Map the following import items to the appropriate items in Accounting CS. If you mark the Skip data mapping screens checkbox, the application will automatically use the default mapping in the data-entry screens that don't require your input.
- Bank accounts. For each QuickBooks bank account, select the corresponding Accounting CS bank account, or select Add as is if the bank account does not exist. Note that QuickBooks bank accounts must be mapped to unique cash accounts in Accounting CS. The other QuickBooks account types do not need to be mapped to unique accounts. Show screen.
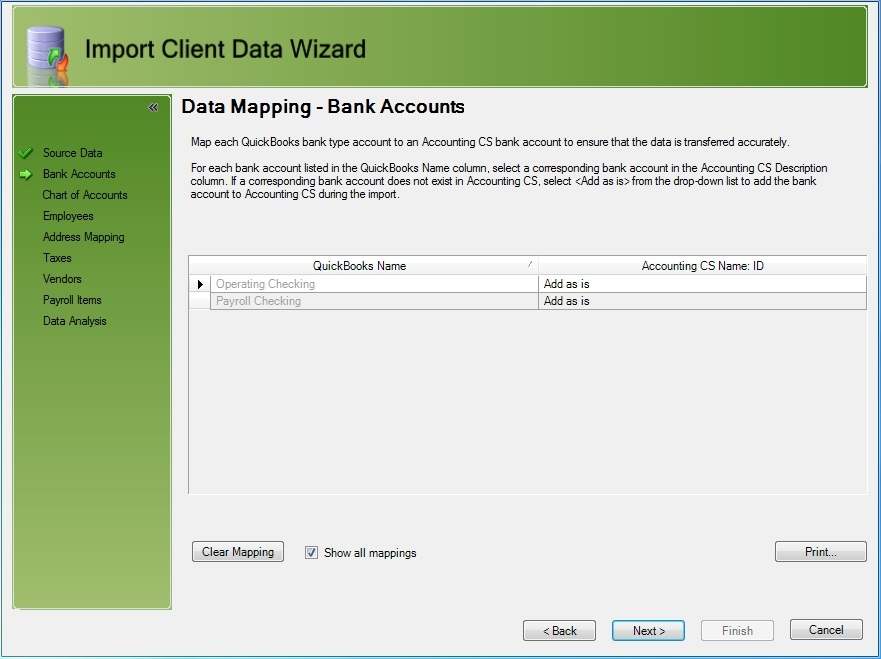
Note: If this is not the first time you have imported, and you receive the message "Each bank account in Accounting CS must have a unique GL account number", you will need to exit the wizard and then update the QuickBooks bank account descriptions to match the descriptions that are in Accounting CS. If the descriptions match, verify that the Inactive checkbox is not marked for the account in Accounting CS.
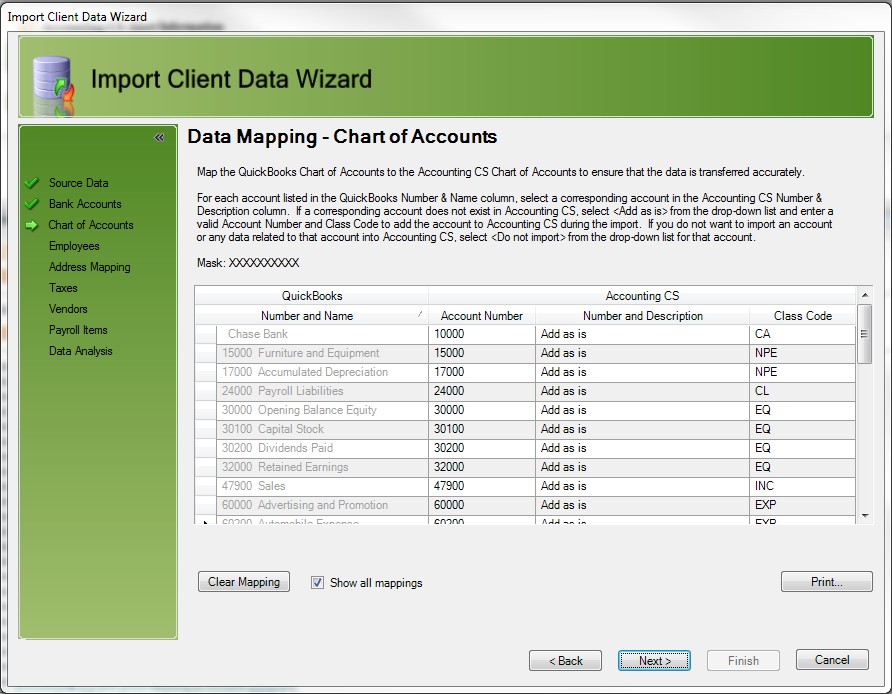
- Chart of accounts. For each QuickBooks account that you want to import, select the corresponding Accounting CS account, or select Add as is if the account does not exist. For each account that you do not want to import, select Do not import. Show screen.
- QuickBooks classes. For each QuickBooks class that you want to import, select the corresponding Accounting CS account segment, or select Add as is if the segment does not exist. For each class that you do not want to import, select Do not import. Show screen.

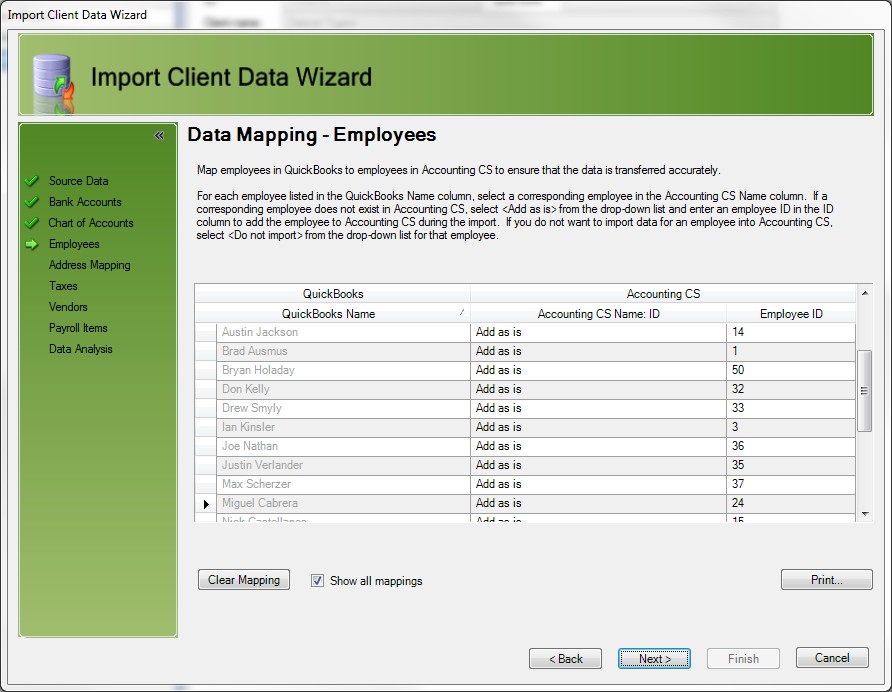
- Employees. For each QuickBooks employee record that you want to import, select the corresponding Accounting CS employee record, or select Add as is if the employee record does not exist. For each employee record that you do not want to import, select Do not import. Show screen.
- Address mapping. This screen lists all employees with an incomplete or incorrect address in QuickBooks import data. The application will not import earnings information for any employee with an invalid address. Therefore, you must address each one.
In the Lookup field, enter the employee's city and state combination or their ZIP code, and then click the
 button. If the application finds more than one possible result for any of the address fields, it lists all options in the drop-down lists for those fields. Select the appropriate information, and then click the Update button. When the employee's address is valid, the application marks the checkbox in the Valid column. Show screen.
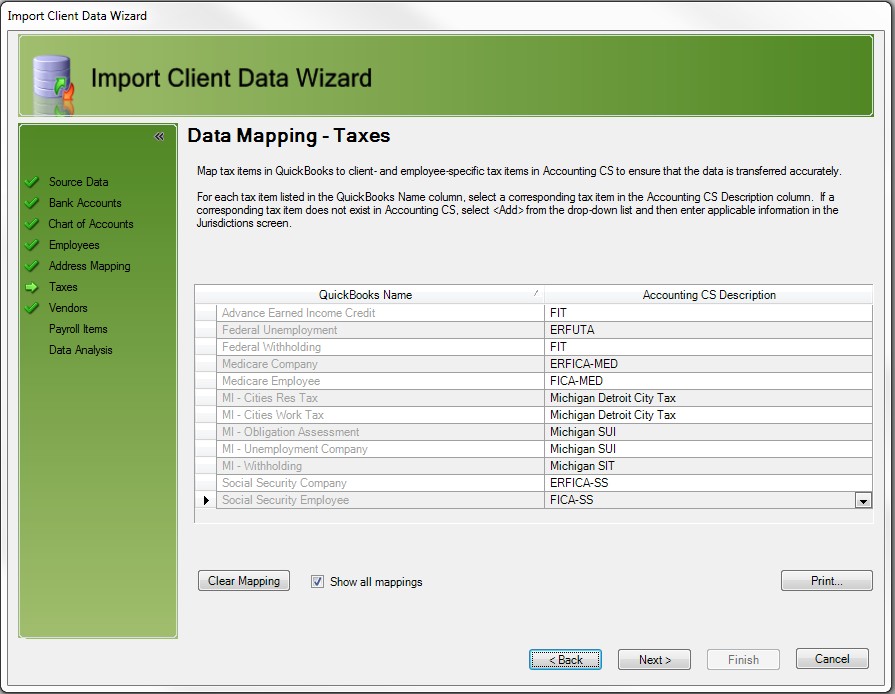
- Taxes. For each QuickBooks tax, select the appropriate Accounting CS tax, or select Add to create the tax in Accounting CS. Note that all QuickBooks taxes must have a corresponding Accounting CS tax, and all QuickBooks state unemployment insurance items must include "unemployment company" in the description. Show screen.
- Jurisdictions. This screen opens only when you select Add for any of the QuickBooks taxes in the previous import screen (Taxes). Enter the applicable jurisdiction information for the new tax.
For each tax listed, highlight the tax in the grid, enter the jurisdiction's city and state combination or its ZIP code, and then click the
button. If the application finds more than one possible result for any of the fields, it lists all options in the drop-down lists for those fields. Select the appropriate jurisdiction information, select the appropriate Accounting CS description, and then click the Update button. Show screen.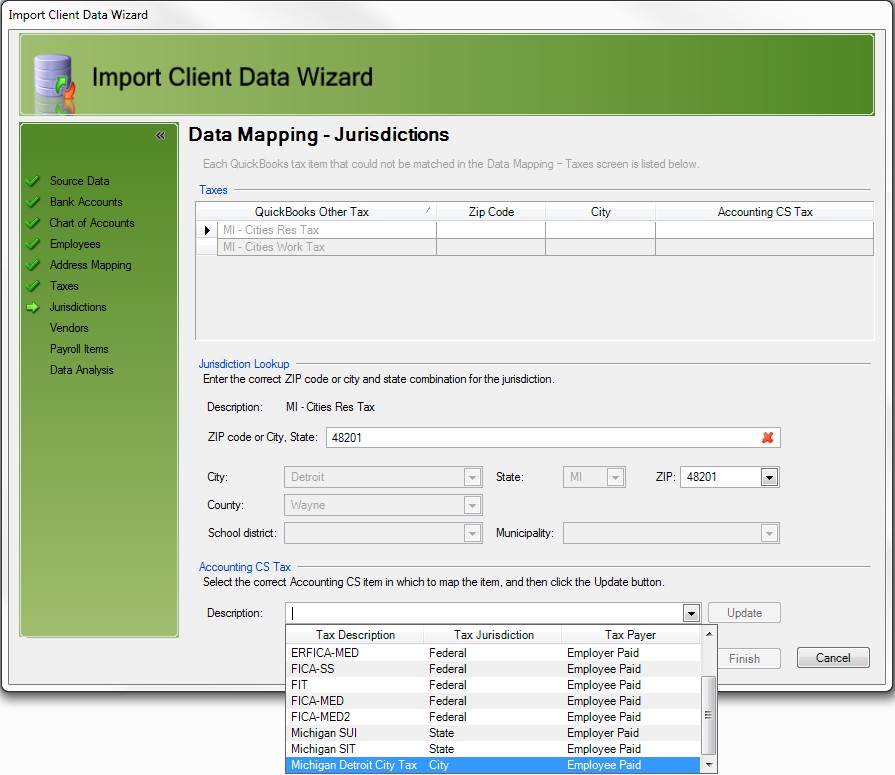
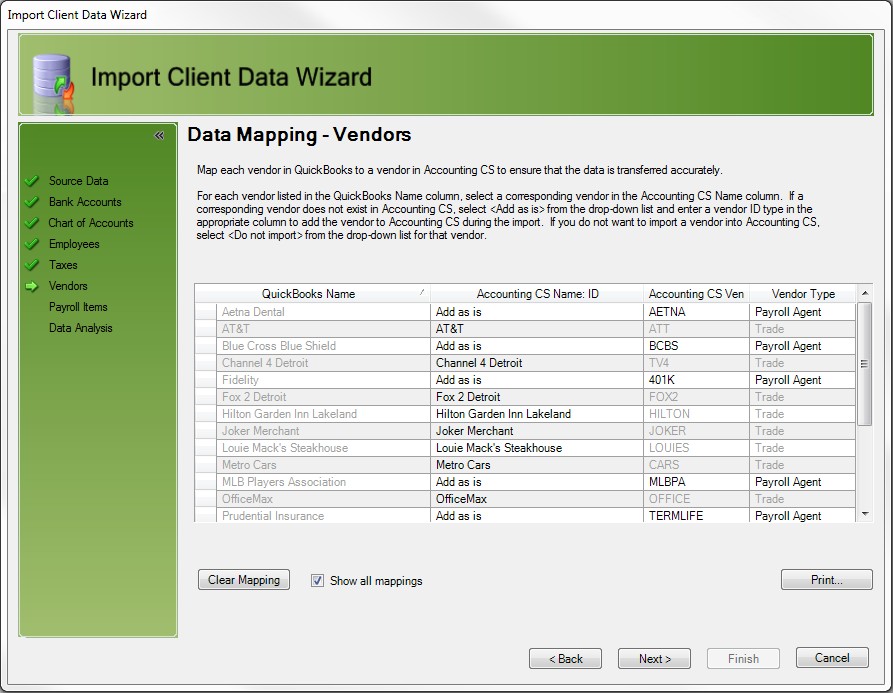
- Vendors. For each QuickBooks vendor record that you want to import, select the corresponding Accounting CS vendor record, or select Add as is if the vendor record does not exist. For each vendor record that you do not want to import, select Do not import. Show screen.
- Payroll items. For each QuickBooks payroll item that you want to import, select the corresponding Accounting CS payroll item, or select Add as is if the item does not exist. For each payroll item that you do not want to import, select Do not import. Show screen.

- Bank accounts. For each QuickBooks bank account, select the corresponding Accounting CS bank account, or select Add as is if the bank account does not exist. Note that QuickBooks bank accounts must be mapped to unique cash accounts in Accounting CS. The other QuickBooks account types do not need to be mapped to unique accounts. Show screen.
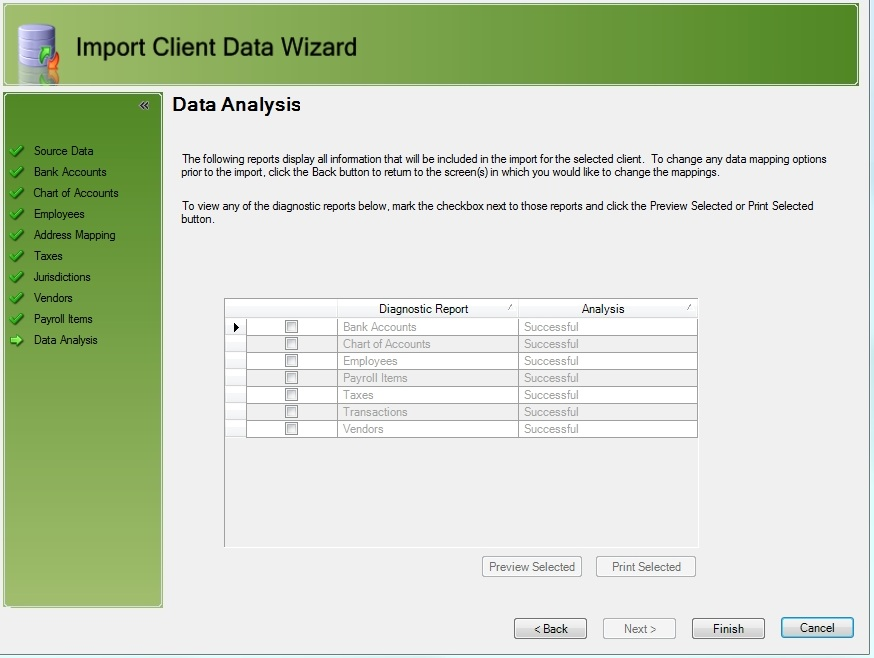
- After you finish mapping the QuickBooks data, the application displays the Data Analysis screen, which gives you the opportunity to print and/or preview diagnostic reports about the data that will be imported. Review the diagnostic reports and correct any information as needed. Please note that the application does not actually transfer the data to Accounting CS until you click the Finish button. Show screen.
- Check any errors encountered during the import that are listed on the completion screen of the Import Client Data Wizard. Print them and if necessary, take the appropriate actions to correct any exceptions or failures.
Was this article helpful?
Thank you for the feedback!

|
Importing client data from QuickBooks Online QuickBooks integration overview |

|
Get the most out of your Thomson Reuters Tax & Accounting products. Our continued learning packages will teach you how to better use the tools you already own, while earning CPE credit. Learn more. |

|
|

|
Chat - Best option for simple questions Call us at +1 800 968 0600. You might like to see our hours and menu options before calling |