


We moved!
Help articles have been migrated to the new Help and Support. You can find help for your products and accounts, discover FAQs, explore training, and contact us!
Accounting CS enables you to set up automatic journal entry templates that contain information for a journal entry transaction. The application automatically creates journal entries from this template when you set up or edit the template, change the posting period, preview or print reports, or choose Edit > Recalculate Automatic Journal Entries in the Actions > Enter Transactions screen.
- Choose Setup > Transaction Templates.
- In the Type field in the Transaction Detail section, select Journal entry.
- Enter information that you want the application to use for journal entries that will be automatically created from this template - journal entry subtype, journal, reference, and description. You can also enter a WP reference and select a Difference or Misstatement for an applicable subtype. For a Regular or Adjusting subtype, you can mark the Auto-reverse next period checkbox to have the application reverse the journal entry when advancing to the next posting period.
- In the Template tab, enter the template ID (up to 11 alphanumeric characters) and description (up to 50 alphanumeric characters).
- In the Type field, select Automatic. Note that this type is not related to the Type field in the Transaction Detail section.
- In the Starting period field, select the posting period in which to start creating the transactions from this template. From this posting period and going forward, the application automatically creates transactions dated for the last day of each posting period.
- In the Basis field, select the desired balance type.
- In the Prior periods field, select the desired prior period treatment to use for transactions created from this template.
Note: If you set up multiple transaction templates with an Automatic frequency, you can click the Prioritize Automatic Transaction Templates link from any saved template. This opens the Prioritize Automatic Transaction Templates dialog, where you can specify the order in which to calculate the transactions.
- Click the Calculation tab.
- In the Calculate from grid, select the account number or range of account numbers to include in the calculation. Note that the account selected in the To Account column must be greater than or equal to the account selected in the From Account column. In the Balance Calculation column for each account or range of accounts, select which amounts (year-to-date or single period) to use for the balance calculation.
- Choose the method for the application to use when applying the overall balance in the Calculate from grid. If you choose Debit, the application will use the overall balance as is. If you choose Credit, the application will change the sign of the overall balance.
- In the Distribute to grid, select the account, percentage, and balance effect (debit or credit) for each distribution. Note that the total percentage for all credit distributions must equal the total percentage for all debit distributions.
Click here for examples.
Example 1
The client's average cost of goods sold is 40% of sales, and the relevant range of sales accounts is 401 through 450. The application will debit account 510 (COGS) and create an offsetting credit to account 130 (inventory).

Example 2
The client pays $1,000 for maintenance each week to Gary Hansen Lawn Maintenance, and the initial debit would be expensed to Location 1 (account 1-663). Because only 40% is actually attributable to the first location, the automatic calculation should credit that location for 60% of the total, and distribute it among the accounts for the other locations (20% to 2-663, 20% to 3-663, 10% to 4-663, 5% to 5-663, and 5% to 6-663).

Example 3
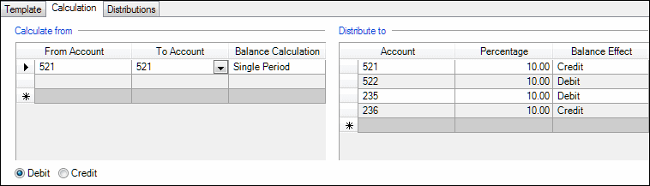
The application calculates the California SUI Base rate and ETT rate as separate rates but posts the lump sum amount to a single liability account and a single expense account. You can use an automatic journal entry to differentiate the SUI base amount from the ETT amount and post to separate liability and expense accounts for each.
The application posts a lump sum amount equal to 1.0% for the combined SUI Base rate (0.9%) plus ETT rate (0.1%). The liability posts to account 235, and the expense posts to account 521. Because the ETT rate is 10% of the total SUI rate, the automatic calculation should pull out 10% from the above accounts to transfer to account 236 (ETT Tax Payable) and account 522 (ETT Tax Expense).
- Click Enter to save the template.
Was this article helpful?
Thank you for the feedback!

|
|

|
Get the most out of your Thomson Reuters Tax & Accounting products. Our continued learning packages will teach you how to better use the tools you already own, while earning CPE credit. Learn more. |

|
|

|
Chat - Best option for simple questions Call us at +1 800 968 0600. You might like to see our hours and menu options before calling |