


We moved!
Help articles have been migrated to the new Help and Support. You can find help for your products and accounts, discover FAQs, explore training, and contact us!
Before you can view and import your client's transactions through the Bank Feeds Dashboard, the account holder must first grant your firm permission to access their sensitive financial data, accept the license agreement, and link their financial account (such as checking account, savings account, other bank account, or credit card account) to Accounting CS. This is a multi-step process that protects your firm by eliminating the liability of managing their passwords and keeping their login information secure.
See also: Video: Setting up and using Bank Feeds
Initiate account linking
These steps are to be completed by the firm staff or client staff (if security group permissions allow).
- Find out if your financial institution is available for integration with Accounting CS.
- Click the Link Account button in either of the following locations to open the Bank Feeds - Link Account dialog.
- In the Bank Feeds section of the Setup > Bank Accounts > Main tab. Verify that the correct client is selected in the upper-right corner of the screen, highlight the account to link, and then click Edit.
- In the Action column of the grid in the Bank Feeds Overview portlet. Click the button in the row with the correct client and bank account combination.
Notes
- If your firm uses Virtual Office CS or Software as a Service (SaaS) to access Accounting CS and other CS Professional Suite applications, or if your firm is licensed for NetFirm CS, you will need to use your CS Professional Suite account login (Thomson Reuters ID and password) to access the Bank Feeds feature. For details, see Using your CS Professional Suite login to access Accounting CS Bank Feeds.
- If the Link Account button is not available, ask your Accounting CS administrator to edit permissions for the security group(s) to which you are assigned (under Setup Menu > Bank Accounts > Main tab on the Accounting tab of the Setup > Firm Information > Security Groups screen or the Setup > Firm Information > Client Security Groups screen).
- In the Account Holder Email Address section, select the account holder's email address. The drop-down list includes email addresses for all contacts at the selected client’s offices (all locations). If the appropriate email address is not in the list, click the Add a contact link next to the drop-down list.
- In the Return Notification Email Address section, enter the email address for the staff member who should be notified when the account holder has finished linking their account. By default, the application enters the email address for the staff member who is logged in to Accounting CS, but you can change the email address if necessary.
- Click OK.
Linking an account
These steps are to be completed by the account holder.
After you complete the steps above, the application sends a registration email to the account holder. Instruct the account holder to follow the steps below.
Notes
- The link in the registration email for this account is valid for three days. If it expires, Accounting CS invalidates the link and you will need to send a new registration email.
- If you send more than one registration email for this account, only the link in the most recent email is valid. Each time you send a new email, Accounting CS invalidates the previous one.
- Open the registration email and click the Register Now button to begin the linking process in your internet browser.
- Read the Software License Agreement and click Agree. Show me.

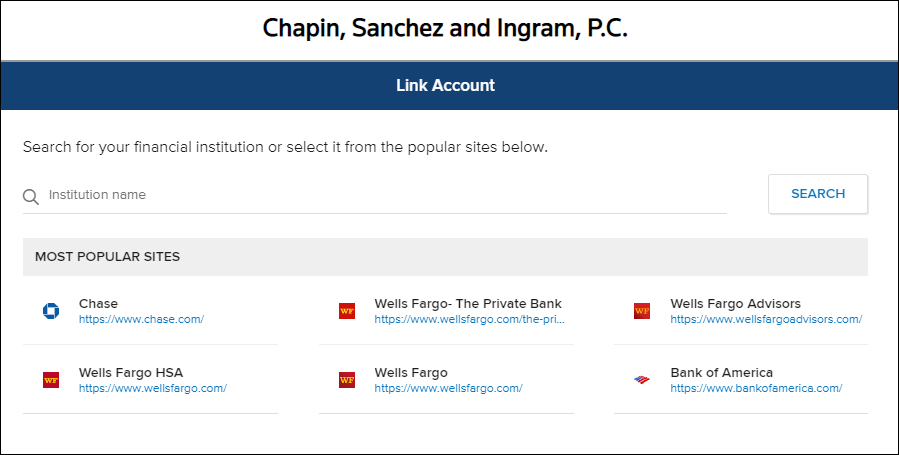
- In the Link Accounts page, search for your financial institution and then select the appropriate financial institution from the search results. Show me.
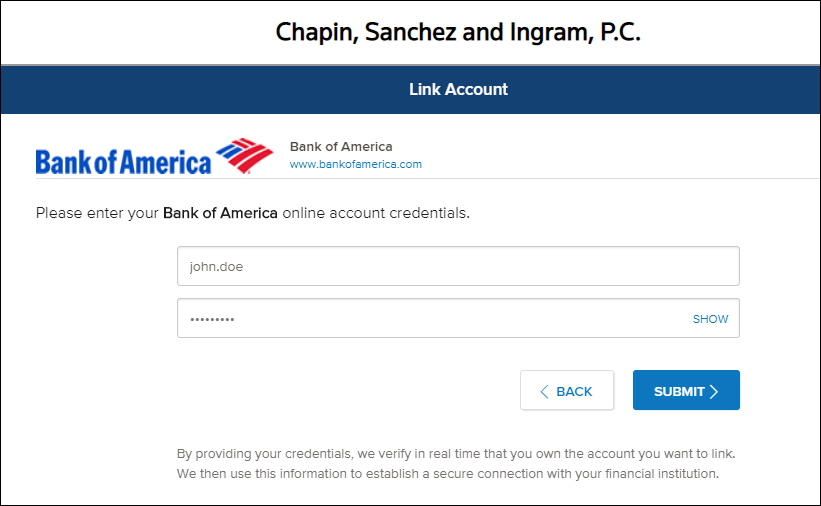
- In the login screen, enter the username and password you use to access this account, and then click Submit. Show me.
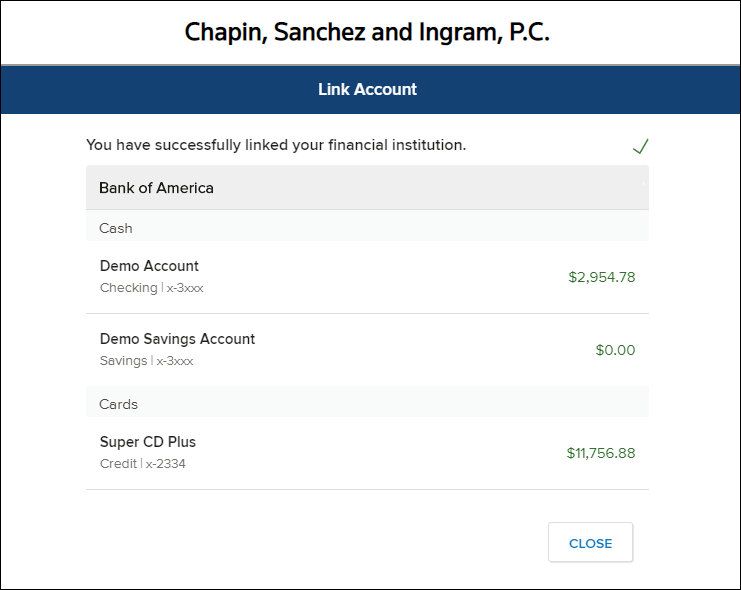
- The application displays the accounts associated with your login information. Review the accounts and verify that the account you want to link is listed, and then click Close. Show me.
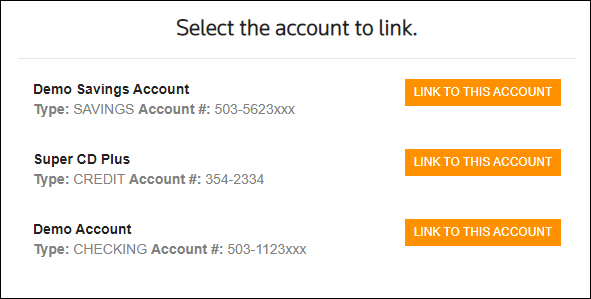
- In the next screen, if there are multiple accounts available, click the Link To This Account button for the financial account you want to link. Show me.
- After the application successfully links the account, close your browser window.
Start using Bank Feeds
After the account holder successfully links their financial account to Accounting CS, the application sends you an email message to let you know that the account has been linked and is ready for you to use Bank Feeds.
Use the Bank Feeds Dashboard to view your client's transactions.
Updating a linked account
If the account holder has already linked their account, but the information is outdated or needs to be updated for any reason (for example, the password or multi-factor authentication questions need to be updated), you can use the Bank Feeds - Update Account dialog to request that the account holder update their account information. This dialog opens automatically when you attempt to retrieve data in the Bank Feeds portlet and Accounting CS determines that the account information needs to be updated.
- In the Account Holder Email Address section, select the account holder’s email address.
- In the Return Notification Email Address section, enter the email address for the staff member who should be notified when the account holder has finished updating their account information.
- Click OK.
- The application sends an email to the account holder requesting that they update the account information. Instruct the account holder to open the update email and click the Update Now button to begin the update process in their internet browser. The staff member specified in step 2 will receive an email message when the account has been updated.
Unlinking an account
Use the following steps to unlink a client's financial account.
- Choose Setup > Bank Accounts and click the Main tab.
- In the Bank Feeds section, click the Unlink Account button. The Unlink Account button changes to the Link Account button.
You should use the Unlink Account button only if you no longer desire to use Bank Feeds for the corresponding financial account. If you are attempting to troubleshoot any type of transaction retrieval issues, please contact our Support team, and do not unlink the account unless you are instructed to do so.
Was this article helpful?
Thank you for the feedback!

|
|

|
Get the most out of your Thomson Reuters Tax & Accounting products. Our continued learning packages will teach you how to better use the tools you already own, while earning CPE credit. Learn more. |

|
|

|
Chat - Best option for simple questions Call us at +1 800 968 0600. You might like to see our hours and menu options before calling |