We moved!
Help articles have been migrated to the new Help and Support. You can find help for your products and accounts, discover FAQs, explore training, and contact us!
A firm administrator or staff member with the appropriate permissions can make firm-wide setup decisions in the Preferences tab of the Setup > Firm Information > Firm screen to specify preferences for security, data entry confirmation, event tracking, and more.
- Mark the Enable firm security checkbox to require a password to open the firm database and enable the staff administrator to specify security privileges for staff and groups in selected areas of the application. Note that without firm security enabled, firm staff can access all areas of the application without using a password. See the Security overview topic for details.
Note: You must enable firm security to use the Workpapers service for any client or to enable Accounting CS Client Access for any client.After you enable firm security, you must exit the application and reopen it to enable access to all the security screens.
- To display the Remember login information checkbox in the login screen, mark this checkbox to enable staff to log in from their own computers without re-entering their user ID and password each time they open the application. To force the login screen reappear for staff, clear this checkbox or choose File > Reset Remember Login.
Data entry confirmation
- In the Data Entry Confirmation section, click the
 button to open the Data Entry Confirmation dialog.
 - Mark the checkboxes next to the data entry fields to prompt for data re-entry in the confirmation dialog for those fields, and click OK. (For details, see the Data Entry Confirmation Entries dialog topic).
Employee requirements
- Mark the Require Hire data checkbox to enable warnings in the application that display next to the Hire date field in the Personal tab of the Employee screen that require you to enter a hire date prior to saving the employee record.
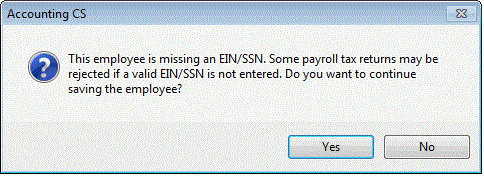
- Mark the Prompt when EIN/SSN is blank or "Applied For" checkbox to display the following warning prior to saving the employee record in the Employee screen.
This employee is missing an EIN/SSN. Some payroll tax returns may be rejected if a valid EIN/SSN is not entered. Do you want to continue saving the employee?
Show me.
Event tracking
Mark the Disable event tracking checkbox if you do not want to view and print a log of monitored events in the application.
Transaction entry
Select Bank Account or Journal as the default data-entry method to use when entering data in the Actions > Enter Transactions screen.
Note: Choose Edit > Options from the Enter Transactions screen to select a different data-entry method on a client-by-client basis. (The selection that is chosen becomes the default method for that client.)
Data sharing options
- Mark the Disable datasharing checkbox to hide the Sync Data sharing
 toolbar button and disable data sharing.
 - Mark the Disable synchronizing pending data-sharing updates upon opening the application checkbox to discontinue automatic data-sharing updates when you launch the application.
Payroll tax liabilities
Mark the Adjust due date for non-banking days to use previous banking day checkbox if the due date for payroll tax liabilities falls on a weekend or holiday.
Note: There is an option in the Deposit Schedules dialog (available from the Main tab of the Tax Agents screen) to adjust the due date to the next banking day. But if an agency does not adjust the due date of the liability, the firm-level option on the Firm > Preferences tab moves the due dates earlier to ensure that payments are made on time.
Payroll tax forms
Select options that best suit how you want to handle payroll tax forms in the application.
Practice CS options
Mark the Automatically export finalized invoices checkbox to export all invoices for which the Create fee as final checkbox is marked for the fees on the invoices or in the Billing tab of the Setup > Clients screen. For details, see Exporting invoices to Practice CS.
FileCabinet CS options
Select options to organize FileCabinet CS documents by category, display documents and folders in the same order as they appear in the Engagement Binder Tree View portlet, disable "NON-NEGOTIABLE" watermarks on checks, and choose how to group forms in FileCabinet CS (for example, by Form, Jurisdiction, or Period End Date).
Workpapers options
Click the  button to open the Source Document sort options dialog and change the default order in which source documents are organized in the engagement binder. You can also specify which folder documents are organized when they are retrieved from Source Document Processing.
Mark the Open PDF workpapers in a native PDF application (for example, Adobe Reader or Adobe Acrobat) rather than the application's own PDF editor.
Was this article helpful?
Thank you for the feedback!


