


We moved!
Help articles have been migrated to the new Help and Support. You can find help for your products and accounts, discover FAQs, explore training, and contact us!
With Employee Self-Service, you can upload W-4 information, check stubs, W-2 forms, 1095-C forms, and (for independent contractors) 1099-NEC forms to an employee portal. The client's employees can then log in to view, edit, and print their information. This topic explains the process flow for setting up Employee Self-Service for a client's employees.
Note: If your firm is interested in providing this feature for a client's employees, please note that additional charges and licensing would apply.
Customer service article - Internal: Employee Self-Service
Employee information that is uploaded and downloaded via the employee portal
Notes
- If there is a date in the Inactive date field in the Main tab of a client record, the application will not send W-2 information to that client's employee portals.
- The application uploads only payroll checks that were entered after the employee's Employee Self-Service portal was enabled. If the check stubs include a year-to-date section, that section will include all payroll history, even if the checks are not on the portal.
Employee information that is uploaded to the employee portal
The following employee information is uploaded from Accounting CS to the employee portal.
- New or updated employee W-4 information. This includes login information used for portal creation and for disabling Employee Self-Service for an employee.
- Changes to the status of uploaded employee checks (void or delete).
- New handwritten payroll checks
Notes
- Existing handwritten payroll checks and historical checks are not uploaded to the portal.
- If a handwritten check has been uploaded to the client's portal but was generated as an historical check, the application will remove that check from the portal.
This information is uploaded and immediately available when any of the following occur:
- Client payroll schedules (timesheets) are uploaded to NetClient CS for remote payroll entry. (Payroll schedules for multiple clients can be uploaded at the same time.)
- Payroll checks are printed for at least one client .
- W-2 forms are printed for at least one client .
- 1095-C forms are printed for at least one client .
- An employee's W-4 information is changed and the employee record is saved.
- This includes the employee name, EIN/SSN, address, and W-4 information on the Payroll Taxes tab of the employee.
Employee information that is downloaded from the employee portal
New or updated W-4 information entered by the employee in the employee portal is downloaded to Accounting CS when either of the following occur:
- The Setup > Employees screen is opened.
- The client's payroll schedule is selected in the Actions > Enter Batch Payroll Checks screen and the Actions > Enter Batch Handwritten Payroll Checks screen.
Notes
- In all of the situations above, information is uploaded for all of the client's employees, whether or not all employees are included in the selected action. For example, if a new employee is added but that employee is not included in the check run, the employee's information is still uploaded during the check printing process.
- If the client changes the address information in the application, the application verifies that the address information is valid. (For example, the application will verify that the city exists in the selected state, that the zip code is valid for the city, and so forth.) If the application finds that any of the information is not valid, it will revert the address to the previous valid address, and you will be prompted to correct the address information in the employee record.
Enabling Employee Self-Service for a client
Set up the client
- Choose Setup > Clients and then click the Payroll Information tab.
- Select the client and click the Edit button.
- In the Employee Data Integration section, mark the $ Employee Self-Service checkbox. When this checkbox is marked, the client has access to all Employee Self-Service functionality, and Employee Self-Service is automatically enabled for all of the client's employees. If necessary, however, you can disable Employee Self-Service for individual employees.
Note: Your firm must be licensed for Accounting CS (including payroll and payroll compliance for clients who will be doing time entry) and NetFirm to use Employee Self-Service. If this checkbox is grayed out and unavailable, verify that you have downloaded and applied your Accounting CS license after you paid the Employee Self-Service fees.
- Click the Enter button to save the updated client setting.
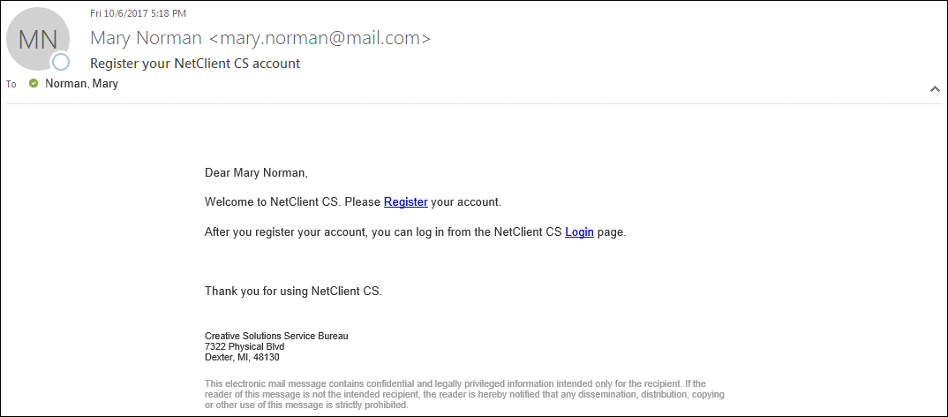
After you click Enter, an email is sent to all employees for the client asking them to register their Employee Self-Service portal. The email is sent from register@netclientcs.com and may end up in the spam folder.
Add employees to Employee Self-Service
- Choose Setup > Employees to add information for the client's employees.
In the Main tab of the Employees screen, be sure to enter a valid email address for each applicable employee.
- If this is the first time Employee Self-Service has been enabled for this client, a registration email will automatically be sent to all employees with a valid email address specified in the Main tab of the Setup > Employees screen. Show screen.
The email provides a link that directs the employee to the NetClient CS account registration page, where the employee can create a login and specify a password to access their account.
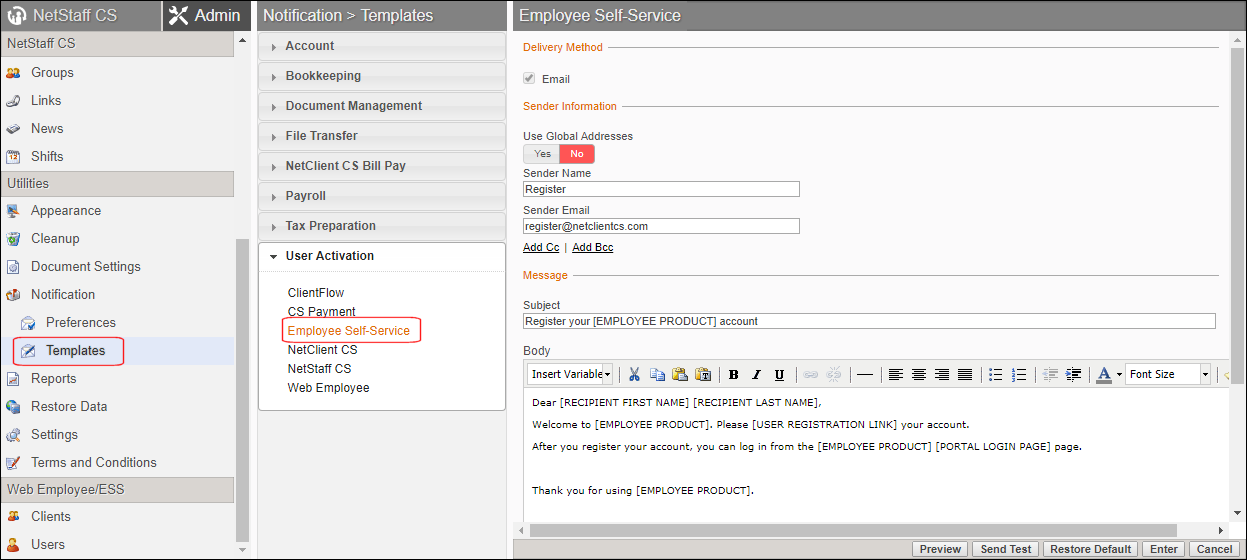
To specify the format and content of the registration email, follow the instructions for modifying templates for notifications that are sent by NetFirm CS and select the User Activation > Employee Self-Service template. Show screen.
Note: If an employee does not have an email address or if you do not know an employee's email address, you can enter your firm's email address or the client's email address for that employee; when the registration email arrives, you or the client can activate the account on behalf of the employee.
Enabling Employee Time Entry for a client
If your client's employees will enter their own time, you can enable Employee Time Entry for the client.
- In the Payroll Information tab of the client record, the Employee Self-Service checkbox should be marked.
- Click the Ellipsis button next to the field in the Payroll Schedules section.
- In the Payroll Schedules dialog, select the schedule that applies to the employees who will enter their time, and click the Edit button.
- In the Time Entry Method section, click the Import option and select Remote payroll entry in the Source field.
- Mark the Enable Employee Time Entry checkbox, and change any other payroll schedule settings, as needed.
- Click Enter to close the dialog, and then save the client record. The client's employee portals will now include a My Time application.
Notes
- Be sure that the employee record includes a valid email address.
- After the client sends timesheets to the employees through Remote Payroll, the employees can enter their own time (see Employee Self-Service time entry).
- Remote Payroll should be enabled for only the person who approves employee timesheets.
For more information about remote payroll, see Remote payroll setup and overview
Sending Form W-2 to the employee portal
To have the application send an electronic copy of the W-2 form to the Employee Self-Service portal when you print your payroll tax forms (to avoid processing the W-2 forms a second time), mark the Send to Employee Self-Service checkbox in the Print Options dialog for Form W-2. The electronic copy of the W-2 form will be sent to the Employee Self-Service portal for all employees. This checkbox affects only the forms currently being printed. For more information see Sending W-2s to Employee Self-Service portals.
Note: If there is a date in the Inactive date field in the Main tab of a client record, the application will not send W-2 information to that client's employee portals.
Sending Form 1099-MISC or 1099-NEC to the employee portal (for independent contractors)
You can have the application send an electronic copy of the 1099-MISC and/or 1099-NEC form to the Employee Self-Service portal of independent contractor employees when you print your payroll tax forms (to avoid processing the 1099 forms a second time).
You can send Form 1099-MISC for tax years 2019 and earlier, and 1099-NEC for tax years 2020 and later.
- Choose Actions > Edit Payroll Tax Forms.
- Select 1099 as the form type, 1099-NEC or 1099-MISC as the 1099 type, and the applicable year. Click the Refresh button.
- By default for the selected client: Mark the Send 1099-NEC to Employee Self-Service checkbox in the Independent Contractors section of the 1099 Additional Information dialog. The application sends an electronic copy of the 1099-NEC form to the Employee Self-Service portal for all independent contractor employees every time you print 1099 forms, unless you have only Copy A selected during processing.
- At print time: Choose File > Process Client Forms and then mark the Send to Employee Self-Service (Independent contractors only) checkbox in the Print Options dialog for Form 1099. The application sends an electronic copy of the 1099-NEC form to the Employee Self-Service portal for all independent contractor employees. This checkbox affects only the forms currently being printed, regardless of what is selected in the 1099 Additional Information dialog of the Setup > Clients screen.
Sending Form 1095-C to the employee portal
To have the application send an electronic copy of Form 1095-C to the Employee Self-Service portal when you print your payroll tax forms, select Employee Self-Service from the drop-down list in the Employee copy field in the Print Options dialog for Form 1095-C. The electronic copy of the Form 1095-C will be sent to the Employee Self-Service portal for all employees.
If you select Paper in the Employee copy field, you can mark the Send to Employee Self-Service checkbox below that field to also send the employee copy of the form to the Employee Self-Service portal.
Activating employee portals
This procedure is to be performed by the client's employees.
After the employee receives the registration email, they can activate their Employee Self-Service account as follows.
- Open the registration email and then click the Register link in the message. Show me.
- In the NetClient CS page, enter a unique ID and password to use as your Employee Self-Service login. (The password must be between 7 and 50 characters, and at least one character must be a number.) Show screen.

- Click OK. NetClient CS verifies the employee's credentials and completes the activation.
- The NetClient CS login page opens. The employee can access their Employee Self-Service portal by entering their login and password information and then clicking the Login button. Show screen.
Notes
- If the employee already has a portal, you can link the portals together.
- If the employee has 10 unsuccessful login attempts, the application locks their account for 30 minutes, after which the employee can try again. If the employee needs to access their account before the 30-minute lock-out period ends, you can ask a Web Services Support representative to unlock the account for your client's employee.
- If the employee forgets their password, they can click the Forgot password link on the login screen, enter their login and email address, and choose the reset method (via email or via security questions).
- If the employee cannot remember their login information, they can contact their accountant. The appropriate staff member in your firm can log in to NetStaff CS and view the employee's login information by clicking the Users link under the Web Employee/ESS heading on the Admin tab.
Viewing or editing an employee's W-4 information
This procedure will be performed by the client's employees.
Once the employee activates their Employee Self-Service account, they can log in anytime to view or modify their W-4 information.
The employee can view the following information.
- Type (Standard, Agricultural, Household, Independent Contractor)
- Resident address (street address, city, ZIP code, county, country, etc.)
- EIN / SSN
The employee can modify the following information.
- Name (first, last, middle initial, suffix)
- Email address
- Federal W-4 information (filing status, amounts claimed for dependents, other income, and deductions, nonresident alien status, federal tax-exempt status, etc.)
- State W-4 information for each applicable state (filing status, number of allowances, additional or fixed amount or percentage, etc.)
The employee can follow these steps to edit their W-4 information.
- Log in to the Employee Self-Service account through https://secure.netlinksolution.com/nextgen.
- Click the My W4 Information portlet to view and edit W-4 information.
- Make any necessary changes, and then click the Enter button.
Note: The fields reflect those on the 2020 Form W-4. All employees hired as of January 1, 2020, must fill out the new version of the Form W-4. Any changes to W-4 information for existing employees must be done on the new version of Form W-4.
- When you open the Enter Batch Payroll Checks screen or the Enter Payroll Checks screen, you will be prompted to accept or reject the changes the employee made in their portal.
Viewing an employee's check stub information
This procedure will be performed by the client's employees.
The application automatically uploads a PDF of the check stub to the employee portal when the employee's paycheck is printed or when a handwritten paycheck is entered and saved. (The PDF image for uploaded checks will not include the actual check region.)
If you void or delete an employee's paycheck that has already been uploaded to the employee's portal, the application automatically queues the check deletion to be uploaded to the employee's portal.
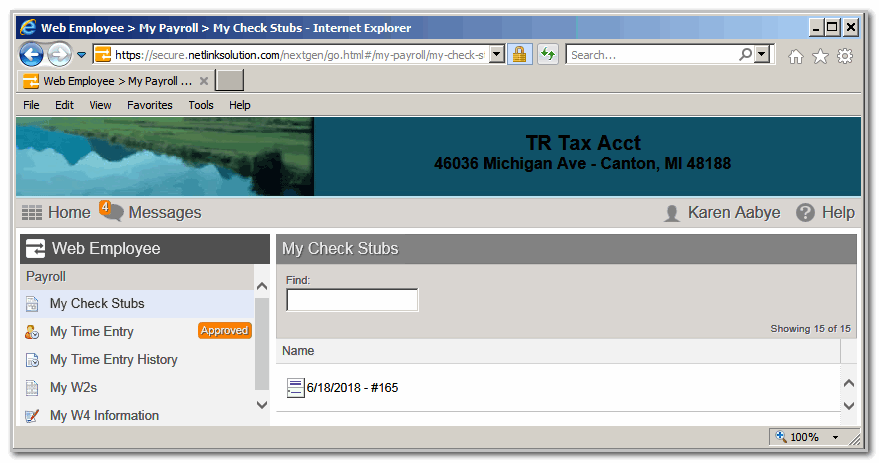
Once the employee activates their Employee Self-Service account, they can log in anytime to view or print their paycheck stub information.
- Log in to the Employee Self-Service account through https://secure.netlinksolution.com/nextgen.
- Click the My Check Stubs portlet to view a list of uploaded paychecks.
- Select the paycheck to view or print.
Viewing an employee's W-2 form
This procedure will be performed by the client's employees.
To view an employee's W-2 form, see Viewing W-2s.
Notes
- Corrected W-2 forms (Forms W-2c) are not uploaded to the employee portal.
- If there is a date in the Inactive date field in the Main tab of a client record, the application will not send W-2 information to that client's employee portals.
Viewing an employee's (independent contractor's) 1099-NEC form
This procedure will be performed by the client's employees.
To view an independent contractor's 1099-NEC form, see Viewing Forms 1099-NEC.
Viewing an employee's 1095-C form
This procedure will be performed by the client's employees.
To view an employee's 1095-C form, see Viewing 1095-C forms.
Changing an employee's login information
This procedure will be performed by the client's employees.
You can change your login ID, email address, and password at any time.
- Log in to your Employee Self-Service account through https://secure.netlinksolution.com/nextgen.
- Click your name in the upper-right corner of the screen, and then choose the appropriate command.
- To update your login ID, name, or email address, choose Edit Account.
- To update your password, choose Update Password.
Resending a registration email message to an employee
When Employee Self-Service is enabled for an employee, a registration email message is automatically sent to that employee. To resend a registration email message to a specific employee, follow the steps below.
- Choose Setup > Employees, select the employee to whom you want to send the email message, and click the Edit button.
- In the Main tab of the Employees screen, verify that a valid email address is specified in the Email field.
- Click the Personal tab. In the Web Access section, click the Send Registration Email button. The email will be sent when Employee Self-Service information is uploaded.
Note: After an employee has been registered for Employee Self-Service, the Send Registration Email button is grayed out and unavailable for that employee.
Disabling Employee Self-Service for a client
If you disable Employee Self-Service for a client, that feature is automatically disabled for all of the client's employees.
- Choose Setup > Clients, select the client, click the Edit button.
- In the Employee Data Integration section of the Payroll Information tab, clear the $ Employee Self-Service checkbox.
- Click the Enter button to save the change for the selected client.
- The application displays a message prompt warning you that all existing employee portals for the client will be disabled. To continue, click the Yes button.
Note: When you disable Employee Self-Service for a client in Accounting CS, NetFirm CS preserves all W-2 and check stub history in the employee portals. As a result, you will continue to be billed for the W-2 and Check Stub modules in NetFirm CS. To learn how to disable these modules, see Deleting clients from Web Employee in the NetFirm CS administration help.
Disabling the Employee Self-Service features for an individual employee
When you enable Employee Self-Service for a client, that feature is automatically enabled for all of the client's employees. To disable Employee Self-Service for a specific employee, follow the steps below.
- Choose Setup > Employees and then click the Personal tab.
- Select the employee for whom you want to disable Employee Self-Service, and click the Edit button.
- In the Web Access section, mark the Employee Self-Service disabled checkbox.
- Click the Enter button to save the change for that employee.
- The application displays a message prompt warning you that the employee portal will be disabled. To continue, click the Yes button.
Note: When you disable Employee Self-Service for an employee, the application does not delete the employee's portal. The portal remains, but the employee cannot access it.
Was this article helpful?
Thank you for the feedback!

|
NetClient CS mobile app (in the NetFirm CS administration help) |

|
Get the most out of your Thomson Reuters Tax & Accounting products. Our continued learning packages will teach you how to better use the tools you already own, while earning CPE credit. Learn more. |

|
|

|
Chat - Best option for simple questions Call us at +1 800 968 0600. You might like to see our hours and menu options before calling |