There are a number of steps to take to ensure a smooth conversion of client data from CSA to Accounting CS. When you are ready to convert your data, we recommend that you first convert one or two of your smaller, less complicated clients to familiarize yourself with the conversion process and with the Accounting CS application.
If you are properly prepared, converting data from CSA to Accounting CS can be a seamless process. There are a number of steps you should take prior to converting client data to help ensure successful data conversion.
In CSA, choose File > Open Client and open the client you are preparing to convert.
- Verify the data paths in CSA for client and system data.
- Choose Utilities > Accounting CS Conversion Report and then mark the System Information checkbox.
- Select the client you are converting, and then click Preview.
The Accounting CS Conversion Report can only be previewed for a client that has the Payroll or Payroll Compliance module
- Make a note of client data path listed at the top of the report.
- Make a note of the data path of the system files (where the csa.sys file resides). This is typically located in the X:\WINCSI\CSASys folder (where X represents the drive where the application has been installed).
For Virtual Office and SaaS users: The CSA client data is typically located at Y:\CSAData and the CSA system files are typically located at Y:\CSASys
- Verify that each CSA client is in the latest processing period for payroll.
Choose File > Client Properties and verify that the latest processing period is selected in the Payroll tab. For a smooth conversion, we recommend that you convert client data at year- or quarter-end.
Notes
- If the client's current period-end dates are before the latest period-end dates, you can choose File > Select Period to Process to advance the client to the latest period.
- Only the current year of payroll data will be converted.
- Verify that each CSA client has a valid address. Choose File > Client Properties and verify the address is valid.
- Verify the account numbers.
- Finalize any open bank reconciliations.
After you complete a reconciliation in CSA, print out a Bank Reconciliation Worksheet. This report lists statement summary, bank summary, and book summary information for the reconciliation of a selected checkbook. If there are any in-transit items in CSA, you will need to enter them in Accounting CS after the conversion as initial open items.
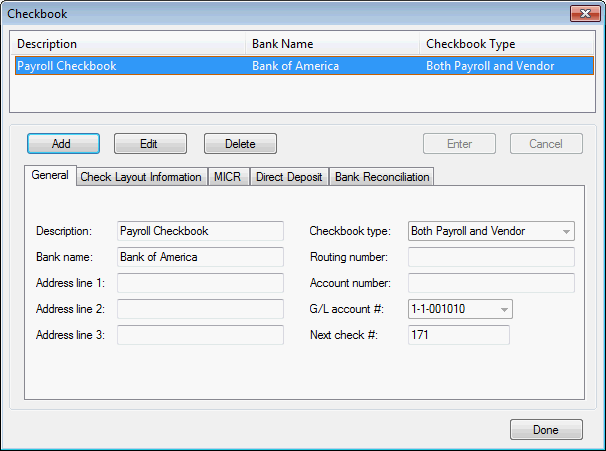
- Add checkbooks to represent any GL accounts that the client uses for checks and deposits.
Even if a client is set up with only the General Ledger module, at least one checkbook must be set up for the client in Tasks > Bank Reconciliation > Account setup screen in CSA. (Payroll Compliance or Live Payroll, go to Setup > Checkbooks). If a checkbook has not been set up for a client before the data is converted, the bank account balances in Accounting CS will be incorrect.
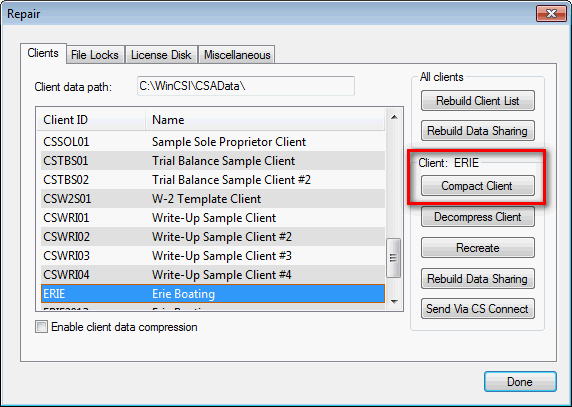
- Compact the client data.
- Choose Help > Repair.
- In the Clients tab, highlight the client to convert, and then click the Compact Client button.
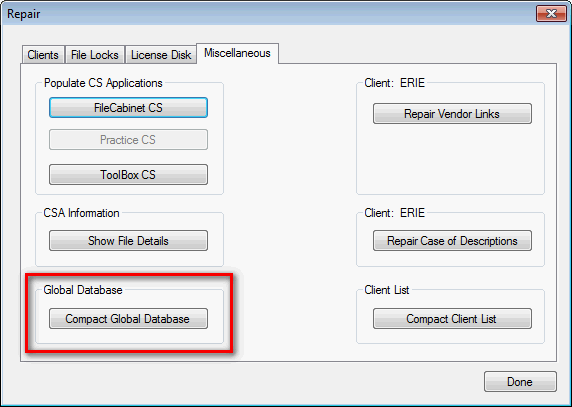
- Compact the global database if you're converting data for after-the-fact payroll or live-payroll clients.
- Be sure that all users are logged out of CSA.
- Choose Help > Repair.
- Click the Miscellaneous tab and then click the Compact Global Database button.
- Run a General Ledger report for the current year to verify that all transactions have been posted.
- Choose File > Print Reports.
- Select the General Ledger report.
- Click the Options button, select Current Year for the data range, and preview the report.
- Verify that the GL is in balance. If the report displays ** COA Balance** on the last page, this indicates that there are unposted transactions.
- To resolve out of balance issues, choose Tasks > Transaction Entry and press F5.
- If the ** COA balance** message still appears after running the report again, be sure to move the GL/PR period back and post the transactions.
Additional steps for clients with any CSA payroll module
- Repair the letter case of description text for payroll-related data (including checkbook names, payroll items, or departments).
- Choose Help > Repair.
- Click the Miscellaneous tab and then click the Repair Case of Descriptions button. The application changes the upper / lower case of text descriptions for checkbook names, payroll items, or departments for the active client to match the case of an equivalent description.
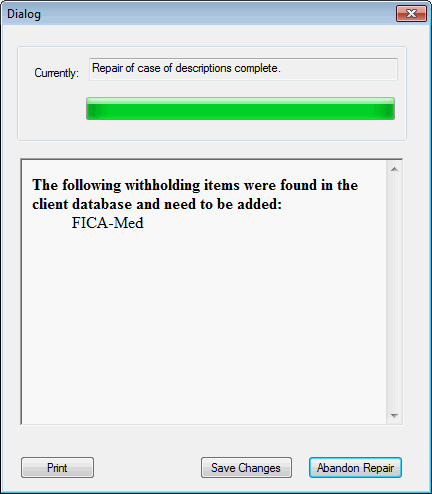
- The application displays a diagnostic message that lists any case discrepancies it detected and changed and also lists any global payroll items in the client database that are not in the global data. If the diagnostic lists any payroll items as missing from the global data, add them to the global database in CSA prior to converting.
Note: If the dialog displays a blank white screen, the repair didn't encounter any issues, and you do not have any items to address.
- Run the Accounting CS Conversion Report to identify issues that may occur during the conversion.
- Choose Utilities > Accounting CS Conversion Report.
- In the Account CS Conversion Report dialog, select the client to convert. (If you are converting data for more than one client, you can mark the Page Break Per Client checkbox to use page breaks to separate report information by client.)
- Click the Print button. If the message There is no data to view appears, see CSA: No Data to View Message when Previewing and/or Printing Reports.
- Verify that the state withholding ID and SUTA ID are in the proper format.
Choose File > Client Properties and click the Payroll tab to verify the IDs in the State tax information grid.
Example: The State of Michigan SUTA ID must be formatted as seven digits XXXXXXX or ten digits XXXXXXX-XXX. If the SUTA ID entered in CSA is formatted as XXXXXXXXXX, the application will not convert it. You must add the dash for it to convert properly.
For clients using Employee Self-Service: To ensure that employee records in Accounting CS link to the appropriate employee portals in Employee Self-Service, the client IDs in Accounting CS must match the client IDs in CSA. If necessary, change any client IDs in CSA, and then resend year-to-date Web Employee checks to the portal before converting the client data. After the conversion, do not re-enable Employee Self-Service for any converted clients until you have verified that all of the information converted properly and that you have corrected any issues. If you reconvert client data after enabling Employee Self-Service, the year-to-date information may not be available on the portals.
Note: Employees who work in an office/location other than the client’s main office need to be associated with the proper office for appropriate taxing. Be sure that, within Payroll CS, each employee has been set up for a payroll department that can be linked specifically to their work location. To create additional work locations and match a payroll department to that work location, refer to Converting CSA clients with employees in multiple work locations.
Additional steps for Engagement CS clients
- Restore archived engagements
- Clear the option to compress/secure engagement files.
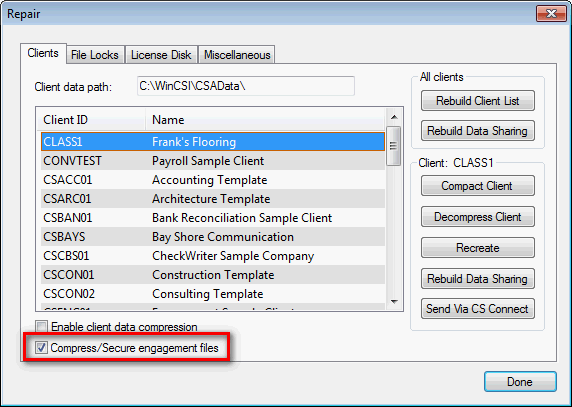
If the Compress/Secure engagement files checkbox is marked in the Help > Repair > Clients tab in CSA, clear the checkbox, and then open and close each client prior to converting.
- Create staff logins for all users that exist in CSA. You will need to map the staff during the conversion process. Please note that assignments to staff who are no longer set up in Engagement CS will convert as unassigned.
Conversion steps — taking client data through the conversion wizard screens
After you complete the pre-conversion steps, you are ready to convert your client data.
In Accounting CS, choose File > Import > CS Professional Suite Accounting Products Conversion.
Depending on the modules that are enabled for the client you are converting, you may not see all of the screens described below.
Note: The client you are converting must be closed in CSA before beginning these steps. Accounting CS will notify you if the client is currently open in CSA.
- Select the locations where your CSA system and client data files are stored.
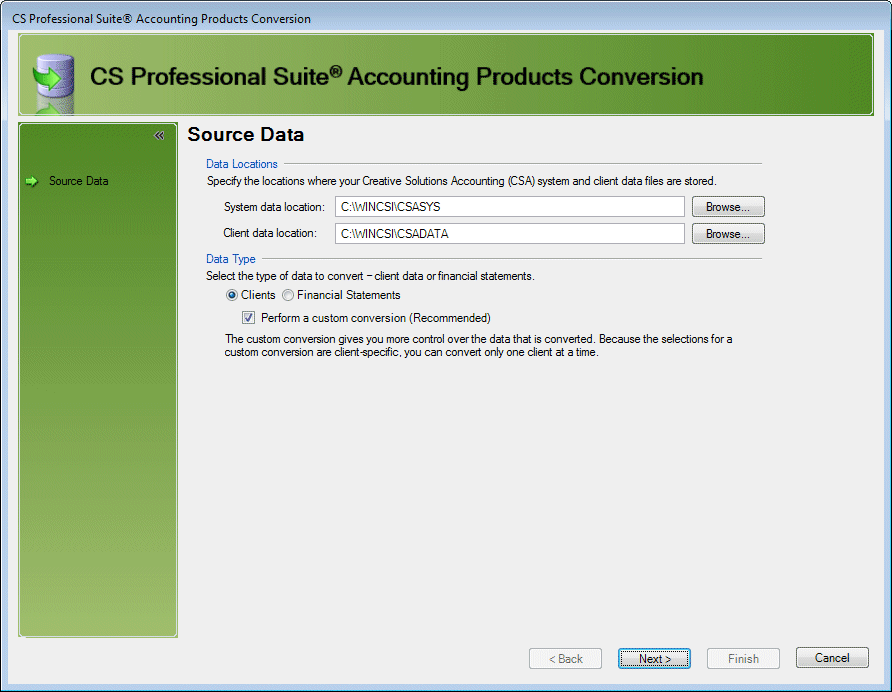
- Specify the locations of your CSA system and client data files.
- If you did not specify the CSA data locations in the Setup > File Locations dialog, click the Browse button to locate the CSASys (system data) and the CSAData (client data) folders within the WinCSI folder.
Note: To find the CSAData folder location, choose Setup > User Preferences and click the File Locations tab in CSA. In most cases, the CSASys file resides in the same location.
- In the Data Type section, choose the Clients option to convert client data.
Note: If you will be converting financial statements, you must convert them in a separate conversion after the client data has been converted.
- Mark the Perform a custom conversion (Recommended) checkbox to convert data for a single client and review all of the mapping screens. If you have many clients with only the General Ledger module enabled (without the Write-Up, Payroll, or Payroll Compliance modules), you can clear the checkbox to perform a batch conversion. Note that some of the data that is converted via a custom conversion will not be converted via the batch method.
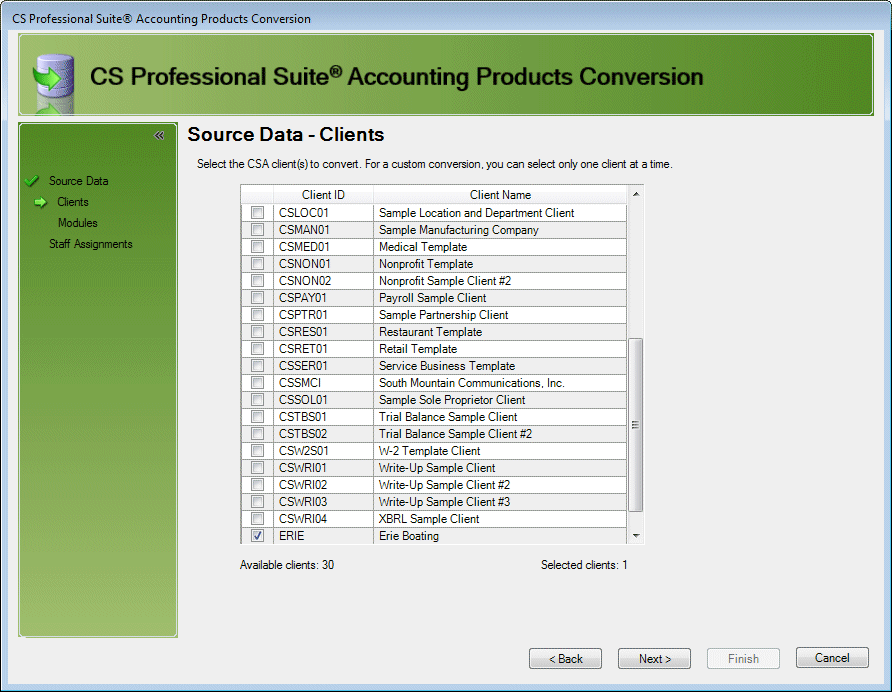
- Select the CSA client to convert.
Mark the checkbox next to the client to convert. If you do not see your client listed, click the Back button to go back to the Source Data screen and modify your data locations.
If you still do not see your client, click Cancel and exit the conversion. Choose Setup > Clients and verify that the client ID of the client you want to convert is not already being used in Accounting CS. If it is being used, highlight that client and then change the client ID or delete the client record.
Accounting CS automatically includes a client that is assigned a Firm ID of FIRM. This client includes some functionality that is not available to clients that you add to the database. Accounting CS does not allow you to convert client data into an existing Accounting CS client; therefore, you will not be able to convert your firm's CSA data into the FIRM client. You can, however, convert your firm's data into a new client. If you want to use the FIRM client for your firm's data, we recommend that you use the spreadsheet import feature to manually bring your firms's data into the FIRM client.
See also: Transitioning firm client data from CSA to Accounting CS
- Specify the types of data to convert for each CSA module.
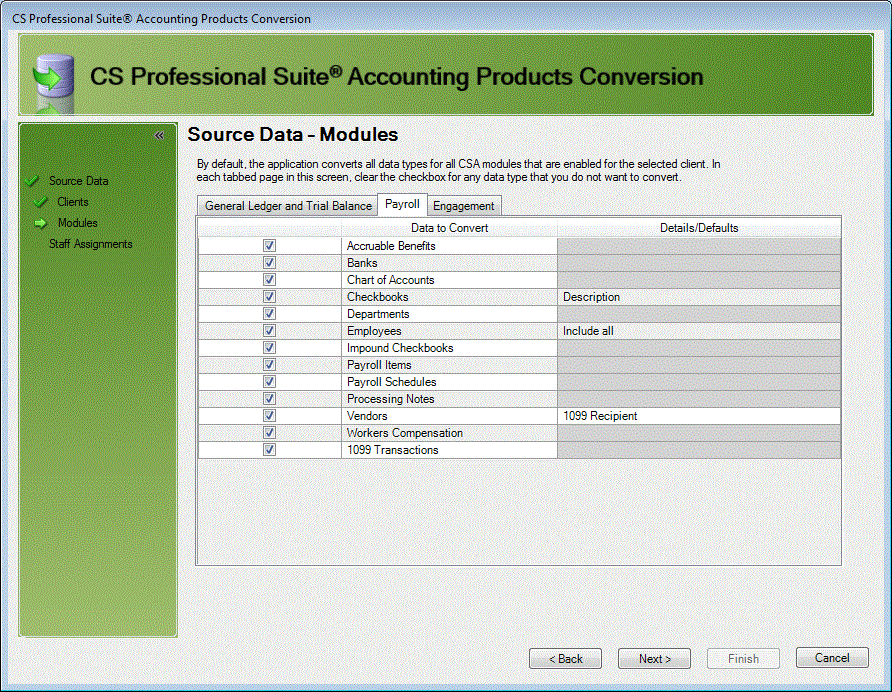
- This screen includes a tabbed page for each CSA module that is enabled for the client. By default, all items are marked to be converted. You can unmark the checkbox for any items that you do not want to convert.
- Earnings information is imported for the client's latest payroll year only.
- Some items, especially those on the Payroll tab, include options in the Details/Defaults column. For example, the Employees row has the option to include all employees or to exclude inactive employees with zero earnings.
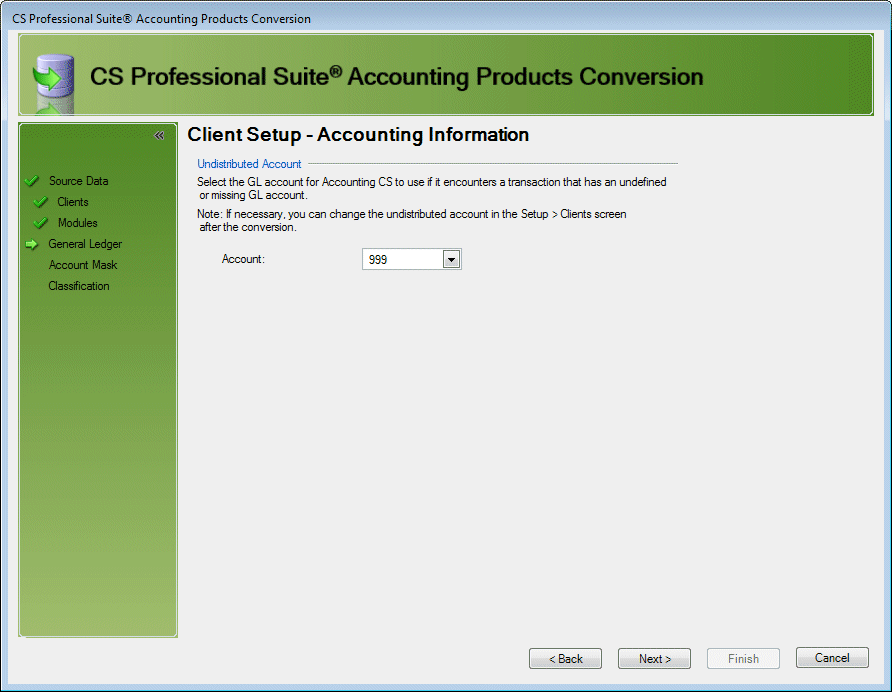
- Select the GL account to use for undefined or missing GL account numbers.
Select the account from the client's Chart of Accounts to use as the undistributed account. If left blank, the application automatically assigns account 999 (and creates it if the account does not already exist).
Note: If necessary, you can change this selection after the conversion in the Setup > Clients > Accounting Information tab.
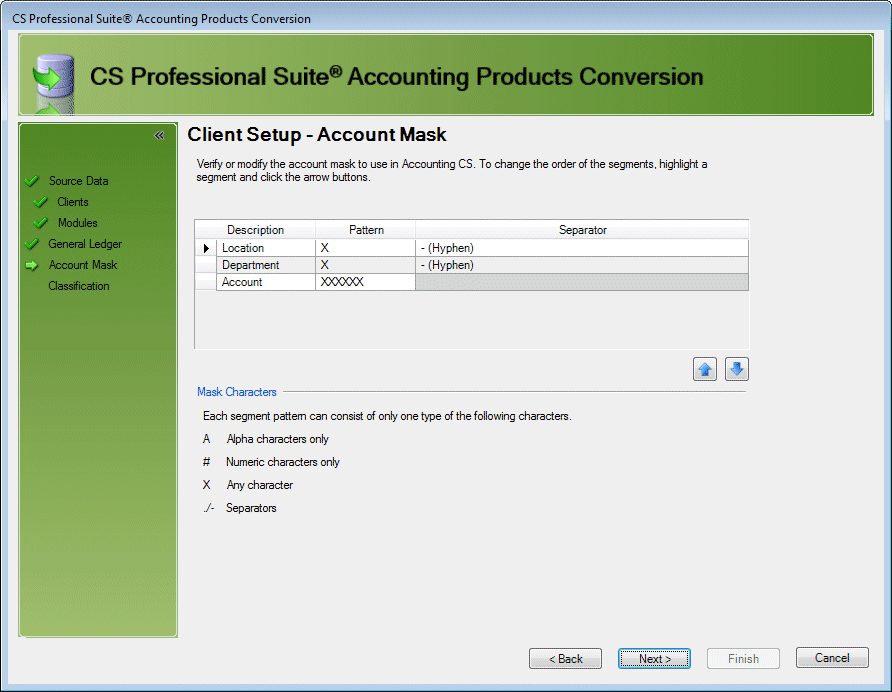
- Verify or modify the account mask to use for this client in Accounting CS.
If you use a segmented Chart of Accounts for the client in CSA, you can use this screen to change the order in which the segments are used. You can also add and change separators here, but you cannot change the length of the mask.
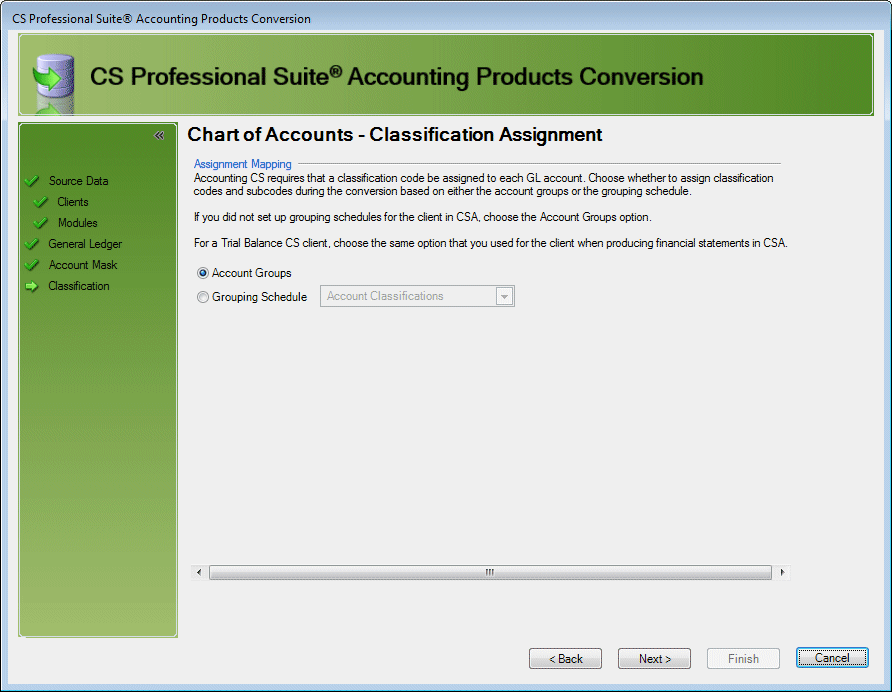
- Choose the method to use when assigning classification codes and subcodes — account groups or grouping schedule.
- Accounting CS uses the Chart of Accounts classification codes and subcodes to determine which accounts to include in the financial statements and to group similar accounts together to compare balances. Use this screen to choose the grouping schedule used for the client in CSA to map to the classification codes and subcodes.
- Generally, if you did not use Trial Balance CS you will want to choose the Account Groups option. If you did use Trial Balance CS, choose the Grouping Schedule option and then select the grouping schedule you used when creating the client's financial statements.
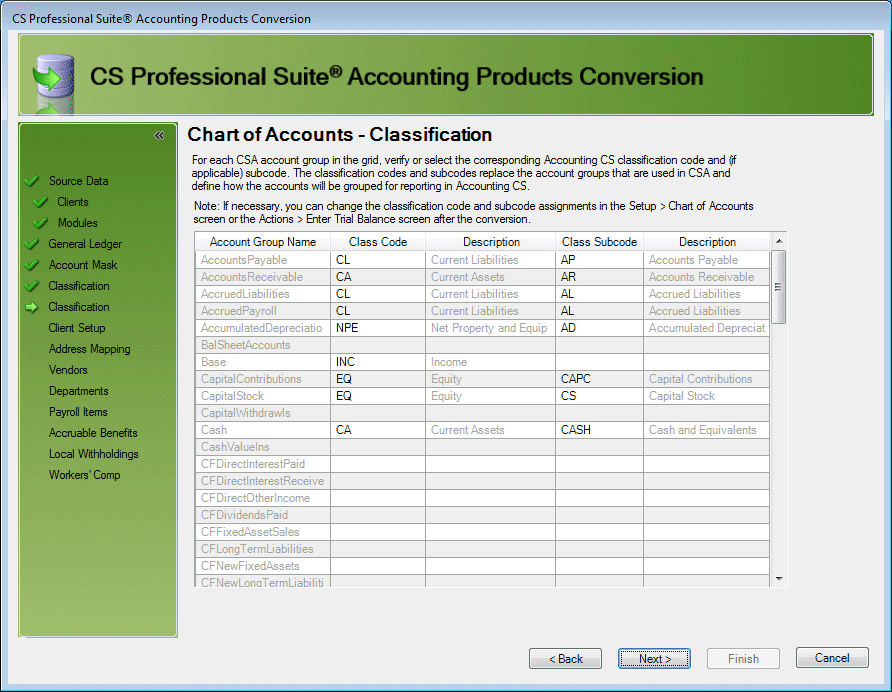
- For each CSA account group, verify or select the corresponding Accounting CS classification code and subcode.
- This screen opens if you chose the Account group option in the previous screen. Map the grouping used in CSA to the account classification in Accounting CS.
- You can assign classification codes and subcodes to accounts at any time after conversion in the Setup > Chart of Accounts or Actions > Enter Trial Balance screens. Because Accounting CS uses the classification codes and subcodes to determine which accounts to include in financial statements, we highly recommend that you address the classifications here.
- For each CSA grouping schedule code/subcode, verify or select the corresponding Accounting CS classification code and subcode.
- This screen opens if you chose the Grouping schedule option in the previous screen. Map the grouping schedule codes used in CSA to the corresponding account classification codes in Accounting CS.
- You can assign classification codes and subcodes to accounts at any time after conversion in the Setup > Chart of Accounts or Actions > Enter Trial Balance screens. Because Accounting CS uses the classification codes and subcodes to determine which accounts to include in financial statements, we highly recommend that you address the classifications here.
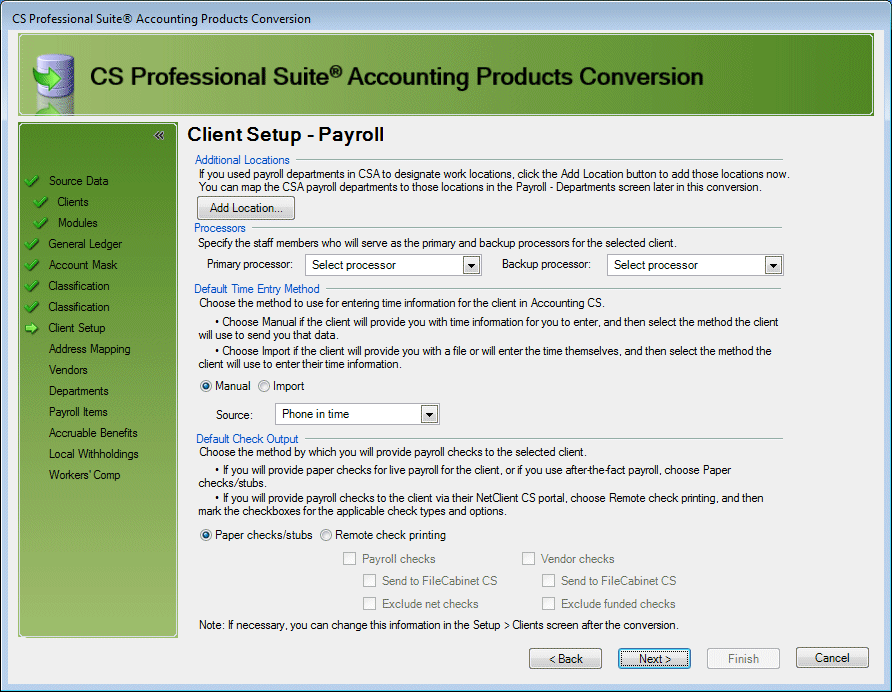
- Add work location information, assign primary and backup processors, and specify the time entry method and default check output.
Accounting CS uses the client's and employees' addresses to determine the applicable taxes. For this reason, there is a built-in address validation feature that can assess the accuracy of an address down to the street level.
- If the client has more than one work location, click the Add Location button to add those locations.
- If you set up staff members in the Setup > Firm Information > Staff screen, select the primary and secondary processors for this client. You can change this information in the Setup > Clients > Main tab at any time after conversion.
- Select the method in which the client's payroll time will be entered. If your firm will enter payroll time, choose the Manual option. If your client provides you with a spreadsheet or uses remote payroll or a supported timeclock application, choose Import.
Note: If you're using the remote payroll (NetClient CS) method or Employee Self-Service (called Web Employee in CSA), there are some post-conversion setup steps that you need to complete. See the Payroll CS to Accounting CS Payroll conversion guide for full details.
- Select the default check method by which you will provide payroll checks to the client - paper checks or remote printing.
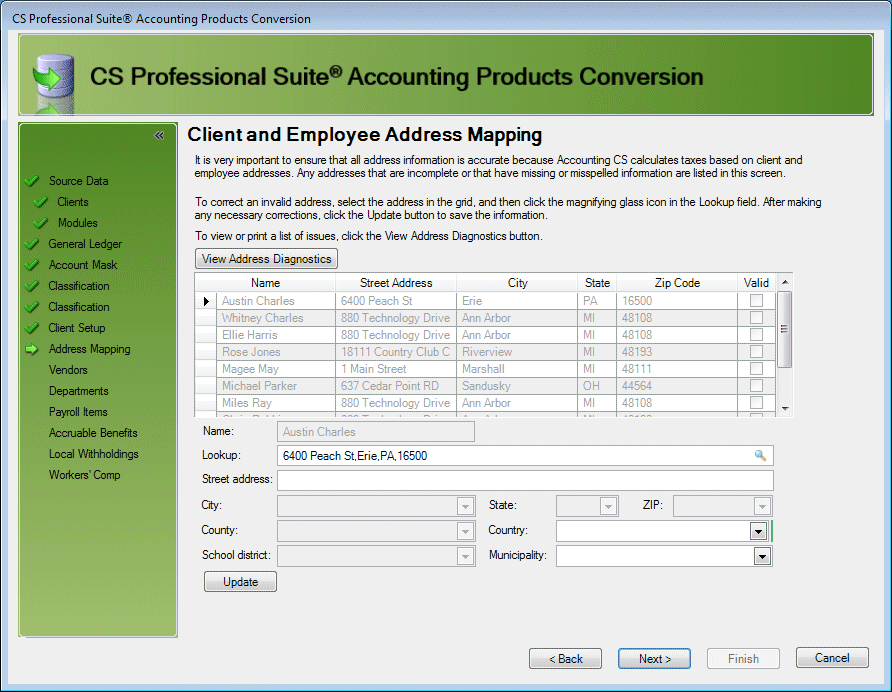
- Verify client employee address information. This step is very important to ensure that Accounting CS calculates taxes correctly.
Note: You may experience a delay between the previous screen and this screen. This is because the conversion wizard is using the built-in address validation feature to verify all of the addresses that were entered in CSA for this client. You may see a progress bar during the validation.
If the application encounters any client or employee addresses that could not be fully validated, it displays those addresses in the grid. If the grid is blank, all addresses were validated and you can proceed with the conversion process.
If any addresses could not be validated, use the following steps to correct them. If you skip these steps, the application will display a conversion diagnostic message at the end of the conversion process.
- In the Lookup field, enter the ZIP code or the city and state combination and press TAB on your keyboard.
- If the application displays pop-up dialog indicating that an address difference was found, choose the appropriate option for handling the addresses and click OK.
- Click the Update button to update the address in the grid. The application will automatically mark the checkbox in the Valid column.
- Repeat these steps until all rows are marked as valid.
It is critical that you do not skip the validation steps. Accounting CS uses addresses to determine the appropriate taxes to withhold on payroll checks. If an address is incorrect, earnings information may not convert correctly.
For Ohio and Pennsylvania only: If the address validates to the wrong school district or municipality, try the following steps.
- Enter only the city, state, or ZIP code portion of the address.
- Click the
 button or press the TAB key on your keyboard to initiate the search.
- Select the correct school district and/or municipality from the drop-down lists.
- Enter the rest of the address and then click the Update button.
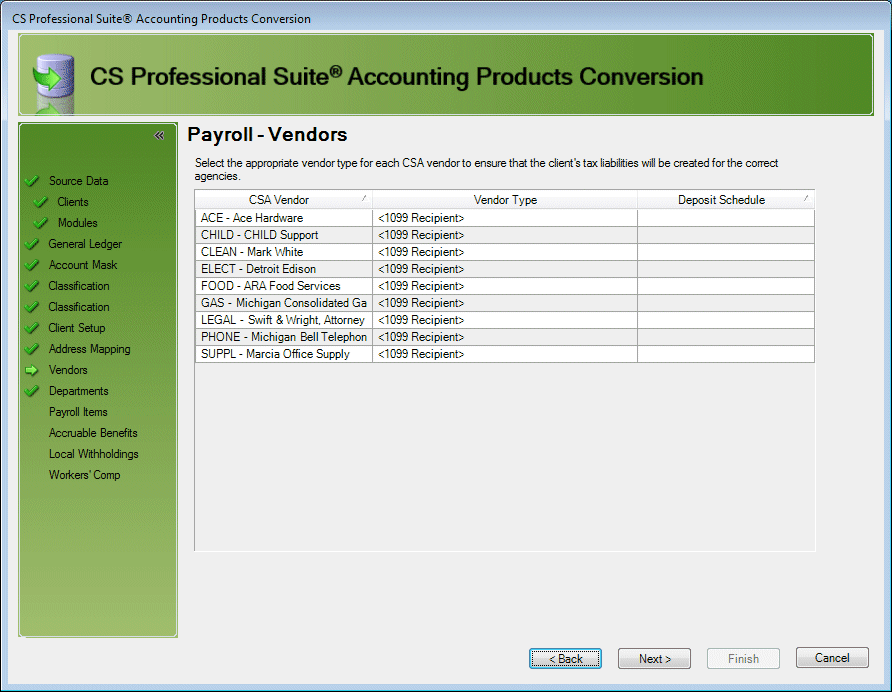
- Select the vendor type for each CSA vendor.
Review the list of vendors to be converted and modify the vendor type, if necessary. You can also select the Do not convert option for any vendor that you do not want to convert.
Note: You can change the vendor type in Setup > Vendors > Main tab at any time after the conversion.
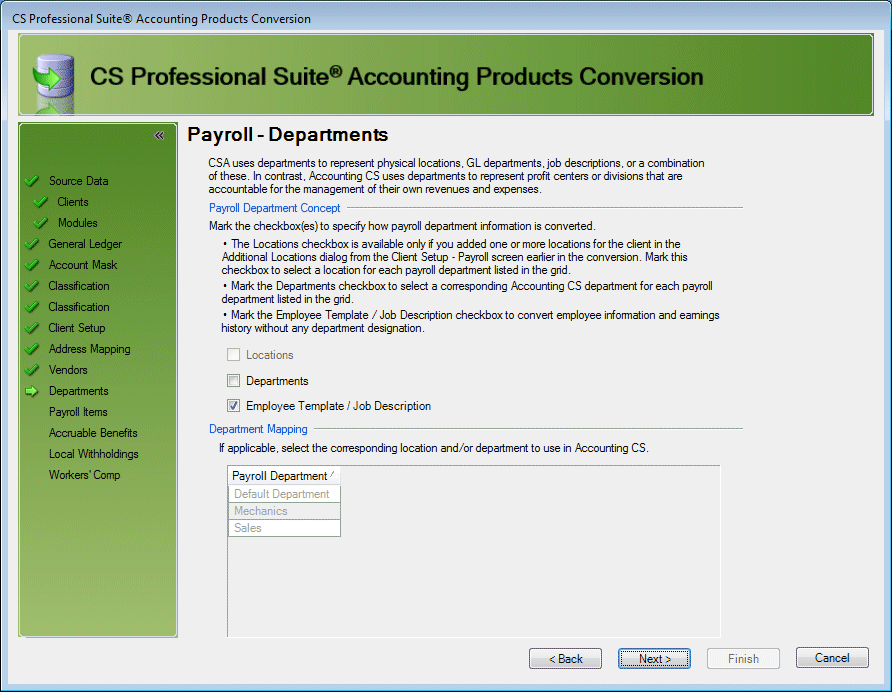
- Specify how payroll department information is converted — by department, location, or both — or choose not to convert department information.
Accounting CS uses payroll departments to help break down the numbers on payroll reports. The selection you make in this screen affects how the departments are created during the conversion process.
- Mark the Locations checkbox to map the CSA department description to a location that you set up in the Client Setup - Payroll screen earlier in the conversion.
- Mark the Departments checkbox to create identical departments in Accounting CS.
Note: You can also choose both Locations and Departments to combine the effect these options have.
- Mark the Employee Template/Job Description checkbox to skip the conversion of departments altogether.
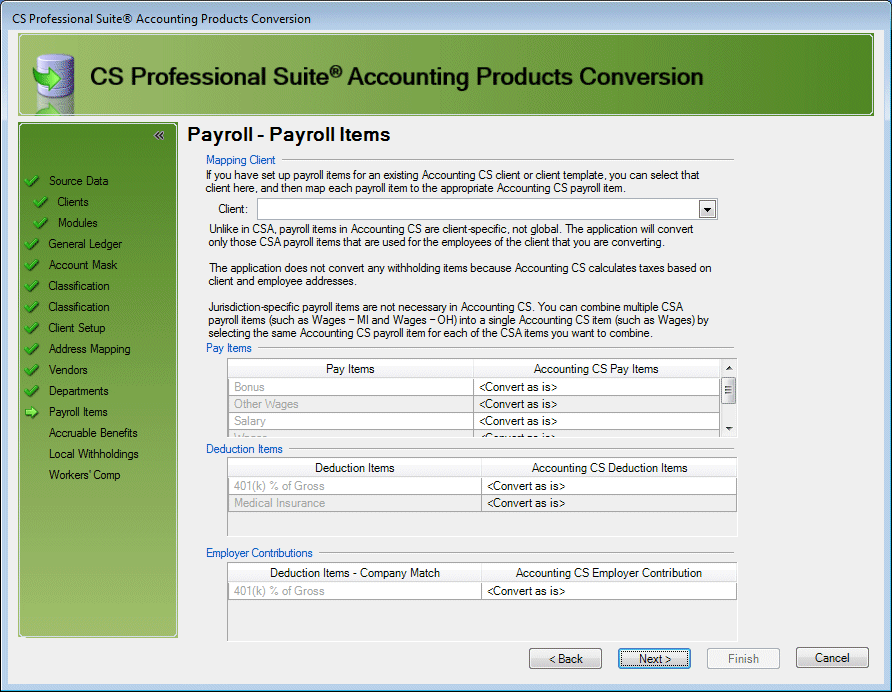
- Map CSA pay items to corresponding Accounting CS items.
If you have an existing Accounting CS client with payroll items that can serve as a standard for your other clients, you can map the existing payroll items from your CSA client to the items for that Accounting CS client. If you map multiple items to the same item in Accounting CS, the application will combine them into the new item in Accounting CS. Otherwise, you can select Convert as is to convert the payroll items as they are set up in CSA.
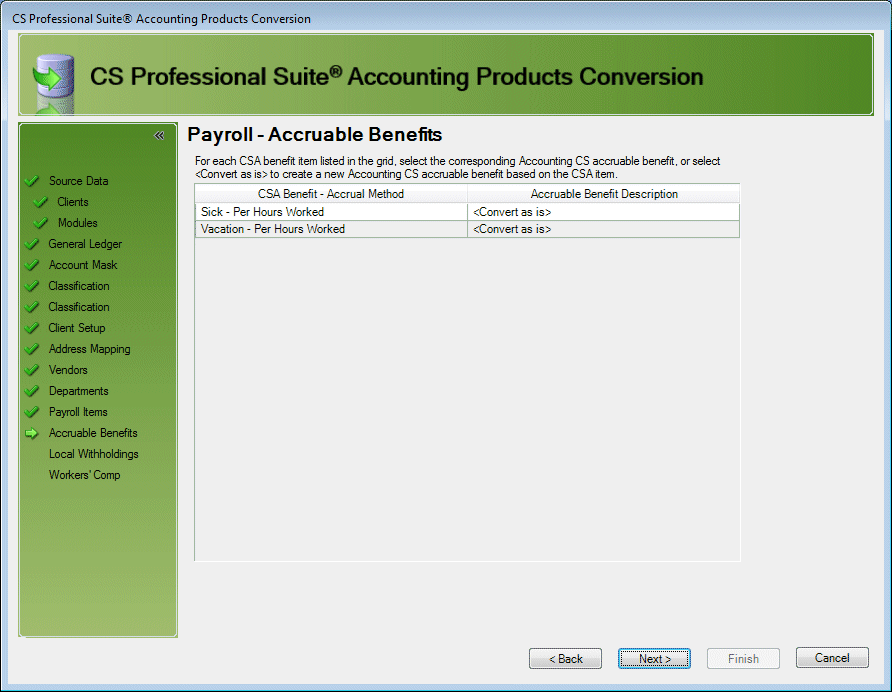
- Map CSA accruable benefit items to corresponding Accounting CS items.
If you selected a client to map the payroll items to in the previous screen, you can map the accruable benefit items to the items for the same client. If you did not select a client in the previous screen, you can convert the accruable benefit items as they are set up in CSA.
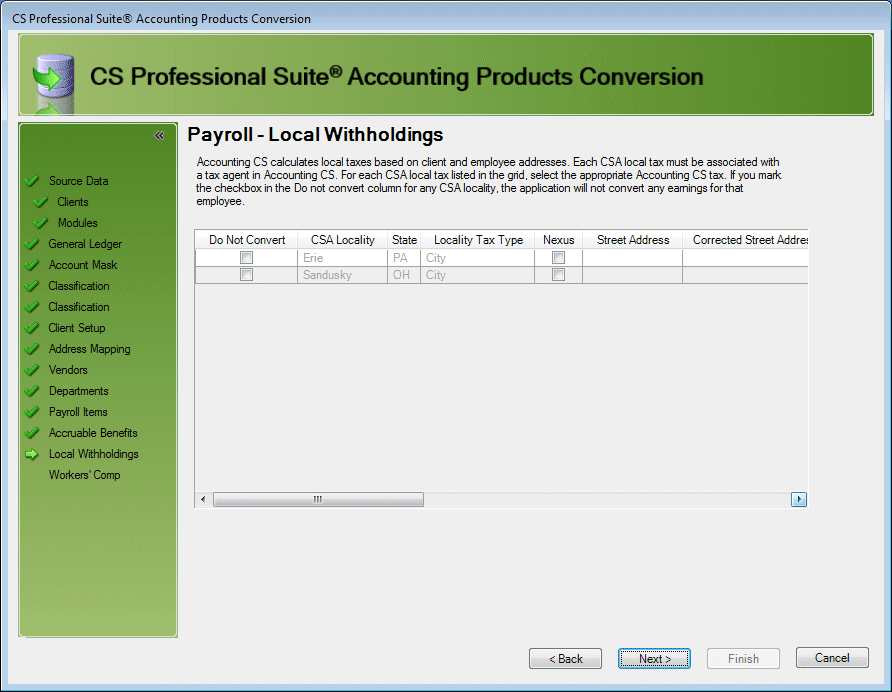
- Map CSA local tax items to corresponding Accounting CS items, or choose not to convert one or more local tax items.
This screen opens only if there are addresses that have local withholdings associated with them (i.e., Ohio or Pennsylvania addresses). Enter a ZIP code in the appropriate column and press the TAB key on your keyboard to begin searching for the applicable item. Enter the required information to further refine the search and determine which tax agents are appropriate.
Note: In order for earnings to be converted correctly, payroll items, such as local withholding items, in CSA must have a locality assigned to them. For more information, see Employee Local Withholding Item Properties > General tab and Payroll Tax Information > Local Tax Information dialog.
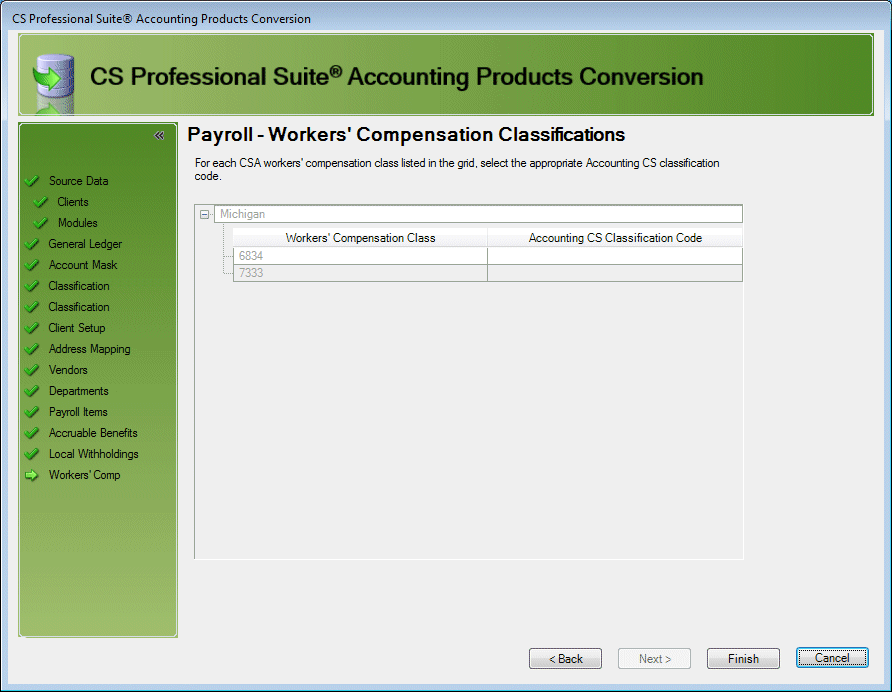
- Map CSA workers' compensation classes to corresponding Accounting CS classification codes.
Use this screen to map the workers' compensation code used in CSA to the code from the predefined list in Accounting CS.
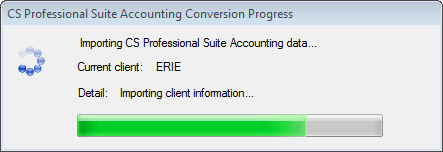
- View a progress bar as the conversion progresses and a diagnostic report upon completion of the conversion.
- After you click the Finish button, a conversion progress window opens.
Keep in mind that as you convert larger clients with more data, the conversion will take longer. Clients with engagement data will take the longest to convert.
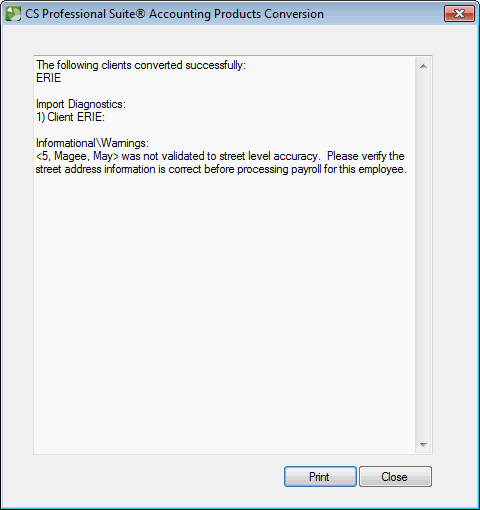
- When the conversion is complete, a Diagnostics dialog opens. The diagnostics alert you to any pieces of information that need to be addressed in Accounting CS.
You can print the diagnostics information in the dialog for future reference.
See also: Common conversion diagnostics
Post-conversion steps
It is imperative that you verify that the information from CSA converted accurately to Accounting CS. After the conversion, we recommend that you take a couple of steps to ensure that client data converted properly.
- Address any diagnostics that were encountered during the conversion. This may involve any or all of the following.
- .
During the conversion, if the application displays any diagnostic messages about address information, you need to review and update the address information to ensure that the information is set up properly for the relevant taxes. In Accounting CS, use the Location finder to validate and correct address information.
- .
During the conversion, if the application displays any diagnostic messages about state identification numbers, you need to review and correct the state identification numbers in Accounting CS.
- In Accounting CS, choose Setup > Clients and select the client from the Client list.
- Click the Payroll Taxes tab.
- Correct the state identification number using the proper format.
- Click Enter to save the client record.
- .
- If routing number and account number information were not set up for the client checkbooks in CSA, you need to set up this information in Accounting CS. Also, because the application does not import vendor check layouts or layout selections from CSA, you need to select the check layouts in Accounting CS.
- If you use InterceptEFT to process your Direct Deposit files, there are additional setup steps to take on the Process Direct Deposit screen in Accounting CS.
- .
The application does not import in-transit bank items or recurring adjustments that exist in CSA, so you need to enter these items in Accounting CS as initial open items.
- In Accounting CS, choose Actions > Reconcile Bank Account and select the current reconciliation for the bank account to reconcile.
- Choose Edit > Initial Open Items and enter all in-transit items for the selected checkbook.
- Click Enter to save the items, and then click Done to close the Initial Open Items dialog.
- Choose Edit > Recurring Adjustments and enter the recurring adjustments.
- Click OK to save the adjustments.
- Choose Actions > Enter Transactions, click the Bank Account mode button, and then click the Date column header to sort transactions by date.
- Locate the latest transaction in the list, and compare the bank balance to the General Ledger balance. If different, see Troubleshooting an unreconciled amount in bank account reconciliation.
See also: Common conversion diagnostic messages
- After converting the client data, generate the Accounting CS reports listed below and compare the data to the comparable CSA reports listed below.
| CSA Reports |
Accounting CS Reports |
| General Ledger |
General Ledger |
| Adjusting Journal Entry (found in Trial Balance CS and Engagement CS) |
Adjusting Journal Entries |
| Trial Balance |
Trial Balance - Condensed or Detailed |
| Employee Listing |
Employee List - Condensed or Detailed |
| Earnings Report |
Employee Earnings |
| Vendor Listing |
Vendor List - Condensed or Detailed |
| Client Information Report |
Client Information |
- Review the Post-conversion considerations and setup steps section in the PDF guides below, especially if your client is using Remote Data Entry, Remote Check Printing, or Employee Self-Service.
For clients using Employee Self-Service: To ensure that Accounting CS employee records sync correctly with employee information in Employee Self-Service, do not change any Client IDs until after the first payroll has been run in Accounting CS.
Note: Converted client data remains intact in CSA. If the converted data cannot be verified for accuracy, you can delete the client in Accounting CS and then go back to the CSA client data to repair and reconvert it.
For Engagement clients utilizing integration with SMART Practice Aids: See Converting and linking an Engagement CS client with SMART workpapers into an Accounting CS Workpapers binder for additional steps to maintain the engagement binder link with the engagement in PPC's SMART Practice Aids.
Data not transferred
Accounting CS and CSA are built on different platforms, which can prevent the following items from being converted.
- Bank reconciliations
- Check layouts
- Employee templates
- Staff members and security settings
- Certain transaction types
- Transmittal letters
- Archived engagements
- Employer taxes (if you only entered employee earnings in CSA and not payroll checks)
For details on data that is not converted, refer to the PDF guides listed below.
PDF guides
Details on all of the above information and more can be found in the following conversion guide PDFs.
CSA to Accounting CS
Payroll CS to Accounting CS Payroll
Engagement CS and Trial Balance CS to Workpapers CS
Financial Statement Conversion Guide


 Workpapers CS


 button or press the TAB key on your keyboard to initiate the search.