CS Professional Suite Accounting (CSA) Tips
The following procedures will help reduce the amount of disk space used by CSA data. Many of these procedures involve removing unnecessary items. You may wish to back up client data before performing these procedures.
Important!
Compress the Client Data Files
Enabling client data compression substantially decreases the amount of disk space required to store client data, but it also decreases the speed with which client data open and close. Because uncompressed client data files require an average of ten times more disk space than compressed files, we recommend that you compress the data files if disk space is a concern.
- In CSA, choose Help
 Repair.
- In the Clients tab of the Repair dialog, mark the Enable client data compression checkbox.
- Click Done.
Reduce the Number of Years of General Ledger Transactions and Balances to Save
If you are saving general ledger transactions and balances for more years than are required, you can conserve disk space by reducing the number of years to save. You must set the desired number of years on a client-by-client basis.
Important!
If you reduce the number of years of general ledger transactions and balances that are saved for a client and transactions and balances exist beyond the number of years specified, those transactions and balances will be deleted.
- In CSA, open the appropriate client database.
- Choose File Client Properties.
- In the General Ledger tab of the Client Properties dialog, enter the smallest possible number appropriate for the client in the Years of balances to save and the Years of transactions to save fields.
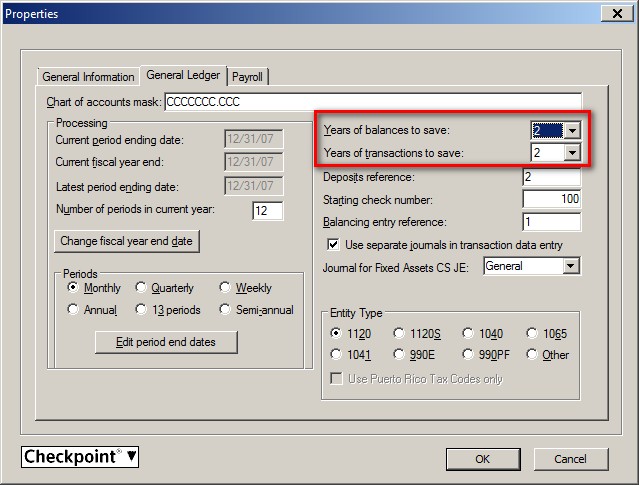
Important!
If you enter 1 (current year) in this field, transactions for the year being closed will be deleted automatically when you close the year.
- If reducing the number of years of general ledger transactions and balances that are saved affects a year that contains transactions or balances, you must confirm the deletion of the data. Click Yes to continue.
- Click OK.
Remove Unnecessary Payroll Departments from Employee Records and from the Client Database
If there are unused payroll departments in the employee records and/or client database, you can conserve disk space by removing them.
Remove Unnecessary Payroll Departments from Each Employee
- In CSA, open the appropriate client database.
- Choose Setup Employees.
- In the Employees window, select the appropriate employee and click the Edit button.
- In the General tab, click the Edit depts button.
- Clear the checkboxes for all departments that are marked but not needed.
- Click OK to close the Edit Employee Departments dialog and return to the Employees window.
Note: You cannot delete any payroll department to which an employee is assigned.
- Click the Enter button to save the changes for the selected employee, and then close the window.
Remove Unnecessary Payroll Departments from the Client Database
- In CSA, open the appropriate client database.
- Choose Setup Payroll Departments.
- Select the unnecessary departments and click the Delete button.
Note: You cannot delete any payroll department to which an employee is assigned.
- Click Yes in the confirmation dialog.
- Click Done and then close the window.
Compact the Client Database
Due to the nature of the CSA database files, deleting information from a client record does not reduce the size of the client database automatically. You need to compact the client database to permanently remove records that have already been marked for deletion from the selected client database.
- In CSA, choose Help Repair.
- In the Clients tab of the Repair dialog, highlight the ID and name and click the Compact Client button.
- A prompt appears stating that the client was compacted successfully. Click OK.
- Click Done.
Compact the Global Database
Due to the nature of the CSA database files, deleting information from a global record does not reduce the size of the global database automatically. You need to compact the global database to permanently remove records that have already been marked for deletion from the global database.
- In CSA, choose Help Repair.
- In the Miscellaneous tab, click the Compact Global Database button.
- A prompt appears stating that the global database was compacted successfully. Click OK.
- Click Done.
Archive Client Data
You can back up your old or unused client data to a low-cost storage drive and delete the data from the production server. Please note that the archive drive is for backups only; storage of live data is not permitted. Follow these steps to change the backup / restore location.
Note: If your firm is paying for additional premium production storage space, you might be able to save money by moving older data to the archive storage drive. See the “NetStaff CS” section of the Pricing information help topic for details.
- In CSA, choose Setup User Preferences.
- In the Options dialog, click the File Locations tab.
- Enter W:\CSA_ARCHIVE in the Backup / Restore field. (You can also click the Browse button to navigate to the archive path.)
- Click OK.
- Choose File Backup to use this new location.
Once you have backed up your old, unused data, you can remove the clients by choosing File Delete.
Note: Do not use the archive location to store live production data. The archive drive allows you to store archived data at a lower cost; it does not perform at the same level as the production file servers.
Restoring Archived Data
Follow these steps to restore data your firm backed up to the archive storage drive.
- In CSA, choose File Restore.
- Verify that the restore path is W:\CSA_ARCHIVE.
- Highlight the client data you wish to restore and click the Restore button.
Back to top