Microsoft Outlook
The following procedures will help reduce the amount of disk space used by Microsoft® Outlook® data.
Compact the Outlook Data File (or PST)
Outlook uses a data file called a "Personal Folders file" and referred to as a PST file. If you delete items (such as email messages or appointments) from a PST file, the size of the file does not change unless you compact the file.
Note: Depending on the size of your PST file, it might take several minutes to compact the file. We recommend that you compact PST files every 1 – 2 months.
- In Outlook, choose File
 Data File Management.
- Highlight the data file that you want to compact, and then click the Settings button.
- Click the Compact Now button.
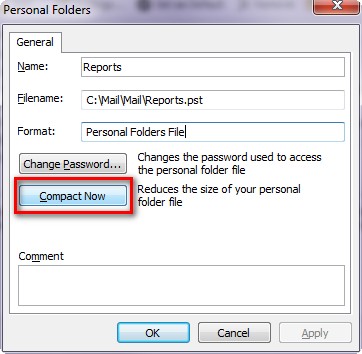
- When the process is complete, click OK.
Empty the Deleted Items Folder
When you delete items in Outlook, they go into a "Deleted Items" folder by default. You can set up Outlook to delete these items automatically or you can manually remove them from the Deleted Items folder.
Automatically Empty the Deleted Items Folder
- In Outlook, choose Tools Options, and click the Other tab.
- Mark the Empty the Deleted Items folder upon exiting checkbox.
- Click OK.
Manually Empty the Deleted Items Folder
- In Outlook, choose Go Folder List.
- In the Folder List, right-click the Deleted Items folder, and choose Empty Deleted Items Folder from the context menu.
Move Inactive Outlook Items to an Archival Data Folder
You can create an additional, archival Microsoft Outlook data file (called a PST file) to limit the size of your active PST file. You can then back up old items such as email messages, appointments, contacts, tasks, journal entries, notes, posted items, and documents in the archival PST file.
Note: If your firm is paying for additional premium production storage space, you might be able to save money by moving older items to archival PST files and storing the files on the archive storage drive. See the "NetStaff CS" section of the Pricing information help topic for details.
Follow these steps to create an archival PST file.
- In Outlook, choose File Data File Management.
- Click the Add button.
- In the New Outlook Data File dialog, select Office Outlook Personal Folders File (.pst) and click OK.
- In the Create or Open Outlook Data File dialog, enter or navigate to W:\MSOFFICE_ARCHIVE as the path for the PST file and click OK.
- Enter a name in the File name field to indicate that the PST will be used for old items (for example, add "Archive" to the file name). If multiple users will create archive PST files in this location, further customize the file name to indicate the user to whom the PST file belongs (for example, Jsmith_Archive.pst).
Important! Outlook names the PST file "Personal Folders.pst" by default. If multiple users create PST files in the same location, such as W:\MSOFFICE_ARCHIVE, you will need to rename each "Personal Folders.pst" file to have a unique name. If users do not change the default file name, they could overwrite each others' archive PST files.
- Click OK to create the PST file.
- In the Create Microsoft Personal Folders dialog, you specify a unique name for the PST file and set a password. It's helpful to give the PST file a recognizable name (such as Jsmith_archive) because the name will appear in various lists within Outlook. When you've finished making changes in this dialog, click OK.
- In the Account Settings dialog, click the Close button.
The new PST file appears in the Outlook folder list. You can select messages or folders and drag them into the archive PST file. If you move large quantities of messages into the archive PST file, you should compact your data folders as outlined in the "Compact the Outlook data file (or PST)" section.
Back to top