FileCabinet CS Tips
The following procedures will help reduce the amount of disk space used by FileCabinet CS data.
Adjust Scan Settings
If you use the following settings when you scan documents into FileCabinet CS, the scanned images will take up less space on the Virtual Office CS or SaaS servers.
- Choose Image
 Scan.
Scan.
- Click the Options button.
- Mark the Reduce Image Size on Disk checkbox.
- Click the Black and White Pages option.
- Click OK.
- Click Exit.
When you're ready to scan an image, follow these steps.
- Place the documents on the scanner.
- Choose Image Scan.
- Click the Scan button.
- The dialog that opens is part of your scanning software. Change the DPI (dots per inch) setting to 300.
- Scan the image.
Compact FileCabinet CS Data Files
Due to the architecture of the FileCabinet CS drawer data files, it is possible for the data files to contain unused space, which results in larger files than necessary. This issue is most common after you delete or archive data. To reduce the amount of unused space in the data files, you should compact the data files periodically.
- Make sure that no one else is working in, printing files to, or backing up client data to FileCabinet CS.
- In FileCabinet CS, choose Help Repair Compact tab.
- In the Drawers available to compact pane on the left, highlight the drawers that contain the data files you want to compact, and click the Select button.
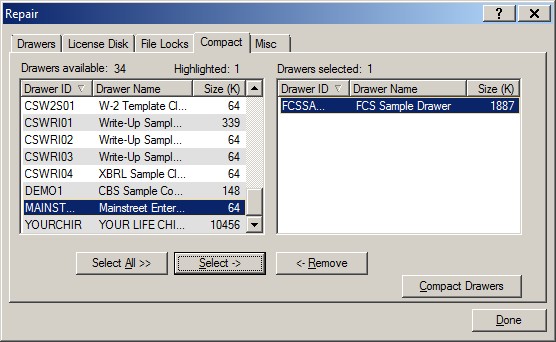
- Click the Compact Drawers button.
- When the process is complete, click OK.
Reduce the Number of Data Backups from CS Professional Suite Applications into FileCabinet CS
Most CS Professional Suite applications include a feature that enables you to back up the application's data into FileCabinet CS automatically. Although this feature provides easy access to data backups, you may want to reduce the number of backups retained to minimize the disk space required for the corresponding FileCabinet CS drawer. For details on setting the options for this feature in each CS Professional Suite application, see the help in the respective application.
If you already have data backups from other applications stored in FileCabinet CS, and would like to remove those backups to conserve space, follow these steps to delete all data backups for multiple drawers:
- Choose Help Repair.
- In the Drawers tab, click the Delete Data Backups button.
- Highlight the drawers with data backups that you want to delete and click the Select button to move them to the right pane.
- Click the delete button to delete data backups for the selected drawers.
- Click Yes when prompted to confirm that you want to proceed with the data backup deletion.
- Click Done to close the Repair dialog.
Note: To delete a data backup for a single drawer, right-click the Data Backup folder for the desired drawer in the Folders window, choose Delete Document from the context menu, and click OK in the Delete Document dialog. If the drawer contains multiple data backups, you can choose to delete all backups, or the selected backup only. After deleting data backups, we recommend that you compact the data for optimal space savings. Please read the "Compact FileCabinet CS data files" section for more information.
Archive Infrequently Accessed Documents to an Alternate Location
FileCabinet CS enables you to free up disk space by moving older, seldom-used documents from the active data location and storing them in an archive location. By moving these documents to a different location (such as CD, a local hard drive, or an archive storage drive) and then compacting the client data, you can reduce the amount of disk space required in SaaS or Virtual Office CS.
Note: After you move documents from the active data location to local media, you will be able to access those documents only if you have access to the local media.
- Make sure that no one else is working in, printing files to, or backing up client data to FileCabinet CS.
- In FileCabinet CS, choose File Archive.
- Click the Create archive option.
- Click the appropriate option as follows.
- Append the archive to this volume—Click this option to add to an existing volume of archived documents.
- Begin a new volume with this archive—Click this option to start a new volume of archived documents, and then enter the volume label and any applicable comments in the fields provided.
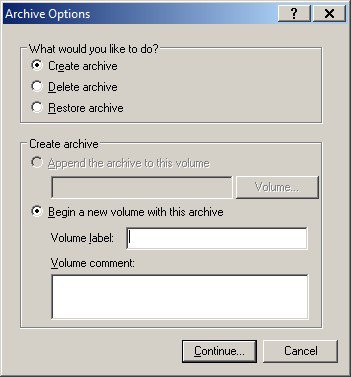
- Click the Continue button.
- Click the appropriate option as follows.
- All contents of selected drawers—Click this option to archive all of the documents in all of the folders in the drawers you will select later in this process.
- Specific folders of selected drawers—Click this option to limit the archive to the documents contained in specific folders within the selected drawers.
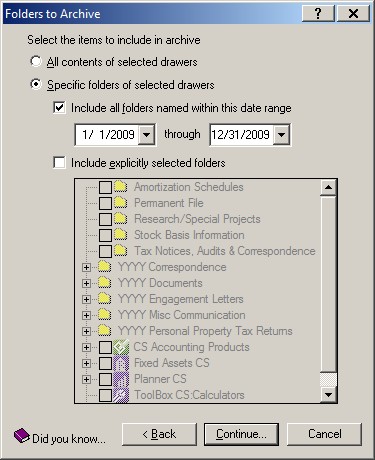
- Click the Continue button to open the Archive dialog.
- In the left pane, highlight the drawers you want to archive and click the Select button to move them to the right pane.
- Verify that the path listed in the Archive location group box points to your local or archive drive. (Local drives all have a $ after the initial letter; for example, C$ on Client (V:) is your local C: drive. Use W:\CABINET_ARCHIVE as the path to the archive storage drive location.) To change the archive location, click the Modify button.
Note: Do not use the archive location to store live production data. The archive drive allows you to store archived data at a lower cost, and does not perform at the same level as the production file servers. See the "NetStaff CS" section of the Pricing information help topic for details.
- Click the Archive button to begin the archive process.
During the archive process, data is deleted from the FileCabinet CS data location and stored only in the archive data location. After the archive process is complete, you can click a volume icon in the folders window to view archive information or double-click a volume icon to access archived documents.
Note: After archiving, we recommend that you compact the data for optimal space savings. Please read the "Compact FileCabinet CS data files" section for more information.
Restoring Archived Data
Follow these steps to restore data that your firm backed up to the archive storage drive.
- In FileCabinet CS, choose File Archive.
- Click the Restore archive option and click Continue.
- Verify that the restore path is W:\CABINET_ARCHIVE.
- Highlight the volumes you want to restore, and click the Restore button.
Back to top